
Hello GitHub
 What does this mean?
Value: 2.5%
Due Date: Thursday 12 March 2026 9:00pm
(Up to 2 days LATE): Saturday 14 March 2026 9:00pm (See Late Submissions)
Learning Outcomes:
- Gain confidence editing, compiling, and running a basic Java program.
- Gain confidence using Maven as a build tool.
- Gain confidence making commits to a local Git repository.
- Gain confidence backing up your Git repository to GitHub.
- Gain confidence in understanding and writing simple test cases.
Table of Contents
- Recommended Approach
- Files Provided
- Step by Step Activity
- Some Tips
- Important Instructions
- Congratulations!
https://classroom.github.com/a/5iIynrUJ
Recommended Approach
To make sure that your machine is properly set for doing the assignment (and all assignments in this course), you can refer to the FAQ on the course website.
For this assignment, you are encouraged NOT to use VS Code, but just the terminal and a text editor. This is to strengthen your understanding of Git and how it operates.
Refer to the instructions on Using Git at the command line if you need to.
Refer to the instructions on cloning the project code and getting started with GitHub Classroom if you need to.
The code in this exercise is simple enough that you will not require any fancy features (such as autocomplete, etc). In fact, running the assignment is much easier when just using a command line.
Let’s begin!
Clone the GitHub repository

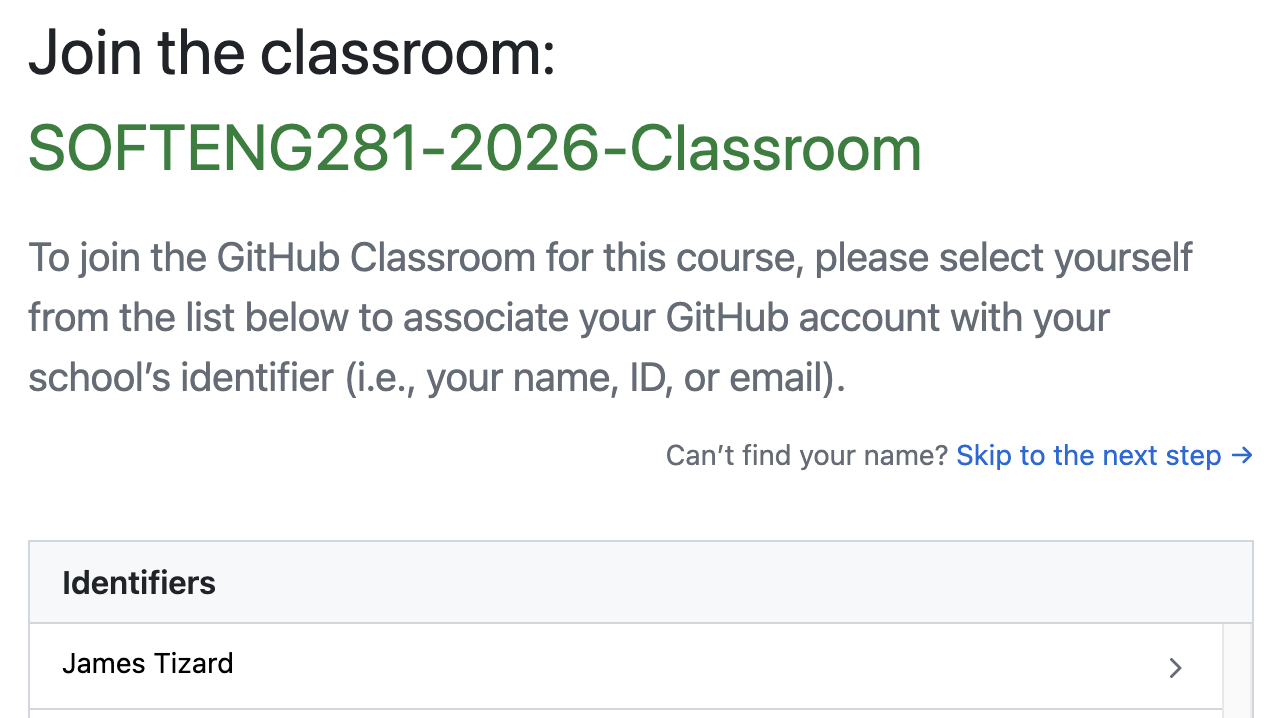
Once you have your GitHub account set up, you can clone the assignment by accepting the following GitHub Classroom invitation:
https://classroom.github.com/a/5iIynrUJ
Then find your name in the identifiers list. If you can’t find your name please contact the teaching staff.
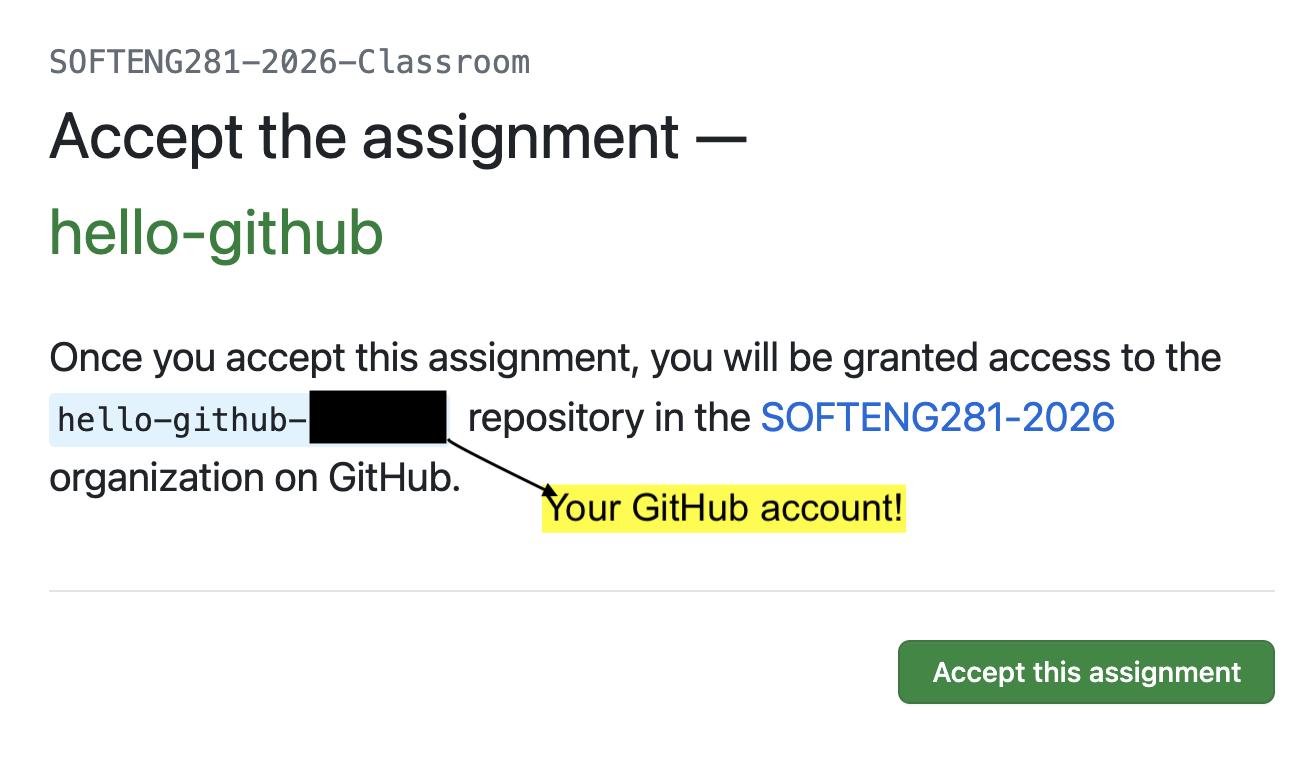
Next click “Accept this assignment”:
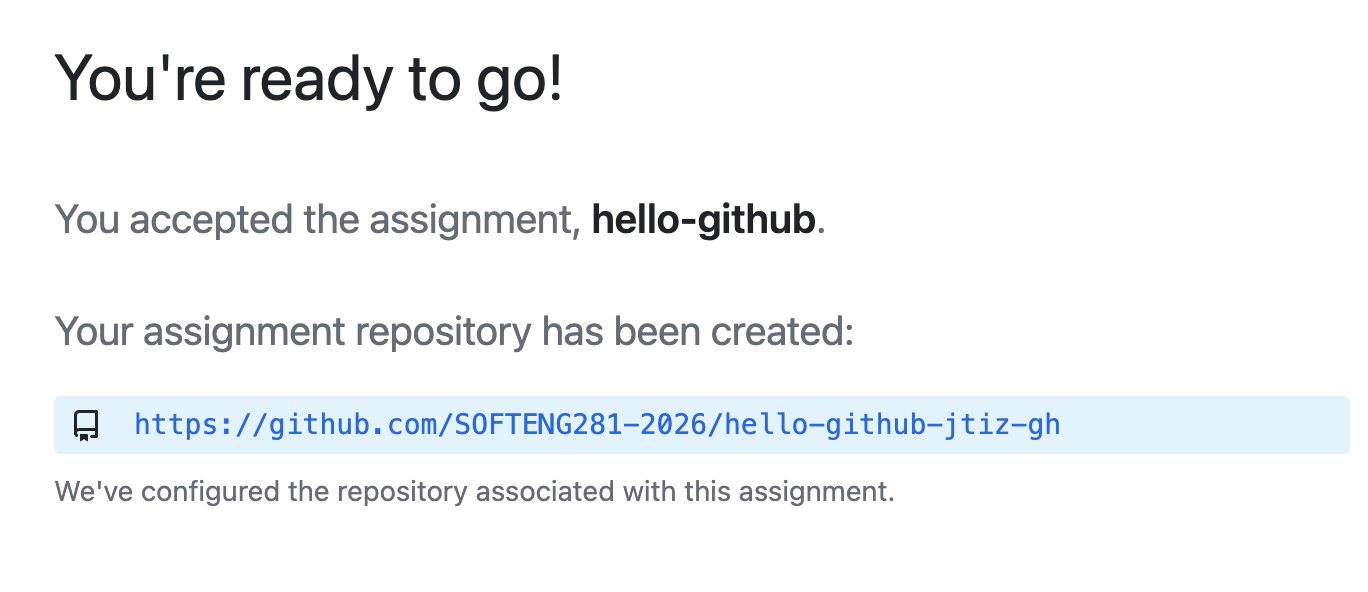
Next join your repository:
Now collect the assignment zip file from the course website at https://softeng281.digitaledu.ac.nz/_download/hello-github-2026.zip
Unzip the assignment files into the folder you want to store your SOFTENG281 assignments. Note, folder names should not include spaces. In the terminal, navigate into the unzipped assignment folder (e.g., cd hello-github-2026).
Becareful that there are hidden files, the content of the folders should be:

Finally, initialise your local folder as a git repo with,
git init
Add your remote GitHub classroom repo with,
git remote add origin https://github.com/.......
git branch -M main
Commit your local files with,
git add .
git commit -m "initial commit"
and push your origin,
git push -u origin main
Files Provided

maven wrapper (mvnw for Unix/Mac OS or mvnw.cmd for Windows)
This file will allow you to build and run this assignment. We will use a Maven wrapper to guarantee that we all have a common configuration to run and test the assignment. This is how your project will be marked. There are three main Maven commands relevant to this assignment:
-
compile(./mvnw compilefor Unix/Mac OS or.\mvnw.cmd compilefor Windows) Compiles the Java classes (will only compile the Java source files that have changed from the previous build). To make sure your code is compiling correctly, you should see aBUILD SUCCESSoutput. However, note that at the very beginning you will see aBUILD FAILUREoutput (more information below).
-
test(./mvnw testfor Unix/Mac OS or.\mvnw.cmd testfor Windows) Compiles the Java classes and runs the test cases (will only compile the files that have changed from the previous build). You should see aBUILD SUCCESSoutput if the code compiles and all the tests pass. If the code doesn’t compile, or if any of the tests fail, you will see aBUILD FAILUREoutput. -
clean(./mvnw cleanfor Unix/Mac OS or.\mvnw.cmd cleanfor Windows) Removes the Java binary files (*.class) by clearing the target directory into which Maven normally builds your project. Runningcleanperiodically is useful, for example to remove those.classfiles referring to deleted or renamed Java source files.
You can append commands together. For example, ./mvnw clean test for Unix/Mac OS or .\mvnw.cmd clean test for Windows will execute the clean command followed by the test command. This is generally a good idea, as a clean will remove any old compiled files that may be causing problems, and you can feel more reassured that the tests are running on a clean slate.
For more information about Maven, visit the related page about development environment.
Note: The first time you run the wrapper, it might take some time (a couple of minutes) to download the required libraries and dependencies. This is normal. Subsequent runs will be much faster.
src/main/java/nz/ac/auckland/se281/Main.java
This class implements the command line interface (CLI).
You should not modify this class.
src/main/java/nz/ac/auckland/se281/MessageCli.java
This class declares the messages of the system.
You should not modify this class, but you are encouraged to use it.
You are encouraged to refer to these messages in the code you write, as it will be easier for you to avoid spelling and formatting issues that might otherwise cause you to fail test cases.
There are two ways to use these messages in your code:
- Get the message so that you can print it yourself by calling the
getMessage()method, or - Request for the message to be printed directly by calling the
printMessage()method.
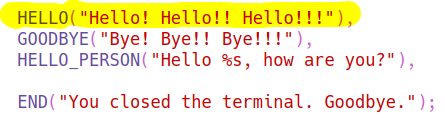
You will notice that the HELLO_PERSON message has a %s placeholder in its value:
public enum MessageCli {
  // ...
  HELLO_PERSON("Hello %s, how are you?")
  // ...
}
This %s placeholder means that the message expects you to pass an argument when you want to getMessage() or printMessage() it.
For example, consider you want to construct the message "Hello Jenny, how are you?"
If you want to get the message to print it yourself, you would do:
String message = MessageCli.HELLO_PERSON.getMessage("Jenny");  // get the message
System.out.println(message);  // print it yourself
But, of course, it will often be easier to just print the message directly:
MessageCli.HELLO_PERSON.printMessage("Jenny"); // print the message directly
Be sure to dedicate time to understand how this works, as it will be very useful to use and make your job easier (especially in future assignments). You should already be familiar with this concept from how printf() works in C.
src/main/java/nz/ac/auckland/se281/Greetings.java
This class declares the methods that are invoked by the command line interface (Main.java). This is where you need to start your coding.
You must NOT change the signature of the existing methods of this class (such as changing method names, parameters, and return types).
src/test/java/nz/ac/auckland/se281/CliTest.java
You should not modify this file.
This Java file is used by the testing framework.
Step by Step Activity
We will guide you step by step to complete this activity.
Step 1 - Fix the compilation error
Open your terminal and navigate into the project folder. To be sure you are in the right folder, you can run the command ls for Unix/Mac OS or dir for Windows. You should see the following:

Type in the terminal ./mvnw clean compile for Unix/Mac OS or .\mvnw.cmd clean compile for Windows. You should get a BUILD FAILURE:
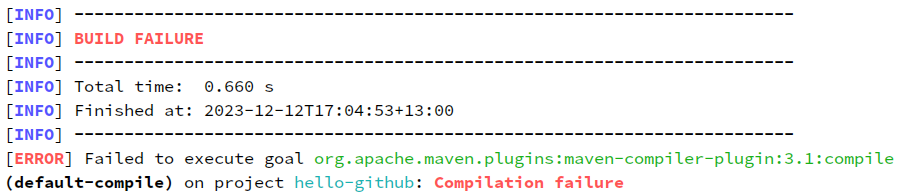
Look at the output to figure out what the problem is, and fix Greetings.java accordingly.
Hint: it is a compilation error, as reported by the Maven output:

This tells us some very useful information:
- The error is in the file
Greetings.java, namely in line 9. - The error is it cannot find the symbol
mesage.
Once you think you have fixed the error, type again ./mvnw clean compile for Unix/Mac OS or .\mvnw.cmd clean compile for Windows. You should get a BUILD SUCCESS if you fixed the compilation error. Your code has compiled successfully!
Step 2 - Commit and push the fix
Now that you fixed the compilation error, it is time to commit to the GitHub repo the new version of the file! If you would like some more help with Git, have a look at the course Resources.
From the terminal, type git status (regardless of Windows or Unix/Mac OS). You will see the following:
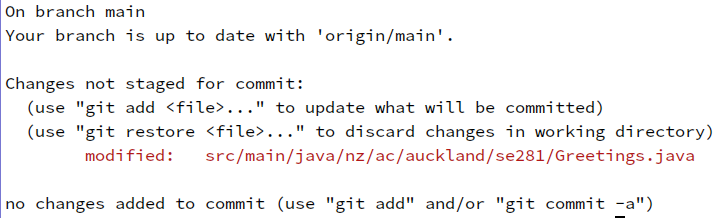
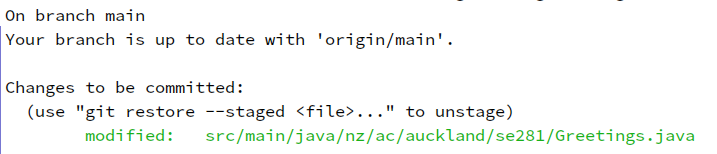
This tells you that you modified the file src/main/java/nz/ac/auckland/se281/Greetings.java, but is not added yet in the “staged” area. In other words, we need to tell Git that we want to include the changes we made to the file in the next commit. To do this, from the terminal execute git add src/main/java/nz/ac/auckland/se281/Greetings.java. If you execute git status again, you will see the following:
Now we can proceed with the commit!
git commit -m "fix compilation error in Greetings class".
With the -m option, we can specify a message that describes the content of the commit. It is a good practice to always give meaningful and informative messages. You should also make sure that you have at least 5 words in the commit message.
At this state, our local copy of the Git repository has a new commit! Do a git push to upload the local repository content to the remote repository in GitHub. Open your account in GitHub.com and make sure that the remote repository is up-to-date, showing your new commit!
Step 3 - Run the program
Once you have the code compiling, then you can run the program like this:
./mvnw clean compile exec:java@run for Unix/Mac OS or .\mvnw.cmd clean compile exec:java@run for Windows
Once the program runs, you will see the following output:
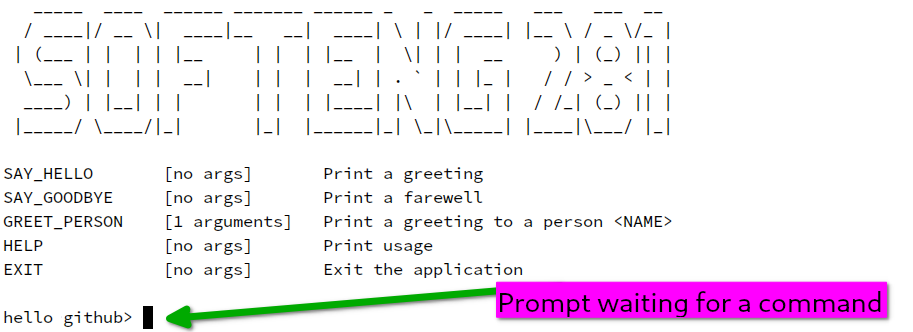
Now you can try some of the commands!
Note: The commands are not case sensitive. Also, you can use underscores or hyphens interchangeably.
For example, the following are all correct and equivalent:
say-hellosay_helloSAY_HELLOSAY-HELLOsAy_hELlOsay-HELLO
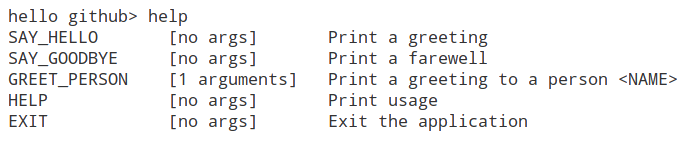
Try the HELP command to see the list of available commands:
You can also try the EXIT command to exit the system:

Only the HELP and EXIT commands are implemented for you. You will need to implement the rest of the commands.
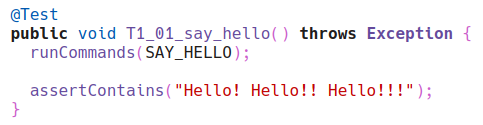
Let’s go back to the SAY_HELLO command. If you type SAY_HELLO, you will see the following:

You’ll see that executing the SAY_HELLO command gives the output "Hi". How do we know if our program is giving us the correct output? It seems to respond, but is it the correct response? We need to test it!
It turns out that our program is actually incorrect, as we want it to say "Hello! Hello!! Hello!!!" instead of "Hi". Before we fix that in the Greetings.java file, we want to introduce the concept of test cases that will make sure we are getting the correct output.
Step 4 - Add a new file for tracking with Git
Let’s add test cases for our project so that we can practice how to track new files on Git, and how to run test cases with Maven.
We will introduce a file called MainTest.java, and place it in src/test/java/nz/ac/auckland/se281. Note that it goes inside the test folder (not the main folder containing the functionality), because it is a test class. For your convenience, download it here:
Before we attempt to use this file, let’s see what Git tells us about this new file. From the terminal, execute git status. You should see the following:
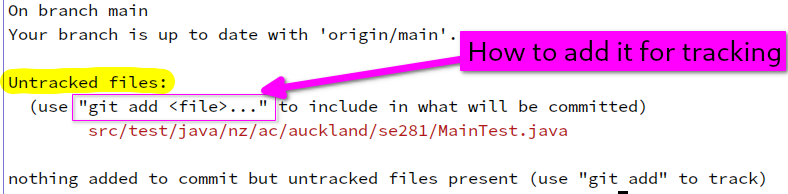
This tells you that there is a new untracked file src/test/java/nz/ac/auckland/se281/MainTest.java.
Now we need to tell Git to commit the new file MainTest.java, by executing this command from the terminal:
git add src/test/java/nz/ac/auckland/se281/MainTest.java
After executing the git add command above, the file is now in the staging area. If you execute git status, you will see the following:
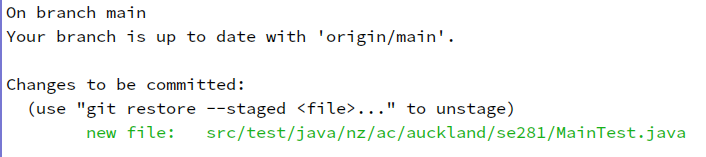
This tells us that the file src/test/java/nz/ac/auckland/se281/MainTest.java is now in the staging area ready to be committed.
We can now proceed with the actual commit:
git commit -m "add a test class for Greetings class"
At this state, your local copy of the Git repository has another new commit! You can see the latest set of commits by executing git log. However, we still need to upload the local repository content to the remote repository in GitHub.
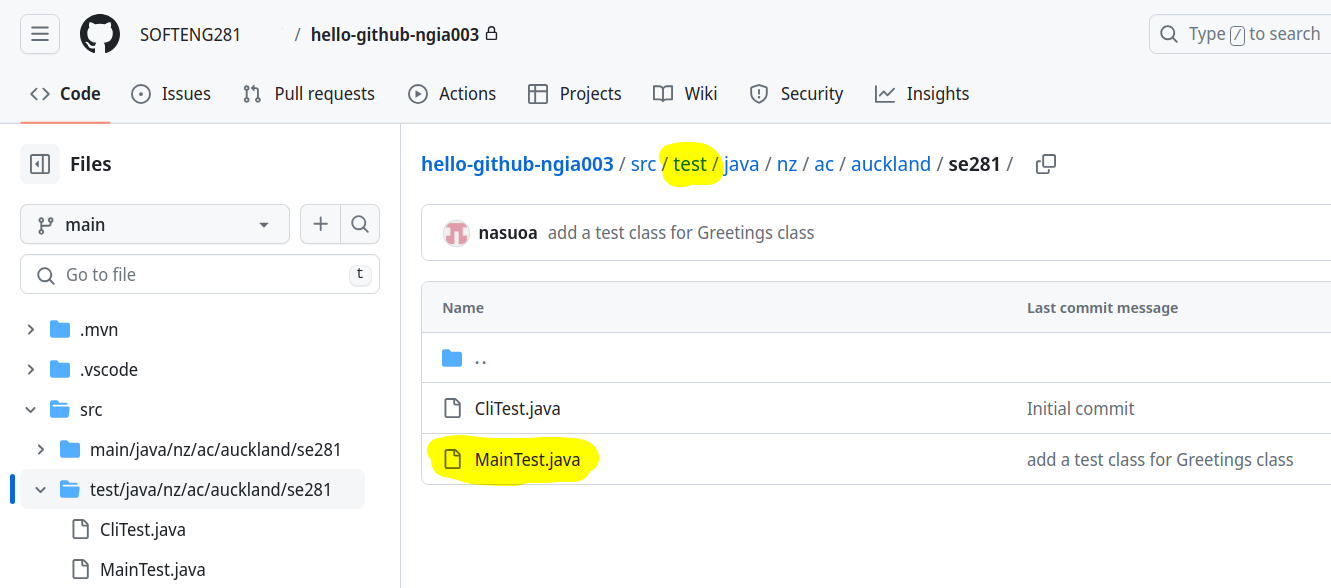
Do a git push to upload the local repository content to the remote repository in GitHub. Open your GitHub.com account again, and make sure that the remote repository is up-to-date by showing the new file:
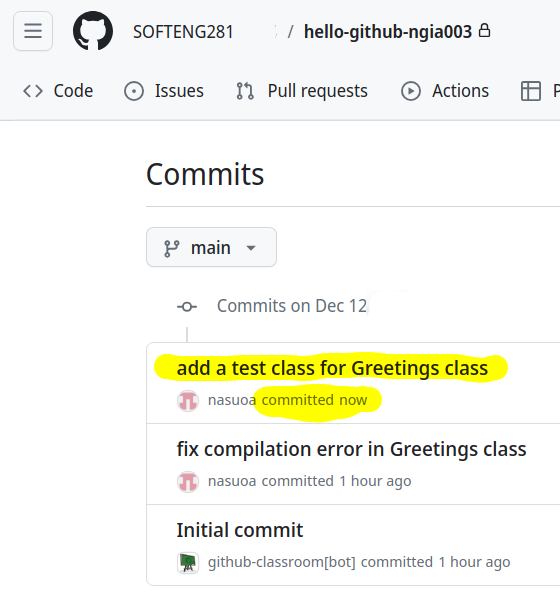
And also the new commit:
Step 5 - Fix Greetings.java to pass the first two test cases
Great! We have created a new file (with test cases in it), and backed it up to the remote repository.
Now let’s start looking at what is inside the MainTest.java file. Open it up in your text editor, and let’s look at the first test case:
The concept of a test case is quite simple:
- If we get what we expect, then the test case passes.
- If we don’t expect what we expect, then the test case fails.
In our setup, we are expecting some particular output to be present:
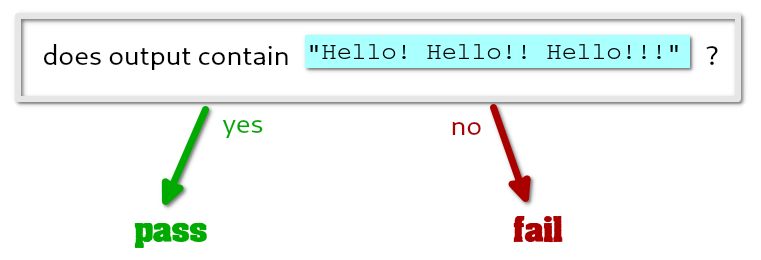
In this test case, if the output of our program (after having run the SAY_HELLO command) contains "Hello! Hello!! Hello!!!", then the test case passes. Otherwise, if that output is not present, then the test case fails. This is what the assertContains() method is checking for.
Let’s run the test cases by executing the following command:
./mvnw clean test for Unix/Mac OS or .\mvnw.cmd clean test for Windows.
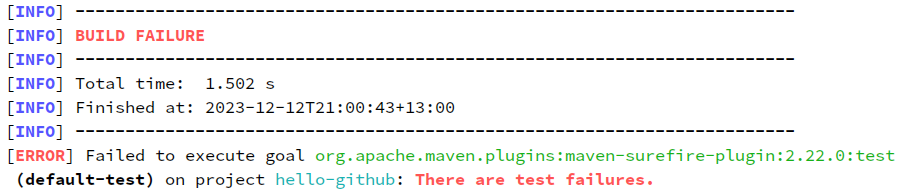
You should get a BUILD FAILURE, which immediately tells us something is wrong:
Scroll up a little bit in the output, and you get a little more information:

This is summarising that we ran 5 tests, and all of them failed.
Let’s scroll up a little bit more, and we get more details about the tests that failed. Let’s take a closer look at the first test that failed:

This tells us that the test case T1_01_say_hello() failed on line 30. More specifically, it is telling us that we expect the output to contain "Hello! Hello!! Hello!!!". But it’s not there, so the assertContains() method (on line 30 of MainTest.java) is failing.
There is nothing wrong with the test case inside src/test/java/nz/ac/auckland/se281/MainTest.java, so you should not be changing anything there in order to get a successful build.
The problem is in the Greetings.java file. Open it up in your text editor, and let’s look at the sayHello() method:
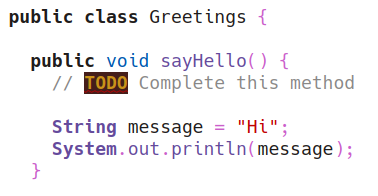
We can see that the sayHello() method is printing "Hi" rather than "Hello! Hello!! Hello!!!". This is why the test case is failing.
Let’s fix this by changing the sayHello() method to print "Hello! Hello!! Hello!!!" instead:

Now, let’s run the test cases again by executing the following command:
./mvnw clean test for Unix/Mac OS or .\mvnw.cmd clean test for Windows.
We will still get a BUILD FAILURE, but this time we will see that only 3 test cases are failing.

This means that two of the five test cases are now passing! You can scroll up to see which test cases are still failing.
Step 6 - Commit the changed file
Now that you made a meaningful change to the code, you should commit and push the new version of the file. From the terminal, execute the following commands:
git status(to see what files have been modified)git add src/main/java/nz/ac/auckland/se281/Greetings.javagit commit -m "fix printing in sayHello method"git push
And, of course, you can check that the remote repository is up-to-date by going to your GitHub.com account.
Step 7 - Improving our solution
Even though the sayHello() method is now printing the correct output, we are not happy with the solution. What happens if you accidentally missed one of the exclamations? Or if we added an extra one? Or we missed a space character? We would actually fail the test case, due to an innocent typo! Give it a try.
So, how do we protect ourselves from these typos? We can use the MessageCli class that we introduced earlier. Have a look inside the MessageCli.java file, and you will see that there is a list of messages, including a HELLO message with a value of "Hello! Hello!! Hello!!!":
Let’s change the sayHello() method to use this message instead of hardcoding the value:
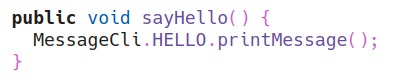
This is a lot safer than manually writing out the message, as we are less likely to make a typo using a pre-defined message value.
To make sure that we are using the MessageCli class correctly, we can run the test cases again:
./mvnw clean test for Unix/Mac OS or .\mvnw.cmd clean test for Windows
Now that you made another meaningful change to the code, you should commit and push the new version of the file. From the terminal, execute the following commands:
git status(to see what files have been modified)git add src/main/java/nz/ac/auckland/se281/Greetings.javagit commit -m "improve printing in sayHello method to use MessageCli"git push
Step 8 - Complete Greetings.java to pass all test cases
Follow the steps above to pass any other test cases that are failing. You can do this by looking at the test cases that are failing, and then making the appropriate changes to the Greetings.java file.
For the final task, you will notice that the greetPerson() method is a little different. Unlike sayHello() and sayGoodbye(), it takes a parameter name. This is because the message is personalised, and we need to know who we are greeting. The greetPerson() method should print the message "Hello Jenny, how are you?" if the parameter name is "Jenny".
You will see that the MessageCli class has a message HELLO_PERSON that you can use to print the message:
HELLO_PERSON("Hello %s, how are you?")
Use your knowledge from C programming to understand how to use the %s placeholder to print the message with the name parameter. Hopefully that gives you a clue as to what you need to do to pass the last test case.
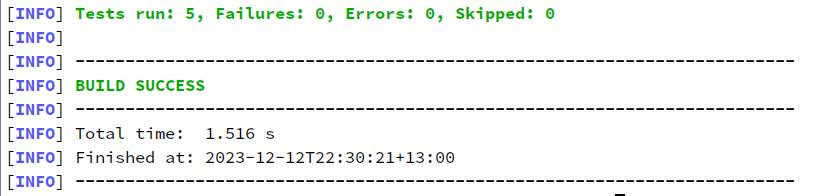
Once you are done, you should have all 5 test cases passing:
Again, make sure you are committing and pushing your changes to the remote repository after each meaningful change.
Some Tips
We would like to share with you a few useful tips/info about Maven and Git…
The Maven target folder
Did you notice how there’s a target folder whenever we do a compile or test Maven command? This is where Maven generates the binaries (executable) of your source code! We can get rid of this by running ./mvnw clean for Unix/Mac OS or .\mvnw.cmd clean for Windows.
The .gitignore file
But, wait a minute… How come when you did git status, Git didn’t tell you that there was a new untracked folder target? This is because of the .gitignore file that we added in the repository for you. The .gitignore tells Git which files and folders it should ignore, because they are not meant to be versioned in the Git repo. In fact, if you try to do git add target, you will see the following message telling you that the folder target will not be added:

Adding several files at once
The last tip is about adding modified files. What if you change several files together? Do you need to do git add for each of them one at a time? No, luckily there is a shortcut. You can do git commit -am "message" (but make sure it’s a better message!), which will add all the changed files that are already tracked by the Git repo (note the -a option, which stands for add). Note that this only works for modified files already tracked. For new files, you need to still do git add for each of them.
Alternatively, you can do git add .—this will add modified files already tracked as well as all the new files. You should do that only if you have a .gitignore file that will help you to ignore all the files that you should not track in a Git repo. However, it is recommended to add them one by one to have full control of which new files you are adding. Otherwise you might end up accidentally adding files in the repo that you don’t want to track.

Important Instructions
Please read the following information carefully before you begin your assignment.
Does passing test cases mean I have completed the assignment?
You will see that we provide some test cases to help guide you. In most cases, these test cases are not comprehensive. They are not designed to test all possible inputs. They are designed to help you get started.
What’s more, you should make sure you do not hard code your logic to pass the specific test cases we provide. You should write your code in a way that it will work for any input.
For example, if we provide a test case that checks if the method checkIfIsEven returns true when the input is 2:
@Test
public void testIsEven() {
  checkIfIsEven(2);
  assertContains("true");
}
You should not write your code like this:
public void checkIfIsEven(int number) {
  if (number == 2) {
    System.out.println("true");
  } else {
    System.out.println("false");
  }
}
This is because in the actual marking, we will use different values for the test cases. For example, we may use the test case:
@Test
public void testIsEven() {
  checkIfIsEven(280);
  assertContains("true");
}
If you have hard coded your logic to pass the test case checkIfIsEven(2), then your code will not pass the test case checkIfIsEven(280) and you will therefore not get the marks for that test case.
Academic Honesty
You MUST use the GitHub repository created in the course’s GitHub Organization.
NEVER use your own repository, or copy your code to another repository to work from.
Doing so means your assignment will not be accepted for marking.
- The work done on this assignment must be your own work. Think carefully about any problems you come across, and try to solve them yourself before you ask anyone for help (struggling a little with it will help you learn, especially if you end up solving it). If you still need help, check on Ed Discussion (if it is about interpreting the assignment specifications) or ask in the Drop-In help clinics (if you would like more personal help with Java). Under no circumstances should you take or pay for an electronic copy of someone else’s work.
- All submitted code will be checked using software similarity tools. Submissions with suspicious similarity will result in action taken following the University’s Guidelines for Academic Misconduct, and forwarded to the Disciplinary Committee.
- Penalties for copying will be severe. In most cases, this is ZERO for the assignment in question. To avoid being caught copying, don’t do it. Please note the same penalty applies to both the person who copied and the person who was copied from.
- The University has recently taken a much stricter stance on academic misconduct and streamlined the process for dealing with it. In a nutshell, it takes a non-negotiation approach — no longer requiring a thorough investigation. You will therefore simply be informed, and find the penalty applied to the assignment. This is why it’s important to not only copy from others, but also not to show your work to others.
- You must not attempt to tamper with your GitHub commits. This means all commits must be preserved, including the one that is automatically created for you. Disregarding this will result in major penalties. See the section on Tampering with your Git commit history for more information.
- To ensure you are not identified for potential plagiarism, you should follow these points:
- Always do individual assignments by yourself.
- Never show or give another person your code.
- Make sure you are doing plenty of commits and pushes to GitHub. This will help you to track your progress and also to ensure that you have a backup of your work. It also makes it easier for us to see that you have not been copying from someone else.
- Do not share your GitHub account with anyone.
- Never put your code in a public place (e.g. Reddit, public GitHub repository, forums, your website, etc).
- Never leave your computer unattended. You are responsible for the security of your account.
- Ensure that you always remove your USB flash drive from any public computer before you log off from it.
- Frequently commit your code to GitHub. This provides a track record of your work and will allow the teaching team to follow your footsteps as you complete your assignment. If you do not frequently commit your code, it will look suspicious.
Git Etiquette
All the take-home programming assignments will require you to make good use of Git and GitHub.
There are marks associated with Git usage. But you could stand to lose more marks if there’s evidence of tampering with your Git commit history.
Make sure you are familiar with the expectations outlined in the Git Etiquette page.
Final Submission on GitHub
In this course, all your programming assignments will be automatically extracted from GitHub. There will be no separate submission on Canvas.
The following instructions are very important. Make sure you double check everything, otherwise your assignment will not be marked:
- You must use the GitHub repository created in the course’s GitHub Organization.
- It is not enough that you were doing
git addandgit commitcommands! This only tracks the changes on your local machine! - Unfortunately, it is not a good look for us to hack into your machine in order to take your local repo (even for the good intentions of marking it). Therefore, it is absolutely important you have (correctly) executed a
git pushso that all your commits and changes are sent to the remote GitHub repository. - To make sure you submitted your code, simply go to https://github.com and check the “commits” tab of your assignment repository. Do you see the latest changes there? If so, you are good. If no, something went wrong and you need to sort it out so that it appears in the remote repository before the deadline.
- As an extra (strongly recommended) precaution, you should clone your GitHub remote repo to your machine (e.g., to a temporary folder), and check it works correctly by compiling it and running it all over again (in a “fresh” directory). This is to protect you if you didn’t correctly include all the changed files (in which case, the assignment runs correctly on your local repo but you didn’t push everything to the remote repo).
- If you want to submit late, review the Late Submissions section to understand how it works with your GitHub repository.
Avoid getting zero marks…
It is your responsibility to make sure all your changes are correctly visible on your remote GitHub repository. Read all the submission instructions carefully. It is not enough that you did commits and they appear in your local repository. Even if you pushed them to the remote repository later on (with timestamps before the deadline), it is not enough! The changes must appear in the remote repository before the deadline to be considered for marking. No exceptions.
You must double check that you have uploaded the correct code for marking! There will be no exceptions if you accidentally submitted the wrong files, regardless of whether you can prove you did not modify them since the deadline. No exceptions. Get into the habit of downloading them again, and double-checking all is there.
Late Submissions
Please also be careful with your final commits. We don’t recommend you risk making any changes in the final minutes (unless your intention is to submit late). For fairness, we have to penalise any late submissions, even if it’s just a minute late. This is why we have a 30-minute late penalty category (so that 1-30 minutes late is only 1% penalty). You get to decide if it’s worth the risk to work on your assignment up until the deadline.
Late submissions are based on the GitHub server timestamp
If you intend to submit before the deadline (and not utilise the late penalty allowance), then make sure you have pushed all your commits to your remote GitHub repository before the deadline.
To determine if you have a late submission, we use the GitHub server timestamp. If the timestamp is after the deadline, then it is late.
Please note: We do NOT use the commit timestamps. This is because the commit timestamps are based on your local machine, and can be easily changed. We will therefore only use the GitHub server timestamp to determine if your submission is late or not. No exceptions. This is why it’s important for you to make sure you push your commits to the remote repository before the deadline.
If you would like more time and submit late (with penalties), then simply keep working on your assignment and make sure you push the latest commits to the remote repository before the following deadlines. By looking at the last push timestamp, we will determine how late your submission is.
After the 48-hour late period passes, your repository will become read-only — and you will not be able to push to it. You will get an error message when you attempt to push, that you do not have access to it. This is to ensure that we can start marking the assignments and provide feedback to you in a timely manner.
Remember: your commits need to be pushed and in the remote repository within the 48 hours, not only timestamped!.
Late submission penalties:
| Late by † | Penalty |
|---|---|
| 1 to 30 minutes late | 1% penalty |
| Up to 3 hours late | 2% penalty |
| Up to 12 hours late | 8% penalty |
| Up to 24 hours late | 15% penalty |
| Up to 36 hours late | 20% penalty |
| Up to 48 hours late | 30% penalty |
| More than 48 hours late | 100% penalty ‡ |
† Based on GitHub server timestamp of last push.
‡ At 48 hours late, your GitHub repository becomes read-only, no more pushes possible or accepted.
It is up to you if you want to risk working on your assignment up until the deadline. If you don’t successfully push to the remote repository before the above deadlines, then it will be late. Don’t risk it.
We will stick by these clearly-specified rules. We have to be fair to everyone, and we will not be able to make exceptions to these rules due to mistakes or misunderstandings. If you are unsure about anything, please ask in Ed Discussion well ahead of the deadline.
Congratulations!
You have finished the assignment! There is no need to submit anything in Canvas. In fact, we will automatically clone your remote GitHub repository at the deadline and mark it automatically. See the Final Submission on GitHub section for details to make sure you have everything in order for marking. Just make sure you have committed and pushed all your changes to the remote repository before the deadline.