
OO Design Patterns
An Introduction to Design Patterns

Reading guide, this material spans 3 lectures
- Lecture 1 — Friday 1 May 2026 — Introduction + Creational patterns: Factory, Builder, Prototype.
- Lecture 2 — Monday 4 May 2026 — Structural patterns: Adapter, Composite.
- Lecture 3 — Friday 8 May 2026 — Behavioural patterns: Command, Strategy
By now you should understand the importance of a good OO design! Good OO designs should be reusable, extensible and maintainable. In fact, useful software constantly changes to add new features, extend existing features, fix bugs, improve performance etc. Software systems with a poor OO design are very hard to maintain and even performing a simple change might take a lot of time and effort. Do you know that software developers spend more time reading the code than actually writing it?
Do you think that crafting good OO designs is difficult?… don’t worry Design Patterns are here to help you!
Software design patterns describe common (and very successful) ways of building software. More specifically, a software design pattern is a general, reusable solution (template) to a commonly occurring problem in software design.
Let’s see a real world example: The “door” pattern
Problem:
- We want a portal between two spaces
- Must be able to open and close
Solution: Build a door!
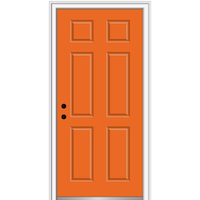
Doors have multiple components: lock, handle, frame etc…
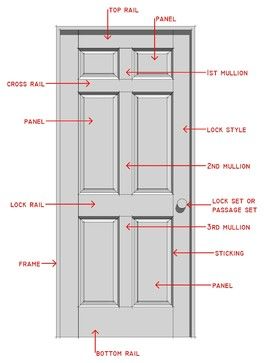
The design pattern “door” specifies how these components interact to solve our problem. The “door” design is reusable, in fact the implementation can be very different!


In this course we are interested in object-oriented design patterns, which show relationships and interactions between classes or instances.
Why use design patterns?
There are key advantages of using OO design patterns.
- They will make your life easier by not reinventing the wheel, design patterns are solution to common OO problems.
- They will improve your OO skills.
- OO design patterns are widely used, you will be able to recognizes them if you read code.
- It is easier to communicate software design ideas if developers have a shared vocabulary. Design patterns will help with that.
- OO design patterns are not specific to a certain programming language, once you learn them you can use them with any OO programming language (e.g., C#, Ruby, Python, TypeScript).
- Many design patterns also make code easier to test: replacing a real implementation with a mock during unit tests is much simpler when the surrounding code already programs to an interface (as you will see with Strategy and Factory).
The 23 classic patterns
There are 23 main OO Design patterns, which can be classified into three main categories:
-
Creational Patterns (5) provide ways to create instances while hiding the creation logic, instead of instantiating objects directly using the
newoperator. This gives the program more flexibility in deciding which instances need to be created. -
Structural Patterns (7) deal with class and object composition. The concept of inheritance is used to compose interfaces and define ways to compose objects to obtain new functionality.
-
Behavioural Patterns (11) deal with communication between objects.
The chart below shows all of the 23 patterns.

We will cover only few of the most used and important. You are of course encouraged to study more about them in the future. Indeed, design patterns are widely used, and often software developer job interviews have always a couple of questions about them.
 Caution!
Do not abuse design patterns! Design patterns do not magically improve the design and quality of your code, they might even make it worst if used when are not needed.
It is important to identify the scenarios and problems which the patterns are meant to address. Design Patterns are solutions for common problems, if your program does not suffer from the problem that a design pattern is meant to address do not use that design pattern!
To make this concrete, here is a tiny anti-example, a “Hello, World!” program drowned in patterns it does not need:
// Strategy interface for greetings,  completely unnecessary for one fixed greeting!
public interface GreetingStrategy { String greet(); }

public class EnglishGreeting implements GreetingStrategy {
    @Override public String greet() { return "Hello, World!"; }
}

// Factory to create the strategy, also unnecessary, we only ever use one.
public class GreetingFactory {
    public static GreetingStrategy create() { return new EnglishGreeting(); }
}

// A printer class — yet another class, just to print one line.
public class GreetingPrinter {
    private final GreetingStrategy strategy;
    public GreetingPrinter(GreetingStrategy strategy) { this.strategy = strategy; }
    public void print() {
        System.out.println(strategy.greet());
    }
}

public class Main {
    public static void main(String[] args) {
        GreetingPrinter printer = new GreetingPrinter(GreetingFactory.create());
        printer.print();
    }
}
Compare with the version without forcing any desing pattern:
public class Main {
    public static void main(String[] args) {
        System.out.println("Hello, World!");
    }
}
The lesson: a pattern is only useful when the problem it solves is actually present in your code. Reach for one when the pain (rigid switch-statements, duplicated wiring, a constructor with twelve parameters) shows up, not before.
Some History
In 1977, Design Patterns originated as an architectural concept in the book “A Pattern Language” by Christopher Alexander. He defined patterns as “successful solutions to problems” in the context of building.
In 1987, Ward Cunningham and Kent Beck leverage to idea and applied it to OO programs.
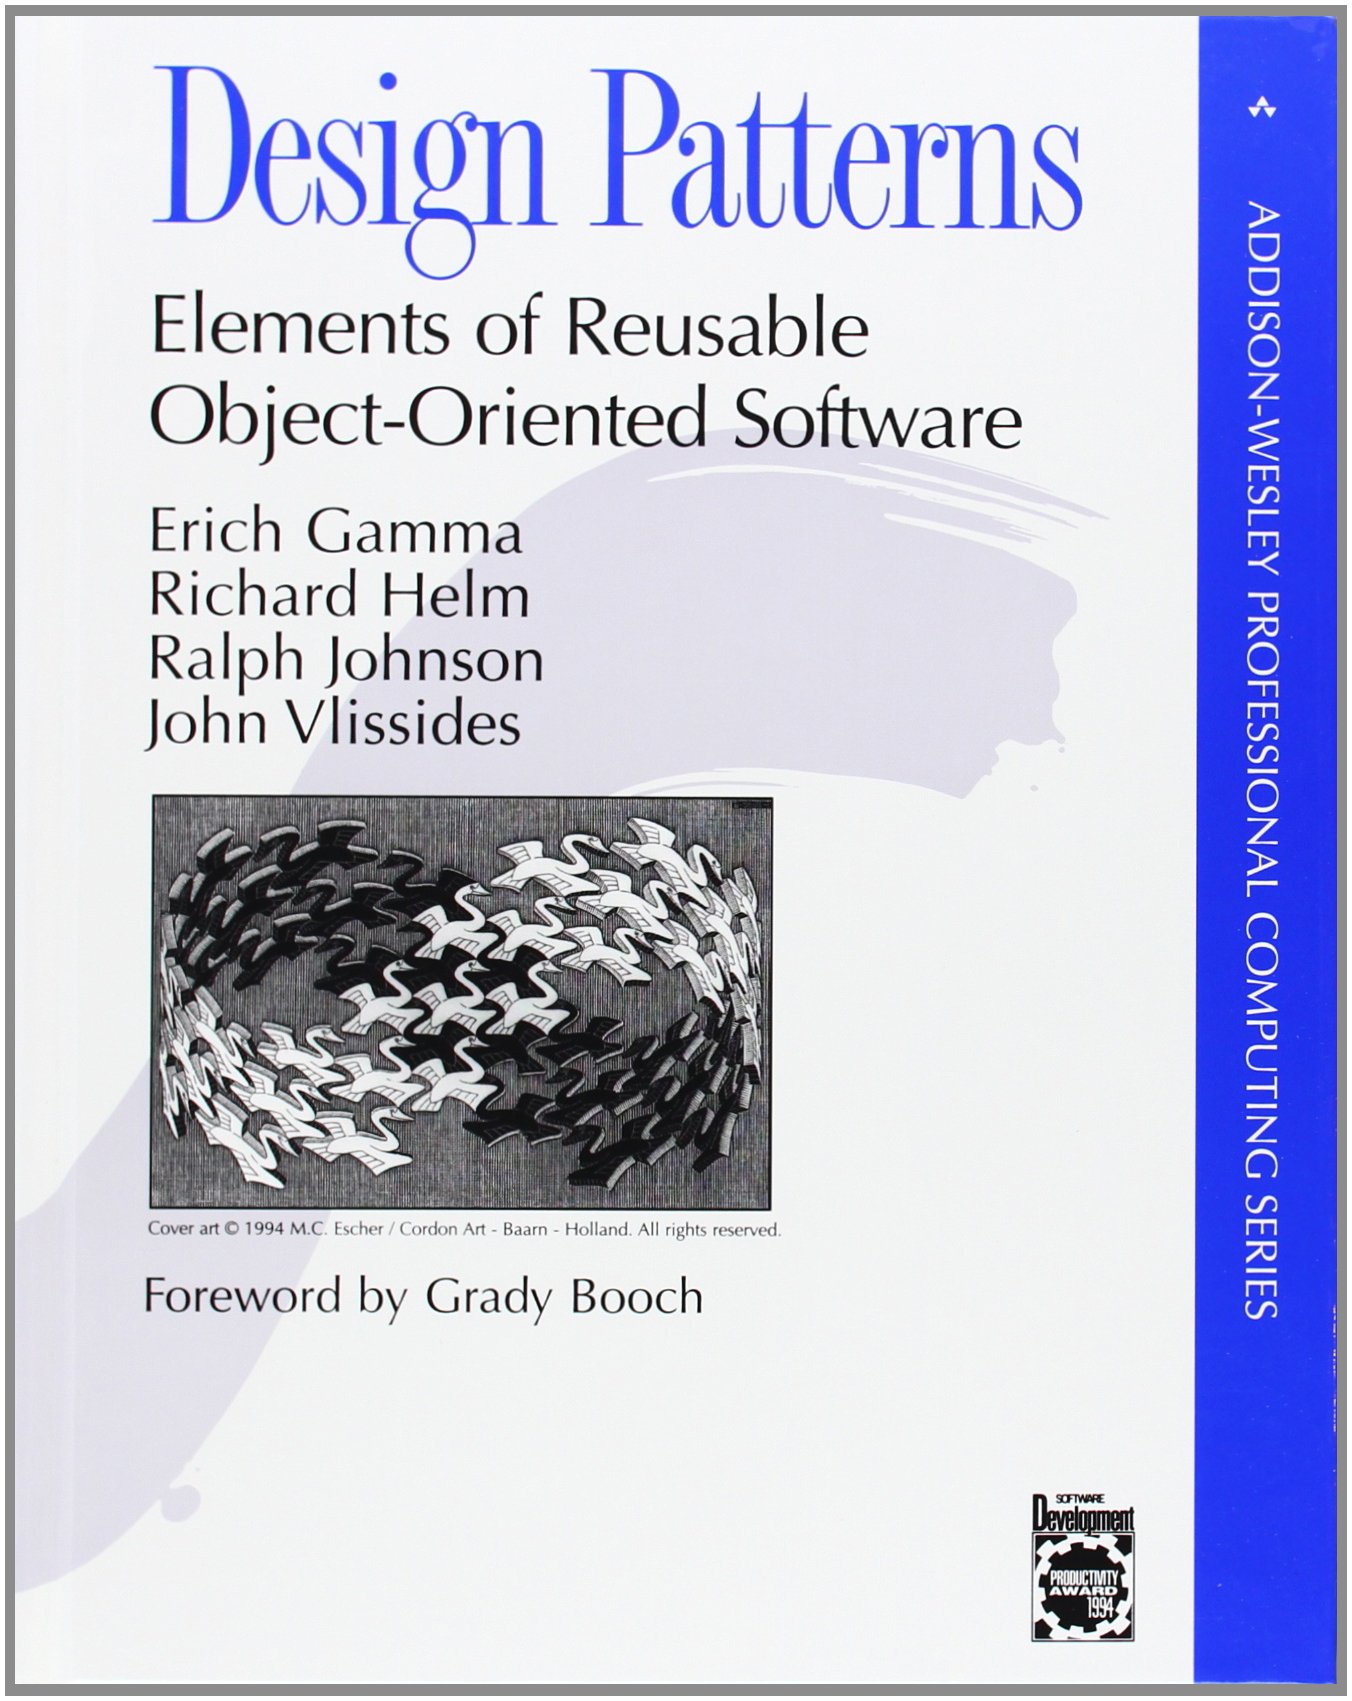
In 1994, the book “Design Patterns: Elements of reusable object-oriented software”, written by four authors (Erich Gamma, Richard Helm, Ralph Johnson, and John Vlissides) also called the “Gang of Four”, proposed 23 (classic) design patterns for OO programs. This is why you will often hear the phrase “GoF patterns” in interviews and code reviews.

Lecture 1 — Friday 1 May 2026 — Creational patterns
Factory (Creational)

The Factory Design Pattern is one of the most used design patterns in Java. It is very useful when you need to provide high flexibility for your code.
Problem:
In OOP we often have to create different instances of similar classes. In such cases, we want to have highly maintainable code so that when we want to add a new class type, we just want to change the code in one place.
For example, let’s assume that you have opened a Coffee Shop and you only make espressos. You implemented an automated system to make coffee. The code looks like this:
public class Main {

    public static void main(String[] args) {

        EspressoCoffee espressoCoffee = new EspressoCoffee();
        espressoCoffee.grindCoffeeBeans();
        espressoCoffee.make();
        espressoCoffee.serve();
    }

}
This is the EspressoCoffee class:
public class EspressoCoffee {

	public void grindCoffeeBeans() {
		System.out.println("Use espresso roast coffee, about 9 grams for a single espresso shot");
	}

	public void make() {
		System.out.println("Place the portafilter in the espresso machine and press the button to pull the shot.");
	}

	public void serve() {
		System.out.println("Espresso can only be served in small ceramic cups");
	}

}
As your coffee shop gets popular, you want to add more types of coffee: Cappuccino and Americano. However, adding a new coffee to the program is not that simple if the rest of the code is already coupled to the EspressoCoffee type. Adding new coffee types into the program would require making changes to the entire codebase.
For example, something like this:
switch (coffeeType) {

    case "E":
        EspressoCoffee espresso = new EspressoCoffee();
        espresso.grindCoffeeBeans();
        espresso.make();
        espresso.serve();
        break;

    case "A":
        AmericanoCoffee americano = new AmericanoCoffee();
        americano.grindCoffeeBeans();
        americano.make();
        americano.serve();
        break;

    case "C":
        CappuccinoCoffee cappuccino = new CappuccinoCoffee();
        cappuccino.grindCoffeeBeans();
        cappuccino.make();
        cappuccino.serve();
        break;

}
Moreover, if later you decide to add another type of coffee, you will probably need to make all of these changes again.
As a result, you will end up with bad code, riddled with conditionals that switch the program behavior depending on the type of coffee.
Solution: The Factory pattern can come to the rescue!
This pattern delegates the responsibility of initializing a class to a particular factory class by creating a type of virtual constructor. By doing so, it encapsulate the object creation, it hides (to the client of the class) the logic of instantiating objects.
First, let’s create a common interface for all types of Coffee. Note that you could also create an abstract class, depending which one would be better. In this case, it is better an interface.
public interface Coffee {

	public void grindCoffeeBeans();
	public void make();
	public void serve();

}
Then, let’s create the coffee classes that implement this interface.
public class EspressoCoffee implements Coffee {

	@Override
	public void grindCoffeeBeans() {
		System.out.println("Use espresso roast coffee, about 9 grams for a single espresso shot");
	}

	@Override
	public void make() {
		System.out.println("Place the portafilter in the espresso machine and press the button to pull the shot.");
	}

	@Override
	public void serve() {
		System.out.println("Espresso can only be served in small ceramic cups");
	}
}

public class AmericanoCoffee implements Coffee {

	@Override
	public void grindCoffeeBeans() {
		System.out.println("Use espresso roast coffee, about 6 grams for an americano");
	}

	@Override
	public void make() {
		System.out.println("add 100ml of hot water");
	}

	@Override
	public void serve() {
		System.out.println("Americano can only be served in big glasses");
	}
}


public class CappuccinoCoffee implements Coffee {

	@Override
	public void grindCoffeeBeans() {
		System.out.println("Use espresso roast coffee, about 3 grams for a cappuccino");
	}

	@Override
	public void make() {
		System.out.println("add 100ml of milk, add the foam");
	}

	@Override
	public void serve() {
		System.out.println("Cappuccino can only be served in big ceramic mugs");
	}
}
Before we write the factory, let’s also fix a smaller problem in the bad code above: the type was passed as a String ("E", "A", "C"), which is fragile. We will use a Java enum instead, so the compiler enforces that only valid coffee types can be passed.
public enum CoffeeType {
    ESPRESSO, AMERICANO, CAPPUCCINO;
}
Now we create a Factory class and method to create the coffee instance based on the CoffeeType. The method createCoffee returns a Coffee object whose concrete implementation depends on the coffee type given as a parameter.
public class CoffeeFactory {

    public static Coffee createCoffee(CoffeeType type) {
        switch (type) {
            case ESPRESSO:   return new EspressoCoffee();
            case AMERICANO:  return new AmericanoCoffee();
            case CAPPUCCINO: return new CappuccinoCoffee();
            default:
                throw new IllegalArgumentException("Unknown coffee type: " + type);
        }
    }
}
Note that for invalid input we yse throw new IllegalArgumentException(...). We will cover exception handling in detail later. For now, treat this as the right way to signal “the caller passed something invalid”.
Then, every time we want to create a coffee instance, we will use the Factory method like this:
Coffee coffee = CoffeeFactory.createCoffee(CoffeeType.AMERICANO); // this will create an Americano
coffee.grindCoffeeBeans();
coffee.make();
coffee.serve();
Why the Factory method is static? It simplifies the usage, the client code don’t need to create an instance of the factory class to use it. If the factory class do not need to maintain any internal state (i.e., there are no fields), making the method static is better. Indeed, many utility class that just perform a task are static. For example. System.out.println("hello"), println is a static method.
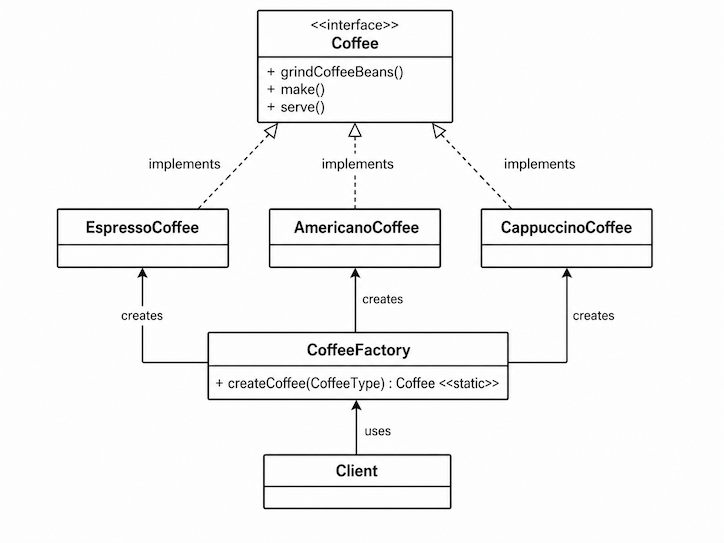
Structure (UML)
Programming to an interface
Notice that the createCoffee method returns a Coffee (the interface), not an EspressoCoffee / AmericanoCoffee / CappuccinoCoffee (the concrete classes). The client code calls coffee.make() through the Coffee reference and never knows which concrete class was actually instantiated. This is a direct application of the “program to an interface, not an implementation” principle you saw in the Interfaces lecture. The Factory pattern is one of the cleanest ways to put it into practice.
A note on Factory nomenclature
What we have just built is sometimes called the “Simple Factory”: a single static method that switches over a type and returns the right concrete object. Strictly speaking, this is not one of the original Gang of Four (GoF) patterns. The two GoF patterns with similar names are subtly different and worth recognising in interviews:
- Factory Method (GoF): a method declared in a base class (often
abstract) that subclasses override to choose which concrete object to create. The “switching” is done by polymorphism rather than by aswitchstatement. - Abstract Factory (GoF): an interface for creating families of related objects (e.g. a
GuiFactorythat produces both aButtonand aCheckboxmatching the same look-and-feel) without specifying their concrete classes.
For the purposes of this course, “Factory” means the Simple Factory shown above; the GoF variants build on the same idea.
Factory in the JDK
Two examples from the Java standard library:
List<String> names = List.of("Alice", "Bob", "Carol"); // List.of is a static factory
The call site says *“give me a List and lets the JDK choose which concrete class to instantiate behind the scenes, exactly like our CoffeeFactory.createCoffee(CoffeeType.AMERICANO).
Key takeaway
Factory decouples client code from the concrete classes it creates. The client asks for a
Coffeeby type tag; the factory decides which concreteCoffeesubclass to build. Adding a new coffee type means changing one place (the factory), not every caller.
 Get your hands dirty!
A bank offers credit cards to its customers. They offer three types of credit cards: Silver, Gold, and Platinum cards. Each card type has a different credit limit: Silver NZD 1,000, Gold NZD 20,000, and Platinum NZD 30,000. The type of issued card depends on the yearly income of the customers. Platinum for an annual salary greater than NZD 200,000. Gold for an annual salary from NZD 100,000 to NZD 199,999. For annual salaries of 99,999 or less, the Bank issues a Silver card. The Bank is planning to add more types of cards in the future. Help the Bank to make their software easier to maintain by applying the Factory design pattern.
- Create an interface
CreditCard. The classesPlatinumCard,GoldCard, andSilverCardshould implement it. - Create a
CreditCardFactoryclass, with a static methodcreateCard(int)following the Factory design pattern.
BONUS Change the interfaceCreditCardto an abstract class. Is it better ifCreditCardis an interface or an abstract class? Why?
import java.util.Scanner;

public class Main {

	public static void main(String[] args) {

		System.out.print("Enter yearly salary in NZD: ");
		Scanner in = new Scanner(System.in);
		int salary = in.nextInt();
		in.close();

		if (salary > 200000) {
			PlatinumCard platnumCard = new PlatinumCard();
			platnumCard.printInfo();
		} else if (salary >= 100000) {
			GoldCard goldCard = new GoldCard();
			goldCard.printInfo();
		} else {
			SilverCard silverCard = new SilverCard();
			silverCard.printInfo();
		}

	}

}
Builder (Creational)

Problem: In OOP we often have classes holding some data that we are setting and later accessing. If we have many instance fields, things can get a bit tedious!
For example, let’s consider the following Pizza class:
public class Pizza{
    private int size;           // mandatory
    private boolean onion;      // optional
    private boolean cheese;     // optional
    private boolean olives;     // optional
    private boolean tomato;     // optional
    private boolean mushroom;   // optional
    private boolean ham;        // optional
    private int sausageCount;   // optional
We have one mandatory attribute (size), and seven optional attributes. The constructor would be:
public Pizza(int size, boolean onion, boolean cheese,
            boolean olives, boolean tomato,
            boolean mushroom, boolean ham, int sausageCount){

    this.size = size;
    this.onion = onion;
    this.cheese = cheese;
    this.olives = olives;
    this.tomato = tomato;
    this.mushroom = mushroom;
    this.ham = ham;
    this.sausageCount = sausageCount;
}
This is very error prone: the parameters might easily be mixed up by the developers as many are of the same type! Seven parameters are not even mandatory. But what if we have new ingredients in the future? Should this constructor be extended with even more parameters to cater for more ingredients? If we do so, we had to change all the previously-written code that used the (old) constructor to add the extra parameter(s)!
Sure, one possible solution is to use a default constructor and then use setter methods to set the optional parameters. For example, something like this:
   Pizza pizza = new Pizza();
   pizza.setSize(10);
   pizza.setTomato(true);
   pizza.setSausageCount(2);
   pizza.setHam(true);
But we still might not want this… what if a developer forgets to set the mandatory field? What if we want that the Pizza is an immutable instance, meaning that once it is created it should not be able to change its state?
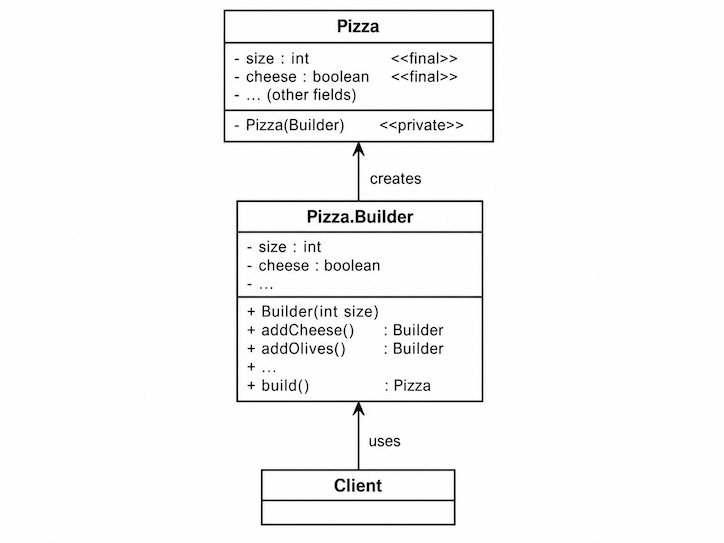
Solution: Use the Builder design pattern: the main idea is to separate mandatory from optional parameters, and to move the construction logic out of the object’s class into a separate static inner class referred to as a “builder” class:
- The
Builderclass has a constructor only for mandatory parameters, and setter methods for all the optional parameters. - In addition, there is a
build()method that glues everything together and returns a complete instance.
Here is the full Pizza class with its inner Builder. A few things to notice:
- All
Pizzafields are declaredfinaland thePizzaconstructor isprivate. Together, these guarantee that once aPizzais built it is truly immutable, there is no setter, no way to swap a field, and no way to instantiate aPizzaexcept through theBuilder. - Each
addX()method on theBuilderreturnsthis, so invocations can be chained (.addCheese().addOlives()....build()). - The
build()method is the right place to put validation. Below we reject pizzas with non-positive size.
public class Pizza {

    private final int size;           // mandatory
    private final boolean onion;      // optional
    private final boolean cheese;     // optional
    private final boolean olives;     // optional
    private final boolean tomato;     // optional
    private final boolean mushroom;   // optional
    private final boolean ham;        // optional
    private final int sausageCount;   // optional

    // private — only the inner Builder may instantiate Pizza
    private Pizza(Builder builder) {
        this.size = builder.size;
        this.onion = builder.onion;
        this.cheese = builder.cheese;
        this.olives = builder.olives;
        this.tomato = builder.tomato;
        this.mushroom = builder.mushroom;
        this.ham = builder.ham;
        this.sausageCount = builder.sausageCount;
    }

    // Pizza's inner static Builder class:
    public static class Builder {

        private int size;                 // mandatory
        private boolean onion = false;    // optional with default value
        private boolean cheese = false;   // optional with default value
        private boolean olives = false;   // optional with default value
        private boolean tomato = false;   // optional with default value
        private boolean mushroom = false; // optional with default value
        private boolean ham = false;      // optional with default value
        private int sausageCount = 0;     // optional with default value

        // We set size in the constructor, enforcing that the client sets it (as it's a mandatory field).
        public Builder(int size) {
            this.size = size;
        }

        public Builder addOnions()    { this.onion    = true; return this; }
        public Builder addCheese()    { this.cheese   = true; return this; }
        public Builder addOlives()    { this.olives   = true; return this; }
        public Builder addTomato()    { this.tomato   = true; return this; }
        public Builder addMushrooms() { this.mushroom = true; return this; }
        public Builder addHam()       { this.ham      = true; return this; }

        public Builder sausageCount(int sausageCount) {
            this.sausageCount = sausageCount;
            return this;
        }

        public Pizza build() {
            // Validate invariants here, *before* the Pizza is constructed.
            if (size <= 0) {
                throw new IllegalStateException("Pizza size must be positive");
            }
            return new Pizza(this);
        }
    }
}
So, creating an instance of the Pizza using the builder pattern will look like this:
Pizza pizza = new Pizza.Builder(10) // note that this "new" creates a "Pizza.Builder" instance, not a "Pizza"!
                .addCheese()        // add cheese to the builder instance, returns the builder instance,
                .addOlives()        // add olives to the builder instance, returns the builder instance,
                .sausageCount(2)    // add 2 sausages to the builder instance, returns the builder instance,
                .addTomato()        // add tomato to the builder instance, returns the builder instance,
                .build();           // now we create the "Pizza" instance!
Note that, in our case the pizza instance is immutable: every field is final, the constructor is private, and there is no setter, once .build() returns, the Pizza cannot change. If we wanted a mutable Pizza we would have to drop final from the fields and add public setters to the Pizza class (and lose the safety guarantees that come with immutability).
This is the final result of what we developed above:
Structure (UML)
Builder in the JDK
The class java.lang.StringBuilder is the canonical Builder in the standard library. Each append(...) call returns this, so calls chain, and the final result is materialised by toString() (the equivalent of our build() method):
String greeting = new StringBuilder()
        .append("Hello, ")
        .append("world")
        .append('!')
        .toString();   // <- analogous to .build()
Key takeaway
Builder separates the construction of a complex object from its representation. Use it when you have a class with one or two mandatory fields and many optional ones.
Get your hands dirty!
Apply the Builder design pattern to this SoupNoodleclass:
The fields noodleType and size are mandatory, while the fields extraNoodle, extraVeggies, bambooShoots, egg are optional (default values are false).
ublic class SoupNoodle {

	public enum NoodleType {
		WHEAT_RAMEN, RICE_VERMICELLI, BUCKWHEAT_SOBA
	}

	public enum Size {
		NORMAL, LARGE, EXTRA_LARGE
	}

	private NoodleType noodleType;
	private Size size;
	boolean extraNoodle;
	boolean extraVeggies;
	boolean bambooShoots;
	boolean egg;

	public SoupNoodle(SoupNoodle.NoodleType noodleType, SoupNoodle.Size size, boolean extraNoodle, boolean extraVeggies,
			boolean bambooShoots, boolean egg) {
		this.noodleType = noodleType;
		this.size = size;
		this.extraNoodle = extraNoodle;
		this.extraVeggies = extraVeggies;
		this.bambooShoots = bambooShoots;
		this.egg = egg;
	}

	@Override
	public String toString() {
		return "SoupNoodle [noodleType=" + noodleType + ", size=" + size + ", extraNoodle=" + extraNoodle
				+ ", extraVeggies=" + extraVeggies + ", bambooShoots=" + bambooShoots + ", egg=" + egg + "]";
	}

}
Prototype (Creational)

Problem: In OOP, we often need to create copies of objects. For example, when implementing a game with an object representing an avatar, we might find it convenient to use this object as a prototype to create thousands of copies and then make minor modifications, such as slightly changing the size. Let’s assume that creating a new Avatar is expensive or slow (e.g., database access, or costly computations). Now, we may want to create a crowd of people walking on the street. How can this be achieved? How do we create an exact copy of an object? By now, it should be clear that an object is characterized by its field values. So, to make a copy of an object, we can create an object of the same type and set the same field values. This might sound easy but can be impossible in some cases.
For example, let’s consider the following Avatar class:
public class Avatar {
    private int size;
    private int walkingSpeed;
    private int walkingDirection;

    public Avatar(int size, int walkingSpeed, int walkingDirection) {
        this.size = size;
        this.walkingSpeed = walkingSpeed;
        this.walkingDirection = walkingDirection;
    }

    public int getSize() {
        return size;
    }

    @Override
    public String toString() {
        return "Avatar [size=" + size + ", walkingSpeed=" + walkingSpeed + ", walkingDirection=" + walkingDirection
                + "]";
    }

  }
Now, let’s say we have an Avatar object with size 5, walkingSpeed 4, and walkingDirection 5. This object is created at runtime we don’t know these values when writing the code. We could do something like this:
Avatar avatar = new Avatar(getSize(), …. WAIT! walkingSpeed and walkingDirection are private but do not have getters. This is quite common, as not every private field necessarily needs a getter. Some fields are only internal and are not meant to be visible from outside of the object itself. Can we add the getters and do? Avatar avatar = new Avatar(getSize(), getWalingSpeed(), getWalkingDirection()); but what if we want to clone an object implemented not by us but imported from a third-party library? We cannot change their code! What if we don’t know the type of the object, but only the one of its superclass?
Solution: Use the Prototype design pattern, which involves delegating the cloning procedure to the objects being replicated. This pattern establishes a shared interface for all objects capable of cloning, allowing you to duplicate an object without tying our code to the object’s specific class. Typically, this interface includes only one method for cloning.
public interface Prototype {
    Prototype copy();
  }
Now, we just have to implement this interface and write the implementation of the method copy(). This time it’s easy because we are inside the object and have access to all fields.
public class Avatar implements Prototype{
    private int size;
    private int walkingSpeed;
    private int walkingDirection;

    public Avatar(int size, int walkingSpeed, int walkingDirection) {
        this.size = size;
        this.walkingSpeed = walkingSpeed;
        this.walkingDirection = walkingDirection;
    }

    public int getSize() {
        return size;
    }


    @Override
    public String toString() {
        return "Avatar [size=" + size + ", walkingSpeed=" + walkingSpeed + ", walkingDirection=" + walkingDirection
                + "]";
    }

    @Override
    public Avatar copy() {
        return new Avatar(size, walkingSpeed, walkingDirection);
    }

  }
The following code
  Avatar avatar = new Avatar(50, 30, 6);
  System.out.println(avatar);
  Avatar clone = avatar.copy();
  System.out.println(clone);
prints:
Avatar [size=50, walkingSpeed=30, walkingDirection=6]
Avatar [size=50, walkingSpeed=30, walkingDirection=6]
Deep vs. shallow copy
The Avatar example above is deceptively simple: all three fields (size, walkingSpeed, walkingDirection) are primitive ints, so copying them with new Avatar(size, walkingSpeed, walkingDirection) does what you would expect — the new object is fully independent from the original.
The story changes the moment a field references another object. Consider a Classroom class that holds a List<Student>:
public class Classroom implements Prototype {
    private String id;
    private List<Student> students;
    // ...

    @Override
    public Classroom copy() {
        Classroom c = new Classroom(this.id);
        c.students = this.students;   // <-- DANGER: same list reference!
        return c;
    }
}
Here c.students and this.students point to the same ArrayList in memory. Adding a student to the original classroom also “adds” the student to the clone, because they share the list. This is a shallow copy — the top-level object is duplicated, but the objects it references are not.
A deep copy also duplicates the referenced objects (and the objects they reference, recursively):
@Override
public Classroom copy() {
    Classroom c = new Classroom(this.id);
    for (Student s : this.students) {
        c.students.add(s.copy());     // copy each Student too
    }
    return c;
}
Rule of thumb. Shallow copy is enough only if every field is a primitive or an immutable reference (e.g.
String,Integer). The moment a field references a mutable object, a shallow copy will leak shared state and you almost certainly want a deep copy. The hands-on exercise below is exactly this case —Classroomreferences a mutableList<Student>, so you will need to copy eachStudentas well.
Cloneable in the JDK, be careful!
Java has a built-in mechanism that looks like the Prototype pattern: the marker interface Cloneable tells the JDK that it is safe to use Object.clone() to clone an object. (clone is analogous to copy above.) You may see it in older codebases, so it is worth knowing what it does:
public class Avatar implements Cloneable {
  private int size;
  private int walkingSpeed;
  private int walkingDirection;

  public Avatar(int size, int walkingSpeed, int walkingDirection) {
    this.size = size;
    this.walkingSpeed = walkingSpeed;
    this.walkingDirection = walkingDirection;
  }

  public int getSize() {
    return size;
  }

  @Override
  public String toString() {
    return "Avatar [size="
        + size
        + ", walkingSpeed="
        + walkingSpeed
        + ", walkingDirection="
        + walkingDirection
        + "]";
  }

  public static void main(String[] args) throws CloneNotSupportedException {
    Avatar avatar = new Avatar(50, 30, 6);
    System.out.println(avatar);
    Avatar clone = (Avatar) avatar.clone();
    System.out.println(clone);
  }
}
If we don’t override clone(), Java’s default implementation copies each field directly, which produces a shallow copy.
Heads up —
Cloneableis widely considered broken.Even though
Cloneableis part of the Java standard library, most professional Java developers avoid it. Here is why, in plain terms:
- It does a shallow copy by default — exactly the bug we just warned about. If your class has a
List, aMap, or any reference to another object, the clone shares that data with the original.Object.clone()isprotected, notpublic. That means a caller outside your class cannot simply writeavatar.clone(). Your class must first overrideclone()and declare itpublic(notice the cast(Avatar) avatar.clone()in the code above).- It forces you to deal with a
CloneNotSupportedExceptioneven when nothing can actually go wrong. That’s why ourmainhad to declarethrows CloneNotSupportedException.Cloneablehas no methods of its own. It is just a flag that tells the JVM “it is OK to callObject.clone()on me”. The actualclone()method lives onObject, not onCloneable.What to do instead in new code:
- Write your own
copy()method (the Prototype approach we saw above), or- Write a copy constructor — a constructor that takes another instance of the same class and copies its fields, for example
Avatar copy = new Avatar(originalAvatar);.We discussed
Cloneableonly because you will run into it in legacy codebases, not because you should use it.
Structure (UML)
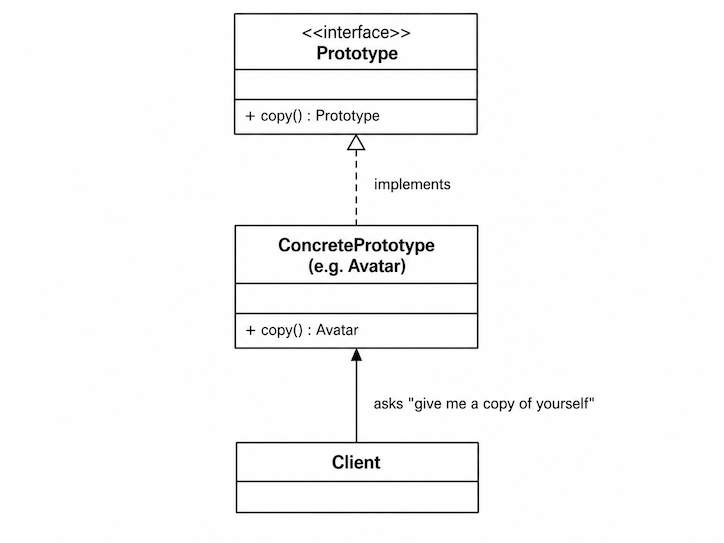
Key takeaway
Prototype lets an object produce a copy of itself, without the caller having to know its concrete class. Always think carefully about deep vs. shallow copy when designing the
copy()method.
Get your hands dirty!
Apply the Prototype design pattern to these classes:
public class Classroom  {
    private String id;
    private List<Student> students;

    public Classroom(String id) {
        this.id = id;
        this.students = new ArrayList<>();
    }

    public void addStudent(Student student) {
        this.students.add(student);
    }

    @Override
    public String toString() {
        return "Classroom{id='" + id + "', students=" + students.toString() + "}";
    }
}
public class Student  {
    private String name;
    private String upi;

    public Student(String name, String upi) {
      this.name = name;
      this.upi = upi;
    }
    @Override
    public String toString() {
        return "Student{name='" + name + "' upi='" + upi + "'}";
    }
}
then implement the Main class:
public class Main{
    public static void main(String[] args) {
      // create a classroom

      // add some students


      // clone the classroom
    }
}
Does both Classroom and Student have to implement Prototype interface and implement the copy method?
BONUS do the same exercise but use the JDK Cloneable interface. Do you need to implement the copy method(s)?
Synthesis: Which Creational pattern fits?
Before moving on to the Structural patterns, take a minute to test your understanding. For each of the following scenarios, decide which Creational pattern (Factory, Builder, or Prototype) is the best fit, and why:
- You are writing a
Notificationclass with one mandatory field (recipient) and ten optional fields (subject,body,priority,attachments,replyTo, …). You also wantNotificationinstances to be immutable. - A configuration parser receives a JSON payload with a
"shape"field that can be"circle","square", or"triangle". You need to build the correctShapesubclass at runtime based on that string. - A game spawns enemies that take ~200 ms to construct because each one loads textures and audio. You want the player to be able to spawn 50 identical enemies on screen instantly when entering a room.
Lecture 2 — Monday 4 May 2026 — Structural patterns
Adapter (Structural)

Let’s assume that you’re visiting Europe. Your laptop expects a NZ power supply (type I). To get your laptop plugged in, you need to get a power adapter that accepts your NZ plug, and allows it to plug in to the European power outlet. The AC adapter knows how to deal with both sides, acting as a middleperson - this is the adapter pattern.
Problem: We have classes with similar behaviour that have incompatible interfaces.
Solution: Create a class that translates the request from one class to another (Adapter design pattern). In a nutshell, Adapter is a structural design pattern that allows objects with incompatible interfaces to collaborate.
Let’s see an example.
Assume that we have an interface with a sort() method that sorts an array of integers (in reverse order).
public interface Sorter {
     int[] sort(int[] numbers);
}
Assume that we want to use an existing library that provides a sorting functionality with reverse order through its ListSorter class.
import java.util.ArrayList;
import java.util.Collections;
import java.util.List;

// library class that we cannot change
public class ListSorter {
    public List<Integer> sortList(List<Integer> numbers)   {
        //copy the list number into another list
        List<Integer> copyList = new ArrayList<>(numbers);
        Collections.sort(copyList,  Collections.reverseOrder());
        return copyList; // return the sorted list
    }
}
There is a problem! The ListSorter class sorts lists, not arrays! What can we do?
We cannot change the ListSorter class to take input arrays. This is because we are not the developers of the library. If we change the method sortList, we might introduce bugs and also we need to change it every time a new version of the library will be released. Moreover, we might not have access to the library source code, making it impossible to change the method.
The Adapter design pattern tells us to create a class SortListAdapter that implements the interface Sorter. Its sort() method converts int[] to List<Integer>, calls the sortList() method of the class ListSorter, and then converts the sorted list back to an array. The two conversion helpers are private methods of the adapter — they are part of how the adapter does its job, not a separate API.
public class SortListAdapter implements Sorter {

    @Override
    public int[] sort(int[] numbers) {
        List<Integer> numberList = convertArrayToList(numbers);

        ListSorter sorter = new ListSorter();
        List<Integer> listSorted = sorter.sortList(numberList);
        int[] arraySorted = convertListToArray(listSorted);

        return arraySorted;
    }

    private List<Integer> convertArrayToList(int[] numbers) {
        List<Integer> list = new ArrayList<>();
        for (int number : numbers) {
            list.add(number);
        }
        return list;
    }

    private int[] convertListToArray(List<Integer> numbers) {
        int[] array = new int[numbers.size()];
        for (int i = 0; i < numbers.size(); i++) {
            array[i] = numbers.get(i);
        }
        return array;
    }
}
Now, if we want to sort an array of integers we can do so like this:
public static void main(String[] args) {
    int[] numbers = new int[] { 5, 34, 2, -1, 3, 444, 89 };
    System.out.println("array in input: " + Arrays.toString(numbers));

    Sorter sorter = new SortListAdapter();

    int[] sortedNumbers = sorter.sort(numbers);
    System.out.println("ordered array (reverse order): " + Arrays.toString(sortedNumbers));
}
An example of the Adapter Design Pattern in the JDK is java.util.Arrays.asList().
This method adapts an array to the List interface, allowing you to treat an array like a List. This is similar to our example above.
String[] array = {"A", "B", "C"};
List<String> list = Arrays.asList(array);
Note that:
-
the returned list is backed by the original array, so changes to the array are reflected in the list, and vice versa.
-
the list is fixed-size: you cannot add or remove elements, but you can modify existing ones.
Structure (UML)
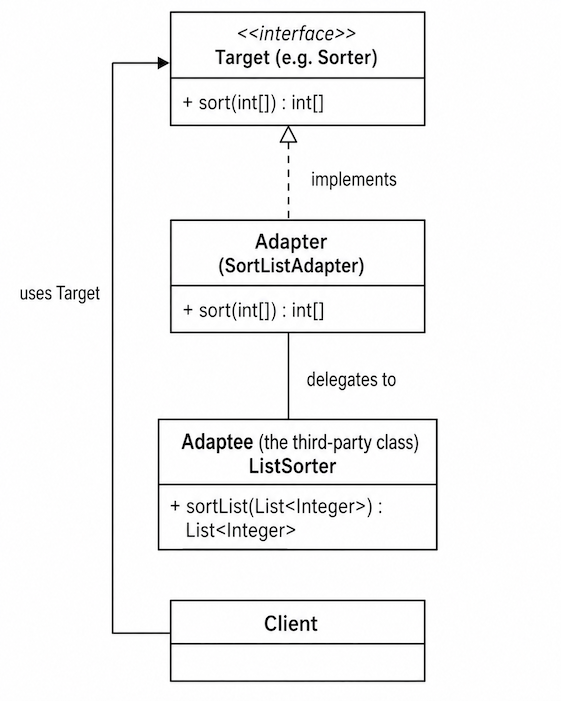
The Client only ever talks to the Target interface (Sorter). The Adapter sits in the middle, implementing Target and translating each call into one or more calls on the Adaptee (ListSorter) that we cannot or do not want to modify.
Key takeaway
Adapter lets two classes with incompatible interfaces work together by inserting a translator class between them. Reach for it when you need to integrate a class (typically from a third-party library or legacy code) that does what you need but exposes an incompatible interface.
Get your hands dirty!
Apply the Adapter design pattern to this program.
Similarly to the sort example, we have an interface Max:
public interface Max{
     int getMax(int[] numbers);
}
that returns the biggest elements of an array.
We have the class ListMax
import java.util.List;

public class ListMax {

    public int getMaxFromList(List<Integer> numbers) {
        //TODO implement by yourself
        return 0; //fix me
    }
}
You need to complete the classes ListMaxand Main using the Adapter design pattern. In particular, you need to also create a MaxListAdapter class to adapt the two interfaces.
Composite (Structural)

Problem:
Sometimes you have to work on a program that deals with entities that can be organized into a tree-like structure.
For instance, let’s say you’re building a File System. You’ll have two classes: File and Folder. A Folder can contain other folders or files. This is a classic example of a tree-like structure, with files as the leaves and folders as the nodes.
Both folders and files might also share similar properties, like having a name and size.
Check out this example implementation:
class File {
    private String name;
    private int size;

    public File(String name, int size) {
        this.name = name;
        this.size = size;
    }

    public void display() {
        System.out.println("File -> " + name);
    }

    public int getSize() {
        return size;
    }
}
A Folder has a name and a list of files and folders.
class Folder {
    private String name;
    private List<File> files = new ArrayList<>();
    private List<Folder> folders = new ArrayList<>();

    public Folder(String name) {
        this.name = name;
    }

    public void addFile(File file) {
        files.add(file);
    }

    public void removeFile(File file) {
        files.remove(file);
    }

    public void addFolder(Folder folder) {
        folders.add(folder);
    }

    public void removeFolder(Folder folder) {
        folders.remove(folder);
    }

    public void display() {
        System.out.println("Folder -> " + name);
        for (File file : files) {
            file.display();
        }
        for (Folder folder : folders) {
            folder.display();
        }
    }
}
But there’s a problem with this design. What if we want to compute the size of a folder? We’d have to do something like this:
    public int totalSize() {
        int size = 0;
        for (File file : files) {
            size = size + file.getSize();
        }
        for (Folder folder : folders) {
            size = size + folder.totalSize();
        }
        return size;
    }
This isn’t great, because we end up with two similar for loops that do the same thing. The design leads to lots of duplicated code and makes the program hard to maintain and extend. The class Folder needs to separately manage two lists: one for File and one for Folder. If we want to add another type (e.g., Shortcut) we need to modify Folder class to add a new list and new logic, which is time-consuming and error-prone. Also. the client code must deal with files and folders separately, rather than treating them uniformly. In this case, we should apply the Composite design pattern.
In summary, you will use the Composite design pattern if:
- You want to treat individual objects and groups of objects in the same way.
- You have a tree-like structure (e.g., a file system).
- You want to simplify client code by abstracting whether it is dealing with a single object (e.g., a file) or a group (e.g., a folder).
Solution
The Composite design pattern can help! It lets you work with tree-like structures by treating individual objects and groups of objects (called composites) uniformly (i.e, in the same way).
To implement the Composite pattern, you’ll need to create three things:
Element – a base interface or abstract class with common methods for managing child composites. It should be either an interface or an abstract class.
Leaf – implements the default behavior of the base component.
Composite – implements the base component methods.
Here’s how to implement the Composite pattern in our example:
Element Create a common interface (or abstract class) to treat files and folders uniformly.
interface FileSystemElement {
    void display();
    int  getSize();
}
Leaf The leaf File will be:
class File implements FileSystemElement {
    private String name;
    private int size;

    public File(String name, int size) {
        this.name = name;
        this.size = size;
    }

    @Override
    public void display() {
        System.out.println("File -> " + name);
    }

    @Override
    public int getSize() {
        return size;
    }
}
Next, create the Composite class.
class Folder implements FileSystemElement {
    private String name;
    private List<FileSystemElement> components = new ArrayList<>();

    public Folder(String name) {
        this.name = name;
    }

    public void addComponent(FileSystemElement component) {
        components.add(component);
    }

    public void removeComponent(FileSystemElement component) {
        components.remove(component);
    }

    @Override
    public void display() {
        System.out.println("Folder -> " + name);
        for (FileSystemElement component : components) {
            component.display();
        }
    }

    @Override
    public int getSize() {
        int size = 0;
        for (FileSystemElement component : components) {
            size = size + component.getSize();
        }
        return size;
    }
}
By applying the Composite design pattern we will have a less redundant, more maintainable, and flexible code. By having a common interface, we can easily add new functionality or extend existing functionality without having to duplicate code or modify multiple classes.
Examples of the Composite design pattern in the JDK? java.awt.Component and java.awt.Container. This is the most popular example of the Composite Design Pattern in the Java AWT GUI framework.
-
Element:
java.awt.Component— the common interface; all GUI elements extend this -
Leaf:
Button,Label, etc. — individual UI elements that cannot contain children -
Composite:
java.awt.Container— a GUI component that can contain other components, including other containers (likeFolderin the example above)
This design allows the client to treat both individual elements and groups of elements uniformly using the Component interface.
Safety vs. transparency
A subtle design question shows up when applying Composite: should addComponent(...) and removeComponent(...) live on the FileSystemElement interface, or only on Folder? The two options have a name in the literature:
- Transparency — put the child-management methods on the base interface (
FileSystemElement). Callers can treat anyFileSystemElementuniformly without ever casting. The price: aFile(a leaf) now also hasaddComponent(...)in its API, even though it has no children, so its implementation must throwUnsupportedOperationExceptionor silently do nothing. - Safety — keep child-management methods only on
Folder. The leaf API is honest (no fake methods), but callers who want to add a child must first checkif (element instanceof Folder f) f.addComponent(...), reintroducing exactly the type checks the pattern was supposed to eliminate.
The version we showed above is the safe variant: display() and getSize() are on the interface, but addComponent() lives only on Folder. The GoF book actually leans the other way (transparency); modern Java code typically prefers safety, especially if you can use sealed types or pattern matching. There is no universally right answer, be aware that you are making a trade-off.
Structure (UML)
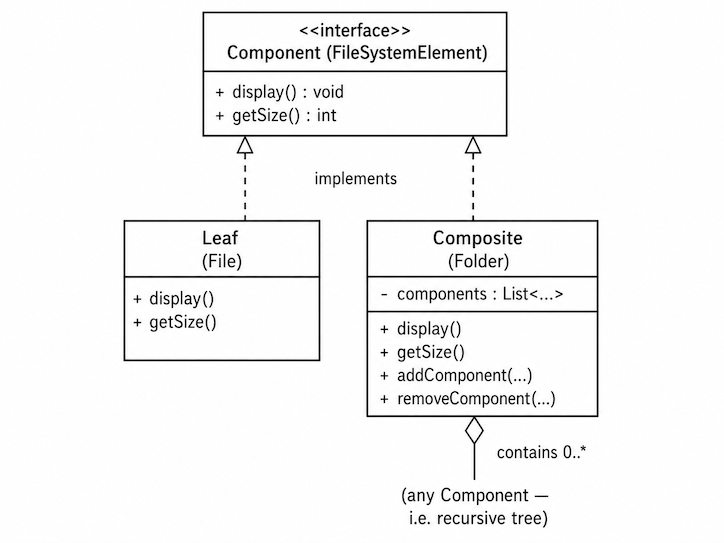
Key takeaway
Composite lets clients treat individual objects (Leaves) and compositions of objects (Composites) uniformly through a shared interface. Reach for it when you have a tree-like structure and you find yourself writing duplicated logic to handle “single thing” vs. “group of things” separately.
Get your hands dirty!
Apply the Composite design pattern to this program.
import java.util.ArrayList;
import java.util.List;

class Developer {
    private String name;

    public Developer(String name) {
        this.name = name;
    }

    public void displayEmployeeDetails() {
        System.out.println("Developer: " + name);
    }
}

class Manager {
    private String name;

    public Manager(String name) {
        this.name = name;
    }

    public void displayEmployeeDetails() {
        System.out.println("Manager: " + name);
    }
}

class Department {
    private String name;
    private List<Developer> developers = new ArrayList<>();
    private List<Manager> managers = new ArrayList<>();

    public Department(String name) {
        this.name = name;
    }

    public void addDeveloper(Developer developer) {
        developers.add(developer);
    }

    public void removeDeveloper(Developer developer) {
        developers.remove(developer);
    }

    public void addManager(Manager manager) {
        managers.add(manager);
    }

    public void removeManager(Manager manager) {
        managers.remove(manager);
    }

    public void displayEmployeeDetails() {
        System.out.println("Department: " + name);
        for (Developer developer : developers) {
            developer.displayEmployeeDetails();
        }
        for (Manager manager : managers) {
            manager.displayEmployeeDetails();
        }
    }
}
Synthesis: Which Structural pattern fits?
For each of the following scenarios, decide whether Adapter or Composite is the better fit:
- Your project pulls in a third-party PDF library whose
Renderer.draw(Page p)method takes aPageobject — but everywhere else in your code you work with your ownDocumenttype. You cannot modify the library. - You are writing a drawing application. A user can group shapes together so that moving the group moves all the shapes inside; groups can themselves contain other groups (groups of groups).
- A logging framework expects all log sinks to expose
void write(String message), but the corporate logging service you must integrate with exposesvoid send(LogEvent e)instead. - An organisation chart shows employees, teams, and departments; the company wants a single “calculate total salary” operation that works whether you call it on a single employee or a whole department.
Lecture 3 — Friday 8 May 2026 — Behavioural patterns
Command (Behavioural)

Problem
Consider the processing of ordering at a restaurant. We have three entities:
Customer, who makes an order.Waiter, who communicates the order to the chefs.Chefs, who cook the meal.
A similar situation is common in OO programs where we have Invoker objects that invoke operations on different Receiver objects. Following the restaurant analogy, the Invoker is the Waiter, and the Receivers are the Chefs. If the Invoker and Receiver interact with each other directly, the Invoker will have a series of if statements to decide which receiver to invoke based on a given command (a kitchen might have multiple chefs that cook different meals).
if (command == A){
   // invoke receiver 1
}else if(command == B){
   // invoke receiver 2
} else if(command == C){
    ....
This situation results in a big headache when we need to add new receivers (chefs) and/or command types (meals). You will need to add more if-elses. The complexity and maintainability of the code will increase in case there are lots of receivers and/or command types.
Solution:
The Command Design Pattern decouples an object making a request (Invoker), from the one that knows how to perform it (Receiver).
It separates the object that invokes the operation from the object that actually performs the operation. It makes it easy to add new commands because existing classes remain unchanged.
Following the analogy of the restaurant, we can apply the Command Design Pattern as follows:
- The
Customermakes an order. - The
Waiterwrites the order on a piece of paper and places it on the Kitchen table and rings a bell. - The right
Chefwill take the order from the table and cook the meal.
All the information on what to cook is in the order itself (the piece of paper), the Chef does not communicate directly with neither the Waiter nor the Customer. The Waiter might not know how to cook the meal or which Chef is going to cook the meal, the Waiter just delivers the order.
This is the Command Design Pattern!
The components of this design pattern are:
-
Commanddeclares an interface for abstract commands (e.g.,execute()). -
ConcreteCommandare classes that implement theCommandinterface. Internally, they have the reference of who is the receiver of the implemented command. -
Receiverknows how to execute a particular command. -
Invokerholds theConcreteCommandthat has to be executed. -
Clientcreates aConcreteCommandand give it to theInvoker.
In this way, the Command Design Pattern decouples the Invoker from Receiver. The Invoker has complete knowledge of which ConcreteCommand to be executed and the ConcreteCommand knows which Receiver to be invoked to execute a particular operation.
Let’s see a concrete example. We want to implement a remote controller for a home automation system that controls different electrical units of a home. For simplicity, let’s assume we have two electrical units: a Light and a GarageDoor. Both are the Receivers using the terminology of this design pattern.
// Receiver
public class Light {
	private String location;

	public Light(String location) {
		this.location = location;
	}

	public void on() {
		System.out.println(location + " light is on");
	}

	public void off() {
		System.out.println(location + " light is off");
	}
}

// Receiver
public class GarageDoor {

	public void up() {
		System.out.println("Garage Door is Up");
	}

	public void down() {
		System.out.println("Garage Door is Down");
	}

	public void lightOn() {
		System.out.println("Garage light is on");
	}

	public void lightOff() {
		System.out.println("Garage light is off");
	}
}
Now let’s create the Command interface, which is very simple, it just declares the method execute.
// Command
public interface Command {
	void execute();
}
Now let’s create 4 concrete commands implementations:
//Concrete Command
public class LightOnCommand implements Command {

	private Light light;

	public LightOnCommand(Light light) {
		this.light = light;
	}

	@Override
	public void execute() {
		light.on();
	}
}
//Concrete Command
public class LightOffCommand implements Command {

	private Light light;

	public LightOffCommand(Light light) {
		this.light = light;
	}

	@Override
	public void execute() {
		light.off();
	}
}
//Concrete Command
public class GarageDoorUpCommand implements Command {
	private GarageDoor door;

	public GarageDoorUpCommand(GarageDoor door) {
		this.door = door;
	}

	@Override
	public void execute() {
		door.up();
		door.lightOn();
	}

}
//Concrete Command
public class GarageDoorDownCommand implements Command {
	private GarageDoor door;

	public GarageDoorDownCommand(GarageDoor door) {
		this.door = door;
	}

    @Override
	public void execute() {
		door.down();
		door.lightOff();
	}

}
Now we can implement the RemoteController that is our Invoker.
//Invoker
public class RemoteController{

  private Command command;

  public void setCommand(Command command){
    this.command = command;
  }

  public void pressButton(){
    command.execute();
  }

}
This is an example of Client that use the classes that we have just created.
//Client
public class Main {

  public static void main(String[] args) {
    RemoteController invoker = new RemoteController();
    Light lightBedroom = new Light("Bedroom");
    Command lightsOn = new LightOnCommand(lightBedroom);
    Command lightsOff = new LightOffCommand(lightBedroom);
    Command garageUp = new GarageDoorUpCommand(new GarageDoor());
    Command garageDown = new GarageDoorDownCommand(new GarageDoor());

    // light switch on
    invoker.setCommand(lightsOn);
    invoker.pressButton();
    // light switch off
    invoker.setCommand(lightsOff);
    invoker.pressButton();
    // garage up
    invoker.setCommand(garageUp);
    invoker.pressButton();
    // garage down
    invoker.setCommand(garageDown);
    invoker.pressButton();
	}

}
Invoker with history
Now with the Command Design Pattern implemented we can do cool things like adding a queue and a history of executed commands. We just need to change the implementation of the Invoker.
import java.util.ArrayList;
import java.util.List;

//Invoker
public class RemoteController {

  private List<Command> historyCommands;
  private List<Command> queueCommands;

  public RemoteController() {
    historyCommands = new ArrayList<>();
    queueCommands = new ArrayList<>();
  }

  public List<Command> getHistoryCommands() {
    return historyCommands;
  }

  public List<Command> getQueueCommands() {
    return queueCommands;
  }

  public void addCommand(Command command) {
    queueCommands.add(command);
  }

  public void executeAll() {
    for (Command command : queueCommands) {
      command.execute();
      historyCommands.add(command);
    }
    queueCommands.clear();
  }
}
Now the Invoker stores all executed commands and queue the ones to be executed.
Command design pattern with undo
This design pattern is also useful when we want to implement an “undo” of a command. In such a case, we need to add the unexecute operation in the Command interface and implement it in all of the ConcreteCommands. Intuitively, the “unexecute” operation has to mirror the execute operation. For example,
public interface Command {
	public abstract void execute();
	public abstract void unexecute();
}


public class GarageDoorUpCommand implements Command {
	private GarageDoor door;

	public GarageDoorUpCommand(GarageDoor door) {
		this.door = door;
	}

	@Override
	public void execute() {
		door.up();
		door.lightOn();
	}

	@Override
	public void unexecute() {
		door.down();
		door.lightOff();

	}

}
Structure (UML)
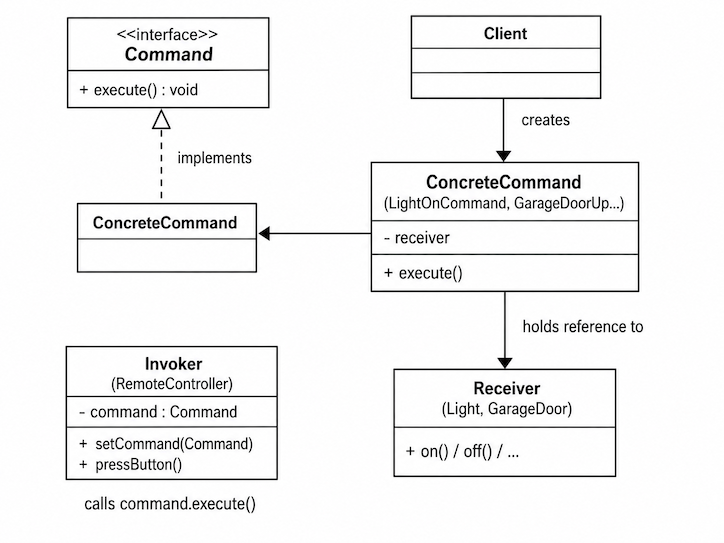
The Invoker has no idea what work it triggers; it only knows that a Command.execute() exists. The Receiver has no idea who triggered the work; it just knows how to do its job. The ConcreteCommand is the glue that binds the two together at construction time.
Command in the JDK — Runnable
Java’s java.lang.Runnable is exactly a Command interface: it declares a single method run() that the caller invokes without knowing what work happens inside. Map it onto the names from the diagram above:
| Our terminology | JDK equivalent |
|---|---|
Command |
Runnable (one method: run()) |
ConcreteCommand |
any class that implements Runnable |
Invoker |
Thread, which calls run() on the command |
Here is a small “bedtime routine” Command that turns off the light and closes the garage door — written exactly like LightOnCommand and GarageDoorDownCommand above, just implementing Runnable instead of our own Command interface:
// ConcreteCommand: a class that implements Runnable.
public class BedtimeRoutine implements Runnable {

    private final Light light;
    private final GarageDoor door;

    public BedtimeRoutine(Light light, GarageDoor door) {
        this.light = light;
        this.door = door;
    }

    @Override
    public void run() {
        light.off();
        door.down();
        System.out.println("Goodnight!");
    }
}
// Client wires the command up; Thread is the Invoker.
Runnable bedtime = new BedtimeRoutine(light, door);
new Thread(bedtime).start();   // Thread calls bedtime.run() on a separate thread.
The Thread class has no idea what BedtimeRoutine does — it only knows that whatever it was given has a run() method. That is the Command pattern at work.
Key takeaway
Command turns a request into a stand-alone object. That object can be passed around, queued, logged, scheduled, or undone, none of which is possible if the work is hardcoded inline as a method call.
Get your hands dirty!
Let’s add an additional receiver
public class Fan {
	static final int HIGH = 3;
	static final int MEDIUM = 2;
	static final int LOW = 1;
	static final int OFF = 0;
	private int speed;

	public Fan() {
		speed = OFF;
	}

	public void high() {
		speed = HIGH;
		System.out.println("Fan is on high");
	}

	public void medium() {
		speed = MEDIUM;
		System.out.println("Fan is on medium");
	}

	public void low() {
		speed = LOW;
		System.out.println("Fan is on low");
	}

	public void off() {
		speed = OFF;
		System.out.println("Fan is off");
	}

	public int getSpeed() {
		return speed;
	}
}
This Receiver represents a Fan with three speeds, high, medium, and low. Implement three concrete commands: FanHighCommand, FanMediumCommand, and FanLowCommandthat set the speed high, medium, and low, respectively. You need to also implement the unexecute operations. This means that you need to save the state of the current speed to be restored in case the client executes unexecute.
</div>
Strategy (Behavioural)

Let’s assume that we need to implement the payment system of a shop. Currently, the shop handles three different types of payment: by cash, by Visa card, or by MasterCard. If cards are used, a fee is to be applied.
The most obvious (but not very good) implementation could be something like this:
public class Order {

    private final String payment;
    private final int amount;

    private double feeMastercard = 0.0015;
    private double feeVisaCard = 0.001;

    public Order(int amount, String payment) {
        this.amount = amount;
        this.payment = payment;
    }

    public void payCash(int amount) {
        System.out.println("Executing cash payment: Charging $" + amount);
    }

    public void payMastercard(int amount) {
        System.out.println("Executing Mastercard payment: Charging $" + amount);
        System.out.println("fees " + feeMastercard * amount);
    }

    public void payVisaCard(int amount) {
        System.out.println("Executing Visacard payment: Charging $" + amount);
        System.out.println("fees " + feeVisaCard*amount);
    }

    public void process(){
        switch (payment){
            case "visa":
                payVisaCard(amount);
                break;
            case "master":
                payMastercard(amount);
                break;
            case "cash":
                payCash(amount);
                break;
            default:
                System.out.println("unknown payment");
        }
    }

    public static void main(String[] args) {
        Order order1 = new Order(15, "visa");
        order1.process();

        Order order2 = new Order(100, "master");
        order2.process();

        Order order3 = new Order(100, "cash");
        order3.process();
    }

}
There are several “problems” with this solution:
- We need to update the
process()method every time we add or delete a payment type. - We can easily pass a wrong payment String (for example, “visacard” instead of “visa”)
This scenario is the perfect case to apply the Strategy Pattern.
We can isolate each of the payment in different classes, called strategies, that define an interface common to all supported payments. Then the Order class uses this interface to execute the algorithm implemented by a Concrete Strategy. In this way, ordering a payment is independent from the strategy. We can add a new algorithm or update the existing one without changing the Order class. With this approach, our payment program becomes much more flexible.
Problem: We have a class that switches between algorithms to accomplish the same task. This means that we would like the option to change the algorithms at runtime.
Solution: The Strategy pattern takes a class that does something specific in a lot of different ways and extract all of these algorithms into separate classes called strategies. The Strategy pattern helps to define a family of algorithms, to encapsulate each one of them and make them interchangeable and independent from the classes that use them. Most importantly, it allows changing the strategy at runtime.
Let’s see how to apply this design pattern in our example.
We need an interface for our strategy (the payment):
public interface Payment {
    void pay(int amount);
}
This interface has a single method pay().
Let’s create our “family” of the three payment algorithms:
public class CashPayment implements Payment {
    @Override
    public void pay(int amount) {
        System.out.println("Executing cash payment: Charging $" + amount);
    }
}

public class MastercardPayment implements Payment {
    double fee = 0.0015;

    @Override
    public void pay(int amount) {
        System.out.println("Executing Mastercard payment: Charging $" + amount);
        System.out.println("fees " + fee * amount);
    }
}

public class VisacardPayment implements Payment {
    double fee = 0.001;

    @Override
    public void pay(int amount) {
        System.out.println("Executing Visacard payment: Charging $" + amount);
        System.out.println("fees " + fee * amount);
    }
}
Note that the three algorithms can implement very different behaviours. The important thing is, that they must all implement the same Payment interface.
Now we need to modify the Order class that makes use of the strategies:
public class Order {

    private final Payment payment;
    private final int amount;

    public Order(int amount, Payment payment) {
        this.amount = amount;
        this.payment = payment;
    }

    public void process() {
        payment.pay(amount);
    }
}
Note that now the process() method is no longer responsible for selecting an appropriate payment. Instead, we pass the desired strategy as an object (Payment payment).
The class Order will make the payment through the interface Payment. The Order class does not need to know the concrete payment processing. That means that in the future, we can add more strategies without changing the Order class at all!
Now we can use the Order class as follows:
Order order1 = new Order(15, new VisacardPayment());
order1.process();

Order order2 = new Order(100, new MastercardPayment());
order2.process();

Order order3 = new Order(100, new CashPayment());
order3.process();
One of the greatest advantage of this design pattern is that it allows to easily change algorithms (strategies) at runtime. We just need to add the setter method of the strategy instance:
public class Order {

    private Payment payment;
    private final int amount;

    public Order(int amount, Payment payment) {
        this.amount = amount;
        this.payment = payment;
    }

    public void setPayment(Payment payment){
        this.payment = payment;
    }

    public void process() {
        payment.pay(amount);
    }
}
Now at runtime we can change the payment strategy! How cool is that!?
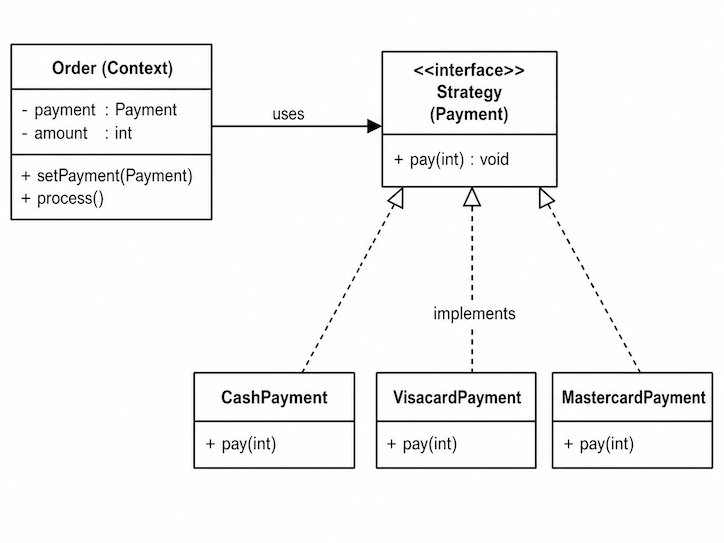
Programming to an interface
The Strategy pattern is the cleanest example of the “program to an interface, not an implementation” principle from the Interfaces lecture. The Order class only ever talks to the Payment interface, it never names CashPayment, VisacardPayment, or MastercardPayment. That is precisely what lets us add a new payment type tomorrow (Apple Pay, bank transfer) without touching a single line of Order.
Structure (UML)
Strategy in the JDK — Comparator
java.util.Comparator<T> is the canonical Strategy in the standard library: a single-method interface that encapsulates one specific way of comparing two objects, passed to algorithms like Collections.sort or List.sort that know nothing about the comparison logic itself:
List<String> names = new ArrayList<>(List.of("Charlie", "Alice", "Bob"));

names.sort(Comparator.naturalOrder());           // strategy 1: alphabetical
names.sort(Comparator.reverseOrder());           // strategy 2: reverse alphabetical
The same List.sort method, three different strategies
Key takeaway
Strategy lets you swap the algorithm a class uses, without changing the class itself. Reach for it when you need to do conceptually the same things in different ways.
Get your hands dirty!
Consider the example above. Add the feature that credit card payments can be declined, if a card payment is declined the payment strategy should be switch to cash payment.
Reference: Pattern comparison & decision table
Now that you have seen all seven patterns covered in this course, this table is a quick reference for revision (and for picking the right tool when you face a design problem in the wild). Each row gives the intent in one line, the key participants, and the smell that should make you reach for that pattern.
| Pattern | Category | Intent (one line) | Key participants | Use it when… |
|---|---|---|---|---|
| Factory | Creational | Decouple client code from the concrete classes it creates. | Product (interface), ConcreteProducts, Factory | You see a switch/if-else over a "kind" tag that picks which subclass to new. |
| Builder | Creational | Construct a complex object step by step, separately from its representation. | Product, Builder (often inner static class), build() |
One or two mandatory fields, many optional ones, and you want immutability + validation in one place. |
| Prototype | Creational | Let an object produce a copy of itself without the caller knowing its concrete class. | Prototype interface (with copy()), ConcretePrototypes |
The caller can't reach all fields, or the object is expensive to construct from scratch — but easy to copy. |
| Adapter | Structural | Make two classes with incompatible interfaces collaborate via a translator. | Target (interface), Adapter, Adaptee | You need to integrate a class — typically third-party — that does the right job but exposes the wrong shape. |
| Composite | Structural | Treat individual objects (Leaves) and groups of objects (Composites) uniformly. | Component interface, Leaf, Composite (holds children) | You have a tree-like structure and you're writing duplicated code to handle "one thing" vs. "many things". |
| Command | Behavioural | Turn a request into a stand-alone object that can be queued, logged, replayed, or undone. | Command interface, ConcreteCommand, Invoker, Receiver | You need to defer, parameterise, replay, or undo work — not just call it inline. |
| Strategy | Behavioural | Encapsulate a family of interchangeable algorithms behind a common interface. | Strategy interface, ConcreteStrategies, Context | Use Strategy when an object must perform an operation, but the exact way of doing it can vary, such as paying by cash, Visa, or Mastercard. |
A useful sanity check before applying any pattern: ask “is the problem this pattern was designed for actually present in my code right now?” If the answer is “well, it might be one day…”, do not apply the pattern yet. Wait for the pain to show up: your code will be simpler today, and the refactor will be obvious tomorrow.
REWIND!

Download the ACP exercise 281_Rewind_Rock_Paper_Scissor
Let’s implement some Artificial Intelligence (AI) to play rock-paper-scissors against a human player!
- Run the
Mainclass and get familiar with the game. Currently theCPUandHumansalways answer the same thing:
public class CPU {

    public Action play() {
        return Action.ROCK;
    }

}
- implement the logic for the Human (human will interact with the console)
Let’s use the Strategy design pattern and create three strategies for the AI, and then we will change them at runtime.
- Random The first strategy is random, it randomly choose an Action (Rock, Paper, or Scissors).
- Cycle The second strategy cycles between Rock, Paper, and Scissors. First game Rock, second game Paper, third game Scissors, fourth game Rock, fifth game Paper and so on.
- Last The third strategies plays the hand that the opponent (Human player) just played. At the first round it plays PAPER.
Now at runtime we want to change these strategies. We start with the Cycle strategy, when the CPU losses 3 times in a row the game changes the strategy to Last, because the player guessed the CPU strategy!. Then, if the CPU losses other 3 times in a row, it likely means that the Human player guessed also this strategy and the game changes it to Random. The game keeps the Random strategy until the player decides to stop the game.
BONUS When the user ends the game print the game statistics (number of games won by the human player and the CPU )
SUPER BONUS When the user ends the game print also which strategy performed the best (in percentage of round played)