
Assignment #1
 What does this mean?
Value: 25%
Due Date for Checkpoint #1 (NO LATE SUBMISSIONS POSSIBLE): Saturday 4 April 2026 9:00pm
Due Date for Checkpoint #2: Friday 1 May 2026 9:00pm
(Up to 2 days LATE) for Checkpoint #2: Sunday 3 May 2026 9:00pm (See Late Submissions)
Learning Outcomes:
- Gain more confidence programming in Java.
- Design an object-oriented programming (OOP) solution to a problem.
- Apply OOP concepts such as inheritance, polymorphism, and encapsulation (information hiding).
Table of Contents
- Recommended Approach
- The Pokemon Management System
- Files Provided
- Checkpoints
- OOP Requirements
- The Commands
- Tasks
- Marking Scheme
- Important Instructions
Warning about static fields
You should not need to use static fields in this assignment. If you are using static fields, you will encounter lots of problems.
If you use static fields, you will notice a weird behaviour that your test cases will pass when executed one at a time, but mostly fail when executed in one go. This is because the static field values are shared across all test cases, and the test cases are executed with this persistant value. This is not the behaviour you want.
So, be sure to always test your final submission using the command we have provided below, as this is how you will be marked:
./mvnw clean compile test for Unix/Mac OS or .\mvnw.cmd clean compile test for Windows
Recommended Approach
Let’s begin!
Full test cases, checkpoint one:
The full test cases for checkpoint 1 are now available, and can be download in a zip file from the following link: https://softeng281.digitaledu.ac.nz/_download/a1-full-test-cases-cp1-2026.zip
You may either replace your MainTest.java with this new file, or copy the full task 1 test cases into your existing MainTest.java.
Join the GitHub repository

STOP! You MUST use the same GitHub account that you used in the Hello GitHub assignment!
Join the assignment by accepting the following GitHub Classroom invitation.
GitHub Classroom link: https://classroom.github.com/a/m3ZXFN6n
Next collect the assignment zip file from the course website at https://softeng281.digitaledu.ac.nz/_download/assignment-1-2026.zip
Unzip the assignment files into the folder you want to store your SOFTENG281 assignments. Note, folder names should not include spaces. In the terminal, navigate into the unzipped assignment folder.
Finally, initialise your local folder as a git repo with,
git init
Add your remote GiHub classroom with,
git remote add origin https://github.com/[your-a1-url]
git branch -M main
Commit your local files with,
git add .
git commit -m "initial commit"
and push to your origin,
git push origin main
The Pokemon Management System

In this assignment, you will develop a centralised system for managing multiple Pokemon! The system is designed to oversee details of various Pokemon, their offered Evolutions, and their possible abilities.
With this system, Pokemon collectors can:
- View a list of all registered Pokemon.
- Register new Pokemon by providing a name, type and rarity.
- Create Pokemon evolutions and link them to the base Pokemon.
- Register and display different actions for each Pokemon evolution.
- Determine the top three Pokemon evolutions with the strongest actions.
- Display text describing the actions in a Pokemon battle.
Since budget constraints require a simple solution, the interface will be entirely terminal-driven. This means that the Pokemon collectors will interact with the system through a menu displayed in the terminal; they select commands by entering the corresponding codes, and additional inputs are prompted as necessary. Once a command is selected, the system processes the action accordingly.
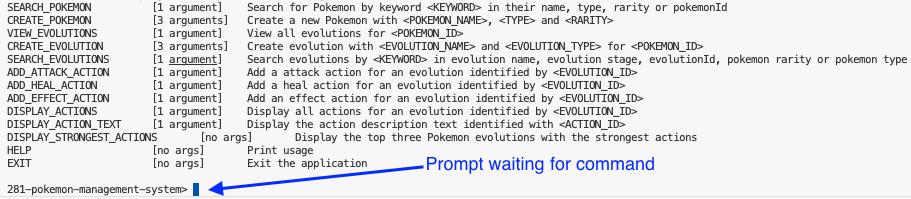
The menu of commands will be displayed on the terminal as follows:
SEARCH_POKEMON          [1 argument]    Search for Pokemon by keyword <KEYWORD> in their name, type, rarity or pokemonId
CREATE_POKEMON          [3 arguments]   Create a new Pokemon with <POKEMON_NAME>, <TYPE> and <RARITY>
VIEW_EVOLUTIONS         [1 argument]    View all evolutions for <POKEMON_ID>
CREATE_EVOLUTION        [3 arguments]   Create evolution with <EVOLUTION_NAME> and <EVOLUTION_TYPE> for <POKEMON_ID>
SEARCH_EVOLUTIONS       [1 argument]    Search evolutions by <KEYWORD> in evolution name, evolution type, evolutionId, pokemon rarity or pokemon type
ADD_ATTACK_ACTION       [1 argument]    Add an attack action for an evolution identified by <EVOLUTION_ID>
ADD_HEAL_ACTION         [1 argument]    Add a heal action for an evolution identified by <EVOLUTION_ID>
ADD_EFFECT_ACTION       [1 argument]    Add an effect action for an evolution identified by <EVOLUTION_ID>
DISPLAY_ACTIONS         [1 argument]    Display all actions for an evolution identified by <EVOLUTION_ID>
DISPLAY_ACTION_TEXT     [1 argument]    Display the action description text identified with <ACTION_ID>
DISPLAY_STRONGEST_ACTIONS       [no args]       Display the top three Pokemon evolutions with the strongest actions
HELP                    [no args]       Print usage
EXIT                    [no args]       Exit the application
You have been given an incomplete implementation of the system, with only the command line interface implemented. You need to implement the commands using object-oriented programming!
Files Provided
Below is a list of the files provided to you for this assignment. You should not modify any of the files provided to you, except for the PokemonManagementSystem.java file (where you will need to implement the logic for the commands), and the MainTest.java file (where you can add your own test cases if you wish).

src/main/java/nz/ac/auckland/se281/Main.java
This class implements the command line interface (CLI).
You should not modify this class.
src/main/java/nz/ac/auckland/se281/MessageCli.java
This class declares most of the messages of the system.
You should not modify this class, but you are encouraged to use it.
You are encouraged to refer to these messages in the code you write, as it will be easier for you to avoid spelling and formatting issues that might otherwise cause you to fail test cases.
Important: The test cases check output text very strictly, including exact spelling, capitalization, punctuation, and spacing. The source of truth for message wording is MessageCli.java. In some places in this handout, examples may differ slightly in wording/casing. You are highly recommended to use MessageCli when printing system messages.
There are two ways to use these messages in your code:
- Get the message so that you can print it yourself by calling the
getMessage()method, or - Request for the message to be printed directly by calling the
printMessage()method.
You will notice that most of the messages have %s placeholders in their values. For example, have a look at the definition of the POKEMON_CREATED message:
public enum MessageCli {
 // ...
   POKEMON_CREATED("Successfully created a '%s', '%s' rarity, '%s' type, ('%s')."),
 // ...
}
There are four %s placeholders, which means this message expects you to pass four arguments when you want to use getMessage() or printMessage() on the POKEMON_CREATED message.
For example, consider you want to construct the message Successfully created a 'Charmander', 'common' rarity, 'Fire' type, ('CHA-C-001').
If you want to get the message to print it yourself, you would do:
String message = MessageCli.POKEMON_CREATED.getMessage("'Charmander'", "'common'", "'Fire'", "'CHA-C-001'");  // get the message
System.out.println(message);  // print it yourself
But, of course, it will often be easier to just print the message directly:
MessageCli.POKEMON_CREATED.printMessage("'Charmander'", "'common'", "'Fire'", "'CHA-C-001'"); // print the message directly
Be sure to dedicate time to understand how this works, as it will be very useful to use and make your job easier. You should already be familiar with this concept from how printf() works in C.
src/main/java/nz/ac/auckland/se281/PokemonManagementSystem.java
This class declares the methods that are invoked by the command line interface (Main.java). This is where you need to start your coding.
You must NOT change the signature of the existing methods of this class (such as changing method names, parameters, and return types).
Of course, you can (and you should) add instance fields and new methods of your own.
If you need to instantiate/initialise fields of the PokemonManagementSystem instance, you can only use the provided zero-parameter constructor (public PokemonManagementSystem()). You should not create other constructors in the PokemonManagementSystem class, as they will not be used by the command line or test cases.
src/main/java/nz/ac/auckland/se281/Characteristics.java
This Java file contains the following enum types:
PokemonTypeRarityEvolutionTypeActionType
These enum types are used to represent the different Pokemon types, rarities, evolution types and action types that are supported by the system. You will find these useful when implementing your system.
You should not modify anything in the Characteristics.java file.
src/test/java/nz/ac/auckland/se281/MainTest.java
This Java file contains the JUnit test cases for this assignment. These test cases make sure that you have implemented most of the assignment correctly.
Making sure that your program passes all of the provided tests will not guarantee that you will get full marks for this assignment, but it will mean that you should get at least half of the marks for the parts that work according to those tests. In fact, we only provided to you half of the test cases that we will use for marking your assignment. You should also note that the test cases we will use for marking your assignment will use slightly different inputs, to ensure you are not hardcoding the expected outputs.
The way that these test cases work is the same as you have seen in the Hello GitHub assignment. You can run them in the same way, either using the Maven wrapper or the Test Runner for Java extension in VS Code.
Writing your own tests or extending the ones you have been given is strongly recommended. Add them inside MainTest.YourTests, which you can find at the bottom of the MainTest.java class. You also need to uncomment each Suite Class near the top of this file:
@RunWith(Suite.class)
@SuiteClasses({
  MainTest.Task1.class,
  // MainTest.Task2.class,
  // MainTest.Task3.class,
  // MainTest.YourTests.class, // <-- uncomment this line
})
You can easily write a test using the helper methods runCommands(), assertContains() and assertDoesNotContain().
These are implemented by us—they are not standard JUnit.
First, with runCommands() you specify the commands to be executed (separated by a comma). With assertContains(), you specify what is the text that you expect to see on the console after executing all the commands, while with assertDoesNotContain(), you specify what is the text that you expect not to see on the console after executing all the commands.
For example, this test case checks that a Pokemon is created and saved:
@Test
    public void T1_10_create_pokemon_saved() throws Exception {
      runCommands(
          CREATE_POKEMON,
          "'Charmander'",
          "'Fire'",
          "'common'", //
          SEARCH_POKEMON,
          "*", //
          EXIT);

      assertContains("There is 1 matching Pokemon found:");
      assertContains("* Charmander (common rarity, type 'Fire', 'CHA-C-001')");
      assertDoesNotContain("Pokemon not created", true);
      assertDoesNotContain("There are", true);
    }
If the CREATE_POKEMON command correctly created and saved the Pokemon, then the SEARCH_POKEMON command should find it. There are some messages that are expected to be there (checked with assertContains()), and some that are not expected to be there (checked with assertDoesNotContain()).
While you can add as many tests as you want, we will not consider them when marking your assignment. Be aware that your code must still work with the original version of the MainTest.java file, where we will reuse the test cases initially provided to you (with slightly different values), while also adding new test cases not visible to you.
src/test/java/nz/ac/auckland/se281/CliTest.java
You should not modify this file.
This Java file is used by the testing framework.
Various “hidden” files
Note: We also provide additional “hidden” files (those starting with “.”). You would need to change the folder options to be able to see them. We provide a .gitignore file that specifies intentionally-untracked files that Git should ignore, and a .mvn folder containing the Maven wrapper. You should not change these files, and you should not delete them.
Checkpoints
To help you tackle this assignment, we have split it into two checkpoints:
- Checkpoint #1 will cover Task 1.
- Checkpoint #2 will cover Tasks 2 and 3.
You will need to submit your code for each checkpoint to your GitHub repository before each checkpoint’s respective deadline. The due dates for each checkpoint are listed at the top of this page. Make sure that you have pushed your commits and that they appear in the remote GitHub repository before the deadline. Refer to the instructions at the bottom of this page (Final Submission on GitHub) for more information on how to submit your code.
Checkpoint #1
This checkpoint is about applying basic Java OOP concepts, such as:
- Using collections
- Using loops
- Using classes
Inside the MainTest.java file, you will find the relevant test cases for this checkpoint are contained within:
- The
MainTest.Task1class
Please note that the marks for Checkpoint #1 (i.e., test cases in Task 1) will only be based on the code you submit before the end of the Checkpoint #1 deadline. Any changes you make to your code after the Checkpoint #1 deadline (which might pass more test cases in Task 1), will not be considered for marks towards Checkpoint #1 (regardless of whether you pass more or fewer test cases in Task 1 by the end of Checkpoint #2). This includes the hidden Task 1 test cases that we will use for marking your assignment.
Please also note that there is no “late submission” opportunities for Checkpoint #1. This also means we cannot support individual “extensions” for Checkpoint #1 (even if you were to provide a medical certificate).
This is because:
- We will be releasing the hidden test cases for
Task 1soon after Checkpoint #1 deadline passes (after we do some final checks on Task 1 submissions), so you can take these into consideration if you wish (they might help for implementation towards Checkpoint #2), and - We will be using the same repository for the entire assignment, meaning it will be impossible to distinguish between the code you intended to target
Task 1versus code you are writing that targetsTask 2andTask 3.
Checkpoint #2
This checkpoint is about applying slightly more advanced OOP concepts:
- Using inheritance
- Using polymorphism
- Using abstract classes
Inside the MainTest.java file, you will find the relevant test cases for this checkpoint are contained within:
- The
MainTest.Task2class - The
MainTest.Task3class
Just like there are hidden test cases for Task 1, there will also be hidden test cases for Task 2 and Task 3. They will be released soon after the Checkpoint #2 deadline passes, after preliminary marking has been completed to make sure the test cases were fair and reasonable.
OOP Requirements
For this assignment, you should use the OOP concepts we covered in class. As such, you should not implement all your code inside the PokemonManagementSystem class. You should create appropriate classes. We are giving you complete freedom on how to do the OOP design. You will decide how many and which Java classes to create.
Inheritance (Checkpoint #2)
You should make sure that you are using inheritance for Checkpoint #2. There, we will check for the following:
- Your code should have at least one abstract class, and
- Your code should have at least three (sub)classes that extend class(es) that you have created.
Note that not all the sub-classes necessarily need to extend the abstract class. It is up to you.
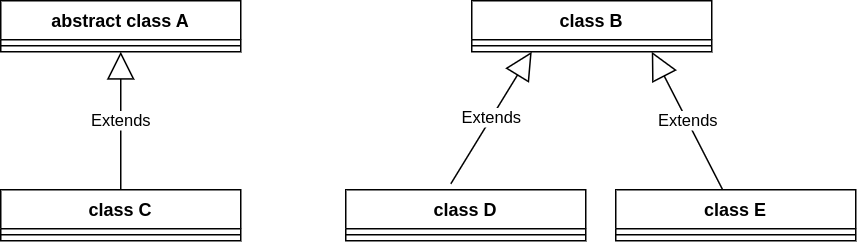
For example, you meet the requirement if you create an abstract class public abstract class A, a public class B, and if you have three (sub)classes public class C extends A, public class D extends B, and public class E extends B:
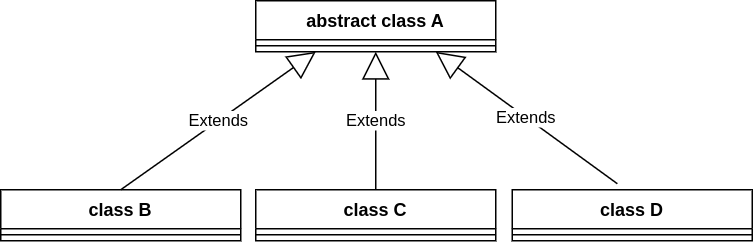
As another example, you meet the requirement if you create an abstract class public abstract class A, and if you have three (sub)classes public class B extends A, public class C extends A, and public class D extends A. You can of course, create more classes on top of these, depending on your OO design choices:
It goes without saying that just creating the classes is not sufficient. Your code has to make use of the classes.
It goes without saying: just creating the classes is not sufficient
First, your code must use those classes. Obviously, if you create classes and never use them to implement your logic, you will not get any credit for them.
What’s more, you must place your classes in separate files to practice good coding practices. For example, if you have a class Foo and a class Bar, you should place Foo in a file called Foo.java and Bar in a file called Bar.java. This is good practice and it will make it easier for you to manage your code. For marking the OO design, we will only consider classes that are in separate files for the purposes of receiving those marks.
The Commands
Before proceeding with the tasks, read the code provided to you and start to familiarise yourself with the command-line interface.
“To run the application interactively in VS Code, open VS Code’s built in terminal and type the Maven wrapper command to run the Main class: ”./mvnw compile exec:java@run” for Unix/Mac OS or ”.\mvnw.cmd compile exec:java@run” for Windows If the terminal window is not open, you can open it by clicking on the Terminal menu, then New Terminal.”
You should see the following output:
Now you can try some of the commands!
Note: The commands are not case sensitive. Also, you can use underscores or hyphens interchangeably.
For example, the following are all correct and equivalent:
create-pokemoncreate_pokemonCREATE_POKEMONCREATE-POKEMONCreate-PokemonCrEaTe_PoKeMoNCREATE-pokemoncreate-POKEMON
Try the HELP command to see the list of available commands:

You can also try the EXIT command to exit the system:

Only the HELP and EXIT commands are implemented for you. You will need to implement the rest of the commands.
Commands with no arguments
The following commands do not require any arguments:
DISPLAY_STRONGEST_ACTIONS       [no args]       Display the top three Pokemon evolutions with the strongest actions
HELP                    [no args]       Print usage
EXIT                    [no args]       Exit the application
This means you can just type them in the command line, press Enter or Return, and they will be executed. For example, if you use the DISPLAY_STRONGEST_ACTIONS command and press Enter or Return, you should see the following:

Obviously, nothing got printed since you need to implement the logic. But notice that no error was reported, since you did not add any arguments (as expected by the command).
If you were to use the DISPLAY_STRONGEST_ACTIONS command followed by some arguments, you would get an error message:

This is because the command expects no arguments, but you provided some (in this case, added, extra, things).
Commands with arguments
The following commands require arguments:
SEARCH_POKEMON          [1 argument]    Search for Pokemon by keyword <KEYWORD> in their name, type, rarity or pokemonId
CREATE_POKEMON          [3 arguments]   Create a new Pokemon with <POKEMON_NAME>, <TYPE> and <RARITY>
VIEW_EVOLUTIONS         [1 argument]    View all evolutions for <POKEMON_ID>
CREATE_EVOLUTION        [3 arguments]   Create evolution with <EVOLUTION_NAME> and <EVOLUTION_TYPE> for <POKEMON_ID>
SEARCH_EVOLUTIONS       [1 argument]    Search evolutions by <KEYWORD> in evolution name, evolution type, evolutionId, pokemon rarity or pokemon type
ADD_ATTACK_ACTION       [1 argument]    Add an attack action for an evolution identified by <EVOLUTION_ID>
ADD_HEAL_ACTION         [1 argument]    Add a heal action for an evolution identified by <EVOLUTION_ID>
ADD_EFFECT_ACTION       [1 argument]    Add an effect action for an evolution identified by <EVOLUTION_ID>
DISPLAY_ACTIONS         [1 argument]    Display all actions for an evolution identified by <EVOLUTION_ID>
DISPLAY_ACTION_TEXT     [1 argument]    Display the action description text identified with <ACTION_ID>
This means you must provide the required number of arguments before pressing Enter or Return for them to be executed. For example, if you use the CREATE_POKEMON command without arguments (or the wrong number of arguments) and press Enter or Return, you should see the following:

To use it correctly, you need to provide the correct number of arguments. Obviously, nothing got printed since you need to implement the logic. But notice that no error was reported, since you provided three arguments (as the command expects).
Tasks
To guide you through the assignment, we have divided it into three tasks. Task 1 corresponds to Checkpoint #1, while Task 2 and Task 3 together correspond to Checkpoint #2.
For each task, we provide a number of test cases (in MainTest.java) that you can use to test your code.
Task 1 (Checkpoint #1) [Worth 6%]
Initial test results
As soon as you compile and run the tests, you will notice the following output…
With the Maven wrapper:
./mvnw clean compile test for Unix/Mac OS or .\mvnw.cmd clean compile test for Windows:

With the Test Runner for Java extension in VS Code:
From the left side of VS Code, click on the Testing icon: ![]()
You will then see all the test cases. You might need to expand to see them all:
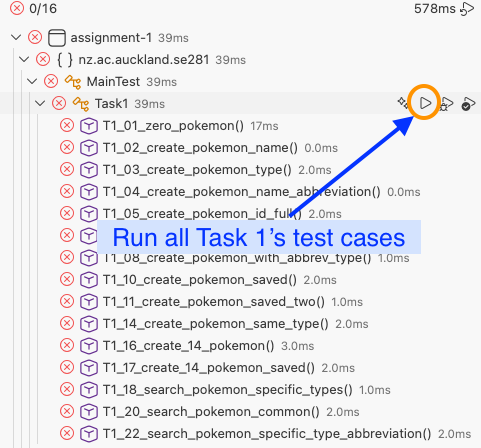
Tip: Running a single test case at a time
Running a single test at a time will help you focus on one test at a time, and will make it easier to understand what is going on.
Option 1: Using the command line
If you wanted to use the command line to run a single test case, you can do so by specifying the test case name. For example, to run the first test case, you would use the following command:
./mvnw compile -Dtest=nz.ac.auckland.se281.MainTest\$Task1#T1_01_name_of_test_case_method test for Unix/Mac OS or
.\mvnw.cmd compile -Dtest=nz.ac.auckland.se281.MainTest\$Task1#T1_01_name_of_test_case_method test for Windows
Note that you need to change two things:
- The name of the Task (e.g.,
Task1), and - The name of the test case’s method (e.g.,
T1_01_name_of_test_case_method).
However, we recommend you use the Test Runner for Java extension in VS Code, as it is much easier to use and allows you to debug your code more easily. See the next section here.
Option 2: Using VS Code’s Test Runner (recommended)
We recommend you use the Test Runner for Java extension in VS Code. It is a very useful tool that will help you run and debug your tests. It will give you control to run all tests at the same time (as in the example above), or run a single test at a time, for example:
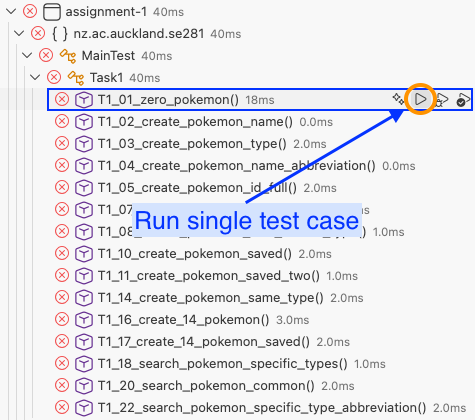
It will also make it easier to debug your code, as you can set breakpoints and step through your code.
When you are trying to pass a particular test case, you will find the Debug Console tab in VS Code very useful. Here, you will see the output of your program after the test you selected has finished running:
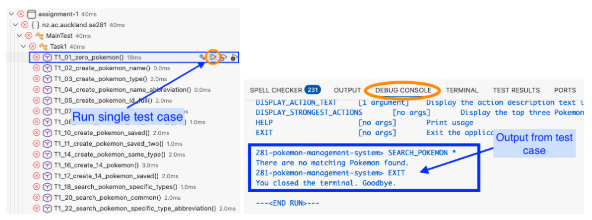
For more help on how to debug your code in VS Code, see the VS Code debugging resource. In particular, there is a section called “Debugging for the Test Cases in the Assignments”.
If you are having issues running tests in Test Runner
If you attempt to run the tests via the Test Runner, and it gives you some problems (e.g., there’s some weird error, or the tests don’t actually appear to run), then try running the tests via the command line first:
./mvnw clean compile test for Unix/Mac OS or .\mvnw.cmd clean compile test for Windows
This should then allow you to run the tests via the Test Runner as expected.
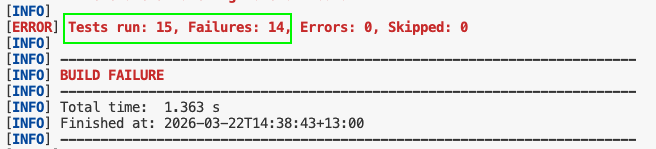
In either case, the examples above are telling you that 15 test cases were run, none of them passed, and all of them failed. In the output, you will find more details on why the test cases failed.
For example, let’s consider the first test case as shown in the terminal, for when you use the Maven wrapper:

The same information is present in the Test Runner for Java extension in VS Code. You can click on the red x ( ) to see the details of the failed test:

The important message to read is:
java.lang.AssertionError: The test is expecting the following output in the console, but it was not there:
 "There are no matching Pokemon found."
This means that the test is expecting the output There are no matching Pokemon found. to be printed in the console, but it was not there. This is because you have not implemented the logic for the SEARCH_POKEMON command yet.
Let’s try something. Go to the searchPokemon() method inside PokemonManagementSystem.java, and add the following code:
public void searchPokemon(String keyword) {
    // TODO implement
    System.out.println("There are no matching Pokemon found.");
}
Run your test again, and you should see the first test is now passing:

Or, from the terminal, we see that now only 14 of the 15 tests are failing since we are passing the first test case:
Now, of course the edit we did was a hack to demonstrate how the tests work. We will very soon have some Pokemon in the system, and this hard-coded print statement will cause all those other test cases to fail! We therefore need to implement the correct logic as described in the following sections.
Creating Pokemon (CREATE_POKEMON and SEARCH_POKEMON)
Task 1 will require you to implement (some of) the logic for the CREATE_POKEMON and SEARCH_POKEMON commands.
The CREATE_POKEMON command creates a new Pokemon with the specified Pokemon name, type and rarity (passed as arguments to the CREATE_POKEMON command). If any invalid input is provided, an error message should be printed (details below).
The SEARCH_POKEMON command searches for Pokemon by keyword
If there are no Pokemon in the system, it prints just the following header:
There are no matching Pokemon found.
If the keyword specified is *, it should print all the Pokemon in the system. For example, if there are two Pokemon in the system:
The order of the listed Pokemon does not matter.
There are 2 matching Pokemon found:
  * Charmander (common rarity, type 'Fire', 'CHA-C-001')
  * Squirtle (common rarity, type 'Water', 'SQU-C-001')
If there is only one Pokemon in the system, then the header should be singular:
There is 1 matching Pokemon found:
  * Charmander (common rarity, type 'Fire', 'CHA-C-001')
You are recommended to attempt the test cases in the order they are numbered. This will help you build up your implementation incrementally. You will therefore notice that the first few test cases that use the SEARCH_POKEMON command are using the * keyword, which means you should print all the Pokemon in the system. So you can momentarily ignore the keyword argument until you reach the test cases that require you to search for specific Pokemon by keyword (more on that later).
Take note of the differences between the different cases above:
- When the quantity is 0, it uses “no”, and the sentence ends with a period (“.”).
- When the quantity is 1, it uses “is”, and the sentence ends with a colon (“:”).
- When the quantity is 2 or more, it uses “are”, and the sentence ends with a colon (“:”).
Hint: Have a look at the MessageCli.Pokemon_FOUND message template:
Pokemon_FOUND("There %s %s matching Pokemon found%s")
This message template has three %s placeholders:
- The first
%sis for the verb (i.e., “is” or “are”) - The second
%sis for the number of Pokemon (e.g., “0”, “1”, “2”, etc.) - The third
%sis for the colon (“:”) or period (“.”)
To get the message "There are 2 matching Pokemon found:", you can do one of the following:
MessageCli.Pokemon_FOUND.getMessage("are", "2", ":");    // Using the getMessage() method
MessageCli.Pokemon_FOUND.printMessage("are", "2", ":");  // Using the printMessage() method
When a new Pokemon is created, it should be added to the system. The arguments have the following requirements:

<POKEMON_NAME>
- Must be at least 3 characters long (surrounding spaces are not counted).
- Must be no more than 10 characters long (surrounding spaces are not counted).
<PokemonTYPE>
- The list of acceptable Pokemon types is provided in the
PokemonTypeenum in theCharacteristics.javafile. - The user can type in the type in any combination of upper and lower case letters, using either full name, or the types abbreviation. For example, the user can type in
Fire,fire,FIR, orfirfor the typeFire. - Each Pokemon has exactly one type in this system. You do not need to worry about handling the same Pokemon with more than one type.
There are a few other requirements that you need to consider, which are explained below.
✭ You do not need to worry about the user typing in too many or too few arguments. You can assume that the user will always type in a command that has the correct number of arguments (this is already handled for you in the code provided).
✭ You do not need to worry about test cases where there are multiple errors in the same command. You can assume that the user will always type in a command that has only one error at most.
✭ As a general rule, if there is nothing explicitly mentioned in this handout, then you do not have to take it into account. We have purposely limited the number of “corner cases” you need to consider, to make the assignment easier to complete. Otherwise, you will be forever anticipating every single possible input, and you will never finish the assignment. If we don’t mention it, you don’t have to worry about it. There won’t be any “hidden” test cases that will test for something we didn’t explicitly mention in this handout.
When a successful Pokemon is created, a success message should be printed:
Successfully created a '<POKEMON_NAME>, <RARITY> rarity, <TYPE> type, ('<POKEMON_ID>').
For example:
281-activity-Pokemon-system> CREATE_POKEMON 'Charmander' 'Fire', 'common'
Successfully created a 'Charmander', 'common' rarity, 'Fire' type, ('CHA-C-001').
The success message prints the Pokemon name, type, rarity and Pokemon ID. The format of this message is very strict. Make sure you check for an appropriate message template in MessageCli to help you.
The Pokemon ID is generated as follows:
<POKEMON_ABBREVIATION>-<RARITY_INITIAL>-<THREE_DIGIT_NUMBER>
- The
POKEMON_ABBREVIATIONis composed from the first three letters in the Pokemon name (in uppercase). For example, the Pokemon abbreviation forCHARMANDERwould beCHA, while the Pokemon initials forPikachuwould bePIK. - The
RARITY_INITIALis the first letter of the rarity (in uppercase). - The
THREE_DIGIT_NUMBERis a three-digit number starting from001and incrementing by1for each new Pokemon of the same type. If the Pokemon is the first Pokemon of a type (e.g., fire), then the number should be001(even if there are other Pokemon of other types in the system). If the Pokemon is the second Pokemon of a type, then the number should be002, and so on.
Example to clarify numbering by type (not rarity):
- If
CREATE_POKEMON Charmander Fire commonis created first, its ID isCHA-C-001. - If
CREATE_POKEMON Charmander Fire rareis created next, its ID isCHA-R-002(notCHA-R-001).
To extract the Pokemon abbreviation from the Pokemon name, you can use the String.substring method. For example:
String PokemonName = "Charmander";
String nameAbbrev = pokemonName.substring(0, 3).toUpperCase();
If there is already a Pokemon with the same name and same rarity, then the (duplicate) Pokemon should not be created, and an error message should be printed. In the following example, the first time the Pokemon is created successfully, while the second time the Pokemon is not created as it’s a duplicate. Therefore, there’s only one Pokemon in the system after the two commands:
281-pokemon-management-system> CREATE_POKEMON Pikachu ELECTRIC common
Successfully created a 'Pikachu', 'common' rarity, 'Electric' type, ('PIK-C-001').
281-pokemon-management-system> CREATE_POKEMON Pikachu ELECTRIC common
Pokemon not created: 'Pikachu' ('common') already exists.
281-activity-Pokemon-system> SEARCH_POKEMON *
There is 1 matching Pokemon found:
* Pikachu (common rarity, type 'Electric', 'PIK-C-001')
Note that a Pokémon of a different rarity than one already created may be created. For example, the system should allow a shiny Pikachu to be created if a common Pikachu already exists, but it should not allow a duplicate shiny Pikachu.
Searching for Pokemon using a keyword
Above we discussed using the * keyword to print all Pokemon in the system. Now, we will discuss searching for Pokemon using a keyword.
The keyword can be any string, and it should be case insensitive. You do not need to worry about any other special characters. The keyword might be a substring of the Pokemon name, type, rarity or Pokemon ID.
The keyword is searched for in:
- The Pokemon name (case insensitive),
- The Pokemon type (case insensitive).
- The Pokemon rarity (case insensitive).
- The Pokemon ID (case insensitive).
Here’s an example of searching for Pokemon using the keyword electric. Notice how the extra spaces at the ends of the ' ' are ignored:
281-pokemon-management-system> SEARCH_POKEMON 'electric   '
There is 1 matching Pokemon found:
* Pikachu (common rarity, type 'Electric', 'PIK-C-001')
If the keyword is found in either the Pokemon name, type, rarity or ID, then the Pokemon should be printed along with the header that summarises how many Pokemon were found (as discussed earlier), not the total number of Pokemon in the system (unless they all match the keyword in some way).
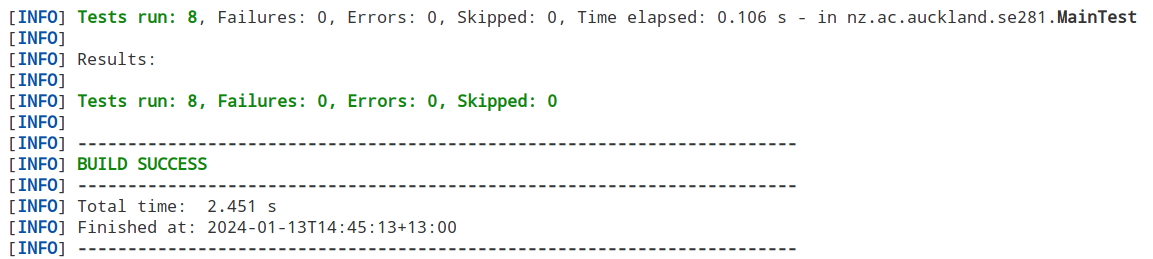
Once you have implemented all the logic for Task 1, you should see all your test cases pass:
As explained at the end of this document, we only provide you with half the test cases from each task. So, even though you have passed all 15 test cases, there are 15 more hidden test cases that we will add to these for Task 1. So, make sure you have implemented all the logic, and read the requirements carefully.
Task 2 (Checkpoint #2) [Worth 5%]
Now that the system supports creating Pokemon, it is time to manage those Pokemon. This will include creating evolutions for Pokemon, viewing a Pokemon’s evolutions, and searching for evolutions in the system.
Go to the top of the MainTest.java file, and uncomment the following line:
@RunWith(Suite.class)
@SuiteClasses({
  MainTest.Task1.class,
  // MainTest.Task2.class, // <-- uncomment this line to get started on Task 2
  // MainTest.Task3.class,
  // MainTest.YourTests.class,
})
You will see 15 new test cases, all of which are failing. Follow the same process as Task 1 to get them all passing, and carefully read the requirements below so you consider scenarios where test cases are not provided.
Creating evolutions (CREATE_EVOLUTION)
The CREATE_EVOLUTION command creates a new evolution for the specified Pokemon ID. The Pokemon ID is the unique identifier that was generated when the Pokemon was created. If any invalid input is provided, an error message should be printed (details below).
When a new evolution is created, it should be added to the system. The arguments have the following requirements:
<EVOLUTION_NAME>
- Must be at least 3 characters long (surrounding spaces are not counted).
- Must be no more than 10 characters long (surrounding spaces are not counted).
- Similar to Pokemon names, the evolution name will be a single word (in which case the single quotes are optional). Again, you don’t need to worry about this, as the code provided already handles this and gives you the full name regardless.
- You don’t need to worry about a Pokemon having multiple evolutions with the same name, we will not test for this.
<EVOLUTION_TYPE>
- The list of acceptable evolution types is provided in the
EvolutionTypeenum in theCharacteristics.javafile. - The user can type in the evolution type in any combination of upper and lower case letters. For example, the user can type in
Final(final evolution),final,FINAL, orfInAlfor the evolution typeEvolutionType.FINAL. - If the user provides an invalid evolution type, then the default value should be
EvolutionType.OTHER. There is no error generated for this. - Have a look at the
fromStringmethod in theEvolutionTypeenum to see how you can convert a string to anEvolutionTypeenum value. This will be useful. For example,EvolutionType.fromString("final")will returnEvolutionType.FINAL.
<Pokemon_ID>
- The Pokemon ID is the unique identifier that was generated when the Pokemon was created.
When a successful evolution is created, a success message should be printed:
281-activity-Pokemon-system> CREATE_EVOLUTION "'Raichu'", "First", "'PIK-C-001'"
Successfully created first evolution 'Raichu' ('PIK-C-001-FIRST') for 'Pikachu'.
This success message includes the evolution name, the evolution ID, the created evolution type, and the Pokemon name. The format of this message is very strict. Make sure you check for an appropriate message template in MessageCli to help you.
Notice that the evolution ID is generated as follows:
<Pokemon_ID>-<EVOLUTION_TYPE>
The EVOLUTION_TYPE can be any of the four types specified in the EvolutionType enum (Base, First, Final, Other).
If the evolution name is less than 3 characters or more than 10 characters long, then an error message should be printed and the evolution should not be created:
281-activity-Pokemon-system> CREATE_EVOLUTION "Hi", "First", "'PIK-C-001'"
Evolution not created: 'Hi' is not a valid evolution name.
If the Pokemon ID does not exist, then an error message should be printed and the activity should not be created:
281-activity-Pokemon-system> CREATE_EVOLUTION "'Pikachu'", "BASE", "'PIK-C-789'"
Evolution not created: 'PIK-C-789' is an invalid pokemon ID.
Viewing evolutions (VIEW_EVOLUTIONS)
The VIEW_EVOLUTIONS command views all evolutions for the specified Pokemon ID. If any invalid input is provided, an error message should be printed (details below).
If the Pokemon ID does not exist, then an error message should be printed:
281-activity-Pokemon-system> VIEW_EVOLUTIONS PIK-C-789
Pokemon not found: 'PIK-C-789' is an invalid pokemon ID.
If the Pokemon has no evolutions, then the following message should be printed:
281-activity-Pokemon-system> VIEW_EVOLUTIONS 'PIK-C-001'
There are no matching evolutions found.
Otherwise, the evolutions should be printed with a header that summarises how many evolutions the Pokemon has registered, followed by the details of each evolutions.
For example, if the Pokemon has one evolution:
There is 1 matching evolution found:
 * Raichu: [PIK-C-001-FIRST] from Pikachu
If the Pokemon has two or more evolutions:
There are 2 matching evolutions found:
  * Charmeleon: [CHA-C-001-FIRST] from Charmander
  * Charizard: [CHA-C-001-FINAL] from Charmander
In all of the above cases, take note of the verb, the word “evolution” (singular or plural), and the colon or period at the end of the sentence. You can use the MessageCli.EVOLUTIONS_FOUND message template to help you with this.
Searching for evolutions (SEARCH_EVOLUTIONS)
The SEARCH_EVOLUTIONS command searches for evolutions by keyword in evolution name, evolution type, evolution ID, Pokemon rarity, or Pokemon type. If any invalid input is provided, an error message should be printed.
If the keyword specified is *, it should print all the evolutions in the system. For example, if there are two evolutions in the system:
281-activity-Pokemon-system> SEARCH_EVOLUTIONS '*'
There are 2 matching evolutions found:
  * Charmander: [CHA-C-001-BASE] from Charmander"
  * Charmeleon: [CHA-C-001-FIRST] from Charmander"
If a keyword other than * is specified, then the keyword should be searched for in:
- The evolution name (case insensitive),
- The evolution type (case insensitive),
- The evolution ID (case insensitive),
- pokemon rarity (case insensitive),
- Pokemon Type (case insensitive).
You do not need to worry about any other special characters. The keyword might be a substring of the evolution name, type, evolutionId, pokemon rarity or pokemon type.
Here is an example of searching for evolutions using the keyword cha:
281-activity-Pokemon-system> SEARCH_EVOLUTIONS "cha"
  There are 3 matching evolutions found:
  * Charmander: [CHA-C-001-BASE] from Charmander
  * Charmeleon: [CHA-C-001-FIRST] from Charmander
  * Charizard: [CHA-C-001-FINAL] from Charmander
The wording for the header should be consistent with the previous examples, depending on the number of evolutions found. This includes the verb, the word “evolution” (singular or plural), and the colon or period at the end of the sentence.
Task 3 (Checkpoint #2) [Worth 7%]
Now that the system supports creating evolutions, it is time to manage those evolutions. This will include adding actions for evolutions, viewing actions for evolutions, and performing other functions related to actions.
Go to the top of the MainTest.java file, and uncomment the following line:
@RunWith(Suite.class)
@SuiteClasses({
  MainTest.Task1.class,
  MainTest.Task2.class,
  // MainTest.Task3.class, // <-- uncomment this line to get started on Task 3
  // MainTest.YourTests.class,
})
You will see 15 new test cases, all of which are failing. Follow the same process as Task 1 and Task 2 to get them all passing, and carefully read the requirements below so you consider scenarios where test cases are not provided.
Actions for evolutions
The system supports three types of actions for evolutions. Each action type has different requirements and actions associated with it:
-
Attack actions Attack actions are performed by a (Pokemon) evolution, and target an “opponent”. The attack action has a name (e.g., Hydro Pump), a type (e.g., water) and an action power (1-5). The attack action will make the opponent’s health reduce.
-
Heal actions Heal actions are performed by a (Pokemon) evolution, and target the evolution itself. The heal action has a name (e.g., Synthesis), a type (e.g., Grass) and an action power (1-5). The heal action will make the evolution’s own health increase.
-
Effect Actions Effect actions are performed by a (Pokemon) evolution, and can target either the evolution itself or its opponent. The effect action has a name (e.g., Rain Dance), a type (e.g., Water) and an action power (1-5), a target (e.g., self), a target stat (e.g., attack stat), and an effect direction (e.g., increase). The effect action’s result is specified by the command arguments.
When any action is added, it should be added to the system and tied to a particular evolution. The evolution ID is the unique identifier that was generated when the evolution was created. If any invalid input is provided, an error message should be printed (details below).
When an action is added, a success message should be printed:
281-activity-Pokemon-management-system> ADD_ATTACK_ACTION BUL-C-001-FINAL
  Action name: Vine Whip
  Action element type: Grass
  Action strength (1-5): 1
Attack action 'BUL-C-001-FINAL-A1' added successfully for evolution 'Venusaur'.
You will notice that adding actions only requires the evolution ID as an argument. The rest of the information is prompted for after the command is executed. This is handled for you, and you will receive expected components in the String[] options parameter in the PokemonManagementSystem.addAttackAction method (or the equivalent method for heal and effect actions).
For the example above, the options array would contain the following:
options[0] = "Vine Whip"
options[1] = "Grass"
options[2] = "1"
To see this in your code, you can easily print each value out in your addAttackAction()
public void addAttackAction(String evolutionId, String[] options) {
 for (int i = 0; i < options.length; i++) {
  String value = options[i];
  System.out.println("option " + i + " = " + value);
 }
}
When an action is added, it should be added to the system. The action ID is generated as follows:
<EVOLUTION_ID>-A<ACTION_NUMBER>
The ACTION_NUMBER is a number starting from 1 and incrementing by 1 for each new action for the same evolution. If the action is the first action for the activity, then the number should be 1 (even if there are other actions for other evolutions in the system). If the action is the second action for the evolution, then the number should be 2, and so on. In the example above, the action ID would be BUL-C-001-FINAL-A1.
If an invalid evolution ID is provided, then an error message should be printed and the action should not be added:
281-activity-Pokemon-system> ADD_ATTACK_ACTION BUL-C-001-001
 Action name: Vine Whip
  Action element type: Grass
  Action strength (1-5): 1
Action not added: 'BUL-C-001-001' is an invalid evolution ID.
Notice how it still asks for all the options, even though the evolution ID is invalid. This is because determining whether the evolution ID is valid or not is done by you after the options are collected and passed to you.
Displaying actions
The system supports viewing actions for evolutions. This includes viewing attack, heal and effect actions.
The DISPLAY_ACTIONS command displays all actions for the specified evolution ID.
If the evolution has no actions, then the following message should be printed:
281-activity-Pokemon-system> DISPLAY_ACTIONS CHA-C-001-BASE
There are no recorded actions for evolution 'Charmander'.
Otherwise, the actions should be printed with a header that summarises how many actions the evolution has.
For example, if the evolution has one action, the header should be:
281-activity-Pokemon-system> DISPLAY_ACTIONS BUL-C-001-BASE
There is 1 action for evolution 'Bulbasaur'.
...
If the evolution has two or more actions, the header should be:
281-activity-Pokemon-system> DISPLAY_ACTIONS CHA-C-001-FINAL
There are 2 actions for evolution 'Charizard'.
...
In all the cases above, take note of the verb, the word “action” (singular or plural).
ACTION_ENTRY_HEADER(“ * %s action (%s) ‘%s’ for ‘%s’.”),
When displaying actions, you will need to print the information related to the action. Have a look at the ACTION_ENTRY_HEADER message templates in the MessageCli class to help you with this. You should be making use of these message templates to print the actions in the correct format. It actually doesn’t matter on the order of the actions, or the order of the lines of bits of information within the action. As long as the correct information is there, and it is in the correct format (based on those templates), then the test cases will pass.
Below is a full example of how an attack action should be displayed. First, the action is added. Then, the action is displayed.
281-activity-Pokemon-system> ADD_ATTACK_ACTION BUL-C-001-FINAL
  Action name: Vine Whip
  Action element type: Grass
  Action strength (1-5): 1
Attack action 'BUL-C-001-FINAL-A1' added successfully for evolution 'Venusaur'.

281-activity-Pokemon-system> DISPLAY_ACTIONS BUL-C-001-FINAL
There is 1 action for evolution 'Venusaur'.
  * Attack action (BUL-C-001-FINAL-A1) 'Vine Whip' for 'Venusaur'.
Below is a full example of how a heal action should be displayed. First, the action is added. Then, the heal action is displayed:
281-activity-Pokemon-system> ADD_HEAL_ACTION BUL-C-001-FINAL
  Action name: Synthesis
  Action element type: Grass
  Action strength (1-5): 1
Heal action 'BUL-C-001-FINAL-A1' added successfully for evolution 'Venusaur'.

281-activity-Pokemon-system> DISPLAY_ACTIONS BUL-C-001-FINAL
There is 1 action for evolution 'Venusaur'.
* Heal action (BUL-C-001-FINAL-A1) 'Synthesis' for 'Venusaur'.
Below is a full example of how an effect action should be displayed. First, the action is added. Then, the action is displayed:
281-activity-Pokemon-system> ADD_EFFECT_ACTION SQU-S-001-BASE
  Action name: Rain Dance
  Action element type: Water
  Action strength (1-5): 2
  Action target (self or opponent): self
  Action target stat (e.g., speed stat): attack stat
  Effect direction (e.g., increased, decreased): increased
Effect action 'SQU-S-001-BASE-A1' added successfully for evolution 'Squirtle'

281-activity-Pokemon-system> DISPLAY_ACTIONS SQU-S-001-BASE
There is 1 action for evolution 'Squirtle'.
* Effect action (SQU-S-001-BASE-A1) 'Rain Dance' for 'Squirtle'.
Displaying strongest actions
The DISPLAY_STRONGEST_ACTIONS command displays the top three actions in the system based on each action’s “action power”. Only the single strongest action should be considered for each evolution. Therefore, if a single evolution has two of the top strongest actions, only it’s strongest action should be displayed. The second and third actions should come from other evolutions, even if the action power is lower.
Also note, for simplicity your solution does not need to consider cases when two competing action powers have the same value. The actions to be listed will always have different values, you don’t need to consider ties.
For each of the three strongest actions a message should be printed detailing that action. If there are less than three strongest actions, nothing should be printed for those missing. For example, if there is only one action in the system, simply report it as the strongest action, and don’t print messages for the 2nd and 3rd strongest actions.
Below is an example where there are three actions for different evolutions in the system.
281-pokemon-management-system> ADD_ATTACK_ACTION PIK-C-001-BASE
 Action name: Thunderbolt
 Action element type: Electric
 Action strength (1-5): 3
Attack action 'PIK-C-001-BASE-A1' added successfully for evolution 'Pikachu'.

281-pokemon-management-system> ADD_EFFECT_ACTION CHA-C-001-FINAL
 Action name: Dragon Dance
 Action element type: Dragon
 Action strength (1-5): 4
 Action target (self or opponent): self
 Action target stat (e.g., speed stat): attack stat
 Effect direction (e.g., increased, decreased): increased
  Effect action 'CHA-C-001-FINAL-A1' added successfully for evolution 'Charizard'.

281-pokemon-management-system> ADD_ATTACK_ACTION SQU-C-005-BASE
 Action name: Water Gun
 Action element type: Water
 Action strength (1-5): 2
Attack action 'SQU-C-005-BASE-A1' added successfully for evolution 'Squirtle'.

281-activity-Pokemon-system> DISPLAY_STRONGEST_ACTIONS
The evolution with the 1st strongest action is 'Charizard', with 'Dragon Dance' of action power of '4'
The evolution with the 2nd strongest action is 'Pikachu', with 'Thunderbolt' of action power of '3'
The evolution with the 3rd strongest action is 'Squirtle', with 'Water Gun' of action power of '2'
Displaying action text
Finally, you can display action text, which describes how an action will be implemented in a Pokemon battle. This is done with the DISPLAY_ACTION_TEXT command and the action ID. Each action text has the following details.
- The name of the evolution performing the action (e.g., Squirtle)
- The action verb (e.g., attacked)
- The action target (e.g., opponent)
- The action name (e.g., Hydro Pump)
- The thing that is changed by the action (e.g., opponent’s health)
- The direction of the effect on that thing (e.g., opponent’s health was reduced.)
Be sure to use the appropriate method from MessageCli.java to ensure the action text matches the expected format.
For an attack action, several details of the action text are fixed. An attack always targets the “opponent”, and always reduces the opponent’s health. An example of an attack action text is given below.
281-pokemon-management-system> ADD_ATTACK_ACTION SQU-S-001-BASE
  Action name: Hydro Pump
  Action element type: Water
  Action strength (1-5): 3
  Attack action 'SQU-S-001-BASE-A1' added successfully for evolution 'Squirtle'.

281-pokemon-management-system> DISPLAY_ACTION_TEXT SQU-S-001-BASE-A1
  Squirtle attacked its opponent with Hydro Pump, its opponent's health was reduced.
For a heal action, several details of the action text are also fixed. A heal always targets the evolution itself and always increases its own health. An example of a heal action text is given below.
281-pokemon-management-system> ADD_HEAL_ACTION SQU-S-001-BASE
  Action name: Rest
  Action element type: Psychic
  Action strength (1-5): 2
  Heal action 'SQU-S-001-BASE-A1' added successfully for evolution 'Squirtle'.

281-pokemon-management-system> DISPLAY_ACTION_TEXT SQU-S-001-BASE-A1
  Squirtle healed itself with Rest, its health was increased.
In effect actions, more action-text details are specified when the effect action is added. The verb will either be “buffed” or “debuffed” depending on whether the action targets the evolution or its opponent (respectively). The target is also specified as either “self” or “opponent”. The impacted stat is also specified (e.g., “speed stat”) along with whether that stat is affected as “increased” or “decreased”. An example is given below.
281-pokemon-management-system> ADD_EFFECT_ACTION SQU-S-001-BASE
  Action name: Bubble
  Action element type: Water
  Action strength (1-5): 2
  Action target (self or opponent): opponent
  Action target stat (e.g., speed stat): speed stat
  Effect direction (e.g., increased, decreased): decreased
  Effect action 'SQU-S-001-BASE-A1' added successfully for evolution 'Squirtle'.

281-pokemon-management-system> DISPLAY_ACTION_TEXT SQU-S-001-BASE-A1
  Squirtle debuffed its opponent with Bubble, its opponent's speed stat was decreased.
Notes for Task 3 (clarifications)
- For all Task 3 outputs,
MessageCliis the source of truth for wording, capitalization, punctuation, and spacing. - For
DISPLAY_ACTIONS, if the provided evolution ID is invalid, print the corresponding invalid-ID message fromMessageCliand do not print an actions header/list. - For
DISPLAY_ACTION_TEXT, if the provided action ID is invalid, print the corresponding invalid-ID message fromMessageCli. - You may assume prompted option values for action element type, action power, effect target, and effect direction are valid and already provided in
options; the key validation in add-action methods is whether the evolution ID exists. - Treat effect-action
targetanddirectionvalues as case-insensitive and ignore surrounding spaces before using/storing them. - In
DISPLAY_STRONGEST_ACTIONS, each evolution can appear at most once. - If one evolution has multiple actions, only its strongest action (highest action power) is eligible for ranking.
- Print up to three strongest-action lines (1st/2nd/3rd) depending on how many distinct evolutions have at least one action; print no placeholders for missing ranks.
- You may assume there are no ties in action power when ranking strongest actions.
Your Tests (optional)
You can add your own test cases in the MainTest.YourTests class, in a similar way to how the test cases are written in the MainTest.Task1, MainTest.Task2, and MainTest.Task3 classes.
These won’t be marked (in fact, they will be ignored during marking), but they are useful for you to test your code. Furthermore, knowing how to write test cases (and getting into the good habit of doing so) will help you write better code and gets you into the problem-solving mindset, which is extremely useful for your future career as an engineer.
Marking Scheme
| Item | Value | Due | Note |
|---|---|---|---|
| Task 1 | 6% | Checkpoint #1 | ❶ |
| Task 2 | 5% | Checkpoint #2 | ❶ |
| Task 3 | 7% | Checkpoint #2 | ❶ |
| OO Design | 2% | Checkpoint #2 | ❷ |
| Code Style | 2% | Checkpoint #2 | ❸ ❹ |
| Git Etiquette | 3% | Checkpoint #2 | ❸ ❺ |
| Total | 25% |
Important Notes: In order to get these marks, you need to make a genuine attempt on the assignment:
❶ We have provided you with half of the test cases used for marking each of the tasks. However, you should not hard-code any logic in order to pass these given test cases as we will change them to have slightly different values. Such hard-coded test cases will naturally fail and get you no marks. See the section below “Does passing test cases mean I have completed the assignment?” for more information.
❷ The classes you create must actually be used, and not be “dummy classes”. You need to create and use at least one abstract class, and at least three (sub)classes that extend a class that you have created. You also need to pass at least 20% of test cases (in Task 2 and 3) in order to get the marks for this item (in other words, these classes need to actually contribute to the functionality of the program).
❸ If you did not pass at least 20% of the total test cases, you will get zero marks for this component. You will not get these marks if you only cloned the repo and pretty much only “submit” the code we provided you.
❹ This is checked and marked at the end of Checkpoint #2, but it’s recommended you clean up your code as you go along rather than at the very end. Make use of the Code Style tool frequently, and learn from it. View required Code Style conventions here.
❺ Although this is marked at the end of Checkpoint #2, there is no opportunity to “fix” past mistakes since you can’t tamper/change your Git history. With that said, we will provide some leniency so you can still get full marks if you made the odd mistake and not too often. We will share reports throughout the assignment so you can see how you’re tracking with this, so you can view any mistakes you might have made and not repeat them. View required Git Etiquette conventions here.

Important Instructions
Please read the following information carefully before you begin your assignment.
Does passing test cases mean I have completed the assignment?
You will see that we provide some test cases to help guide you. In most cases, these test cases are not comprehensive. They are not designed to test all possible inputs. They are designed to help you get started.
What’s more, you should make sure you do not hard code your logic to pass the specific test cases we provide. You should write your code in a way that it will work for any input.
For example, if we provide a test case that checks if the method checkIfIsEven returns true when the input is 2:
@Test
public void testIsEven() {
  checkIfIsEven(2);
  assertContains("true");
}
You should not write your code like this:
public void checkIfIsEven(int number) {
  if (number == 2) {
    System.out.println("true");
  } else {
    System.out.println("false");
  }
}
This is because in the actual marking, we will use different values for the test cases. For example, we may use the test case:
@Test
public void testIsEven() {
  checkIfIsEven(280);
  assertContains("true");
}
If you have hard coded your logic to pass the test case checkIfIsEven(2), then your code will not pass the test case checkIfIsEven(280) and you will therefore not get the marks for that test case.
Code Style Tool
Note: You should have received an email (from “GradeStyle”) with your personal access token. If you didn’t, it’s most likely because you have not associated your GitHub username with your identity when you accepted one of the assignments. In that case, please email Valerio and let him know what GitHub username you used for Hello GitHub.
There will be marks allocated to your code style. Please see the Java Conventions and Best Practices page for more information on code style relevant to this course.
To provide you with feedback on your code style, we will be using a tool we have developed. This tool will check your code for common code style issues, and email you a report on your code style. This email report will let you know what you need to fix.
After the assignment deadline has passed, we will use the same tool to mark code style for your submission.
To benefit from this tool, you need to have your commits pushed to the remote GitHub repository. The tool will extract the code from there, analyse your code, and email you the report.
To use the tool, a codestyle.config file is needed in to the root directory (where the pom.xml file is). Inside it, you should include two things:
email: "student@aucklanduni.ac.nz"
accessToken: "token-that-was-emailed-to-you"
Note: You will notice that the codestyle.config file is added to the .gitignore file. It is good practice to never track credentials in a repository.
The access token will be emailed to you, and is unique for you.
In the assignment repo, you will find a codestyle_SAMPLE.config for your convenience. You can copy-and-paste it, change the name (to codestyle.config), and fill the email and accessToken values with your credentials.
To invoke the actual tool, you will run:
./mvnw clean compile exec:java@style for Unix/Mac OS or .\mvnw.cmd clean compile exec:java@style for Windows
You will receive an email with the feedback.
Some notes about running the tool:
- We limit the number of times you can run the tool (currently once per 30 minutes). With a large number of students, we cannot afford to run the tool on every commit. To make the most of the tool, we therefore recommend you start the assignment early on, and run the tool frequently. If you leave it too late, you will not be able to run the tool as many times as you might like.
- The tool runs on code you have pushed to the remote repository. It does not run on your local repository. Therefore, if you want to generate a new report on your latest code, you will need to do a
git commitand agit pushto the remote repository. The tool will decline to run if you have not pushed your latest code to the remote repository. - Some of the code style aspects might require your code to compile. So, make sure you have a working code before running the tool. If you have a compilation error, the tool will not run (and it will still count as one of your runs). So, remember to do a
./mvnw clean compilefor Unix/Mac OS or.\mvnw.cmd clean compilefor Windows (or include theclean compilein yourexec:java@stylecommand) before running the tool. - The tool will use the GitHub username that was registered in the first Hello GitHub assignment you completed. If you did not associate your name with a GitHub username, you would not have received an email with the access token. If you have associated your GitHub username, but you did not receive an email with the access token, please contact us.
- If you are using a different GitHub username (compared to the one you used in the Hello GitHub assignment), then the tool will not be able to find your repo, and therefore will not be able to run. You need to be using the same GitHub account you registered earlier.
Here’s an example of running the Code Style tool.
Please note: Although the video is from a previous semester, the process is still pretty much the same. Follow the process to use the code style tool, but ignore differences of anything else you notice (like the code style table or weighing of components etc). Instead refer to this year’s handout for that specific information. This video is only to explain running the code style tool.
Academic Honesty
You MUST use the GitHub repository created in the course’s GitHub Organization.
NEVER use your own repository, or copy your code to another repository to work from.
Doing so means your assignment will not be accepted for marking.
- The work done on this assignment must be your own work. Think carefully about any problems you come across, and try to solve them yourself before you ask anyone for help (struggling a little with it will help you learn, especially if you end up solving it). If you still need help, check on Ed Discussion (if it is about interpreting the assignment specifications) or ask in the Drop-In help clinics (if you would like more personal help with Java). Under no circumstances should you take or pay for an electronic copy of someone else’s work.
- All submitted code will be checked using software similarity tools. Submissions with suspicious similarity will result in action taken following the University’s Guidelines for Academic Misconduct, and forwarded to the Disciplinary Committee.
- Penalties for copying will be severe. In most cases, this is ZERO for the assignment in question. To avoid being caught copying, don’t do it. Please note the same penalty applies to both the person who copied and the person who was copied from.
- The University has recently taken a much stricter stance on academic misconduct and streamlined the process for dealing with it. In a nutshell, it takes a non-negotiation approach — no longer requiring a thorough investigation. You will therefore simply be informed, and find the penalty applied to the assignment. This is why it’s important to not only copy from others, but also not to show your work to others.
- You must not attempt to tamper with your GitHub commits. This means all commits must be preserved, including the one that is automatically created for you. Disregarding this will result in major penalties. See the section on Tampering with your Git commit history for more information.
- To ensure you are not identified for potential plagiarism, you should follow these points:
- Always do individual assignments by yourself.
- Never show or give another person your code.
- Make sure you are doing plenty of commits and pushes to GitHub. This will help you to track your progress and also to ensure that you have a backup of your work. It also makes it easier for us to see that you have not been copying from someone else.
- Do not share your GitHub account with anyone.
- Never put your code in a public place (e.g. Reddit, public GitHub repository, forums, your website, etc).
- Never leave your computer unattended. You are responsible for the security of your account.
- Ensure that you always remove your USB flash drive from any public computer before you log off from it.
- Frequently commit your code to GitHub. This provides a track record of your work and will allow the teaching team to follow your footsteps as you complete your assignment. If you do not frequently commit your code, it will look suspicious.
Git Etiquette
All the take-home programming assignments will require you to make good use of Git and GitHub.
There are marks associated with Git usage. But you could stand to lose more marks if there’s evidence of tampering with your Git commit history.
Make sure you are familiar with the expectations outlined in the Git Etiquette page.
Final Submission on GitHub
In this course, all your programming assignments will be automatically extracted from GitHub. There will be no separate submission on Canvas.
The following instructions are very important. Make sure you double check everything, otherwise your assignment will not be marked:
- You must use the GitHub repository created in the course’s GitHub Organization.
- It is not enough that you were doing
git addandgit commitcommands! This only tracks the changes on your local machine! - Unfortunately, it is not a good look for us to hack into your machine in order to take your local repo (even for the good intentions of marking it). Therefore, it is absolutely important you have (correctly) executed a
git pushso that all your commits and changes are sent to the remote GitHub repository. - To make sure you submitted your code, simply go to https://github.com and check the “commits” tab of your assignment repository. Do you see the latest changes there? If so, you are good. If no, something went wrong and you need to sort it out so that it appears in the remote repository before the deadline.
- As an extra (strongly recommended) precaution, you should clone your GitHub remote repo to your machine (e.g., to a temporary folder), and check it works correctly by compiling it and running it all over again (in a “fresh” directory). This is to protect you if you didn’t correctly include all the changed files (in which case, the assignment runs correctly on your local repo but you didn’t push everything to the remote repo).
- If you want to submit late, review the Late Submissions section to understand how it works with your GitHub repository.
Avoid getting zero marks…
It is your responsibility to make sure all your changes are correctly visible on your remote GitHub repository. Read all the submission instructions carefully. It is not enough that you did commits and they appear in your local repository. Even if you pushed them to the remote repository later on (with timestamps before the deadline), it is not enough! The changes must appear in the remote repository before the deadline to be considered for marking. No exceptions.
You must double check that you have uploaded the correct code for marking! There will be no exceptions if you accidentally submitted the wrong files, regardless of whether you can prove you did not modify them since the deadline. No exceptions. Get into the habit of downloading them again, and double-checking all is there.
Late Submissions
Please also be careful with your final commits. We don’t recommend you risk making any changes in the final minutes (unless your intention is to submit late). For fairness, we have to penalise any late submissions, even if it’s just a minute late. This is why we have a 30-minute late penalty category (so that 1-30 minutes late is only 1% penalty). You get to decide if it’s worth the risk to work on your assignment up until the deadline.
Late submissions are based on the GitHub server timestamp
If you intend to submit before the deadline (and not utilise the late penalty allowance), then make sure you have pushed all your commits to your remote GitHub repository before the deadline.
To determine if you have a late submission, we use the GitHub server timestamp. If the timestamp is after the deadline, then it is late.
Please note: We do NOT use the commit timestamps. This is because the commit timestamps are based on your local machine, and can be easily changed. We will therefore only use the GitHub server timestamp to determine if your submission is late or not. No exceptions. This is why it’s important for you to make sure you push your commits to the remote repository before the deadline.
If you would like more time and submit late (with penalties), then simply keep working on your assignment and make sure you push the latest commits to the remote repository before the following deadlines. By looking at the last push timestamp, we will determine how late your submission is.
After the 48-hour late period passes, your repository will become read-only — and you will not be able to push to it. You will get an error message when you attempt to push, that you do not have access to it. This is to ensure that we can start marking the assignments and provide feedback to you in a timely manner.
Remember: your commits need to be pushed and in the remote repository within the 48 hours, not only timestamped!.
Late submission penalties:
| Late by † | Penalty |
|---|---|
| 1 to 30 minutes late | 1% penalty |
| Up to 3 hours late | 2% penalty |
| Up to 12 hours late | 8% penalty |
| Up to 24 hours late | 15% penalty |
| Up to 36 hours late | 20% penalty |
| Up to 48 hours late | 30% penalty |
| More than 48 hours late | 100% penalty ‡ |
† Based on GitHub server timestamp of last push.
‡ At 48 hours late, your GitHub repository becomes read-only, no more pushes possible or accepted.
It is up to you if you want to risk working on your assignment up until the deadline. If you don’t successfully push to the remote repository before the above deadlines, then it will be late. Don’t risk it.
We will stick by these clearly-specified rules. We have to be fair to everyone, and we will not be able to make exceptions to these rules due to mistakes or misunderstandings. If you are unsure about anything, please ask in Ed Discussion well ahead of the deadline.