
Git Setup
The Differences between Git, git and GitHub
Git and git are not the same.
- Git is a system, particularly a version control system.
gitis a program, particularly a command line-based program.
Git is a system for tracking changes to files that describe program code, i.e., the source code.
git is a program that carries out tasks in accordance to the Git system.
Likewise, Git and GitHub are not the same. The following perspectives are valid:
- Git was originally conceived to track changes to files in a directory.
- GitHub is an online service that hosts directories containing files whose changes are tracked by Git.
Some terminology and history
Any directory can contain any number of files. In Unix, a directory is also a file. By this principle, any directory can contain any arbitrary number of directories, themselves containing any arbitrary number of directories, and so forth.
Today, a directory containing source code files or directories of source code files is referred to as a “repository”. This repository can exist in one or multiple computers simultaneously. Each computer bearing a copy of the repository may mirror all files of the entire original copy of the repository, or only a part thereof. Each computer bearing a copy of a repository may produce its own modifications to the parts of the repository that it bears.
A repository’s files can change over time. Hence, it will have a history of changes. This history of changes can be represented as files, for later interpretation by a program such as git. As per the previous paragraph, each computer bearing a copy of the repository may contain the full history of changes of that repository which mirrors that of the original copy, or only a part thereof. When a computer has modifications to a repository, it will have its own version of the history of changes made to that repository. Two computers can share the same history of changes made to a repository, until a certain point. After which, there can be a divergence in the history of changes. These history of changes can be combined into one, provided that the changes made to the files do not conflict with each other.
Git is a distributed version control system created by Linux kernel creator Linus Torvalds to track changes made by developers to files in the repository bearing source code files of the Linux kernel. As a distributed version control system, Git assumes that every computer bearing a copy of a repository contains its full history of changes, excluding parts of the history of changes that have been made to copies of the repository on computers where the changes have not been shared with other computers bearing a copy of the repository. In other words, two copies of a repository, will have the same history of changes until the points where there is a change made exclusive to one of the two copies.
Hence, Git works best when used in a peer-to-peer approach to version control. There is no one more important computer than another that bears a copy of the repository, since each computer will store the entire history of that repository until the point of divergence with other copies of the repository. Created in 2005, developers working on a repository will pass each other their changes made to files, and hence, the history of the files. There is no one server that solely contains the entire history of the repository, as with centralised version control systems. And when one developer’s computer goes down, the other computers will still bear a copy of the repository. Changes exclusive to the copy in the computer that went down, however, are lost. They are not lost if shared with other computers.
In 2007, GitHub was conceived. Its idea was to provide a cloud-based computer which would store copies of repositories made by other developers. By the earlier discussion, GitHub would be another computer in a group of computers each holding a copy of a repository. However, in addition to storing a copy each of different repositories from around the world, GitHub also provided an ecosystem where open-source developers can meet to discover and work on repositories together. In other words, GitHub can also be viewed as a social media platform by itself, albeit one catered to developers and storing a copy each of their repositories.
Very informally, GitHub can be thought of as “Google Drive”, Git thought of as a system used to store digital files on a computer, and git thought of as the interface used for uploading to and downloading files from Google Drive.
Installing git
Windows and macOS computers do not come with git program by default. Some (but not all) GNU/Linux come with git (e.g., Ubuntu). macOS has the file /usr/bin/git but this is essentially a wrapper around the installer for the Xcode Command Line Tools.
You need to have the full git program installed before you can proceed to this step.
Installing git is not the scope of this article, but in brief:
- Windows
- You may obtain
gitfrom https://git-scm.com. - Some more information is here.
- You may obtain
- macOS
- You are recommended to obtain
gitusing package managers Homebrew or MacPorts, asgitand other GNU Coreutils are almost always supplied in their latest versions through Homebrew and MacPorts. Note that you need to obtain Homebrew or MacPorts first. When using MacPorts, you may need root privileges to complete this task (e.g.,sudo port install git). - Some more information is here.
- You are recommended to obtain
- GNU/Linux
- You may use your respective package manager (e.g.
apt,def,packman, etc). You may need root privileges to complete this task (e.g.,sudo apt install git).
- You may use your respective package manager (e.g.
Setting up git
About running commands
When this document mentions running a command, users of different operating systems ought to do the following:
- Windows
- Assuming you have installed Git from git-scm.com, open Git Bash.
- You may also try running the commands from the PowerShell or the (Developer) Command Prompt. However, Git Bash is the recommended terminal for running commands.
- macOS
- Open up the native Terminal.app preinstalled with all macOS versions. This can be done by typing
Terminal.appin Spotlight Search (e.g. ⌘Space) and clicking on said app. - Alternatively, you can use other terminal emulators such as iTerm2 and Kitty.
- Open up the native Terminal.app preinstalled with all macOS versions. This can be done by typing
- GNU/Linux
- You can use any terminal emulator within your graphical environment.
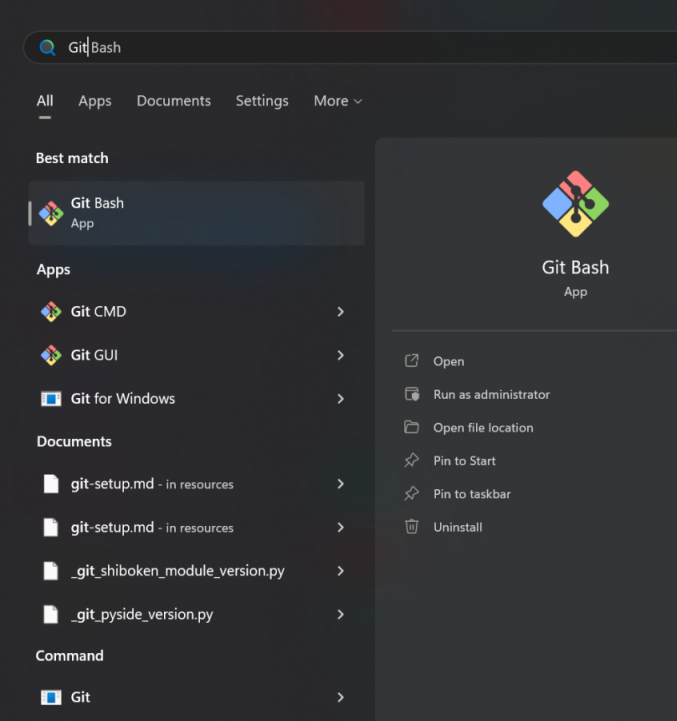
On Windows, search for Git Bash in the Start Menu:
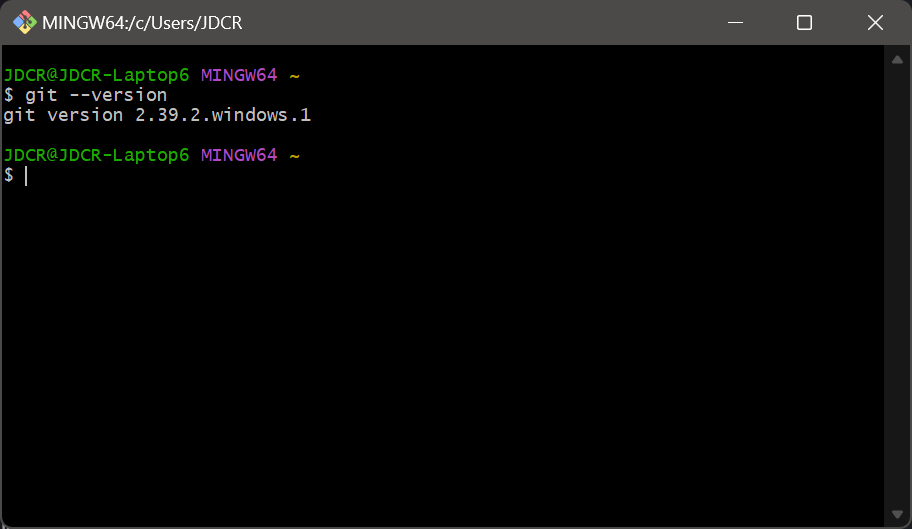
On Windows, terminal commands should be entered on Git Bash from this point:
On macOS, search for Terminal (or Terminal.app) in Spotlight Search:

On macOS, terminal commands should be entered like so:

To be able to connect with GitHub, one needs to set up git on their machine. In particular, git will need to be set up with the parameters that allow GitHub to be treated as a computer that stores a copy of one’s repository (remote). Your own computer (local) will also store a copy of this repository. It is your responsibility to synchronise changes you have made to your own local copy to the remote copy. Your grades will be based on code the teaching team finds in the remote copy.
A word on git configuration scopes
The program git has a subcommand git config, used to configure Git options in the system, global or local scope:
- system (computer-specific configuration): Options configured apply any user dealing with any repository in a single computer, unless that user has their own specific
git(global) configuration, or the repository being dealt with has its owngit(local) configuration. In a network context, a computer may be used by one or more users in a network. If the user is not configured with their own specificgit(global) configuration and the repository being dealt with does not have its own specificgit(local) configuration, then the configuration used falls back to the system configuration. - global (user-specific configuration): Options configured apply to a single user dealing with any repository in a computer, unless the repository in question has its own
git(local) configuration. In a network context, a user may use more than one computer in the network. The user’s own specificgit(global) configuration carries over to the computers in the network that they use. - local (repository-specific configuration): Options configured apply to any user in a computer dealing with a repository stored in that computer. In a network context, if this repository and its own specific
git(local) configuration is in a network drive or is carried over to a different computer in the network, any user in that network dealing with this repository will use the local configuration specific to that repository.
Hence, when configuring git with git config, it is important to specify the scope:
- system:
git config --system <key> [value] - global:
git config --global <key> [value] - local:
git config --local <key> [value]
For this course, we will assume the global context, that is, the git configuration will apply to you as the user, to any repository you touch, unless that repository has its own local configuration.
Configuring your identity: The user.name and user.email fields
Git stores information about the identity of the developer responsible for a change to a file in a repository. Git does this by storing the developer’s name and email address with each commit.
To view the stored values, perform the following commands:
git config --global user.name
git config --global user.email
To edit or update the stored values, perform the following commands:
git config --global user.name "<your name>"
git config --global user.email "<your email>"
Where you will:
- Replace
<your name>with your full name - Replace
<your email>with your Auckland Uni email address
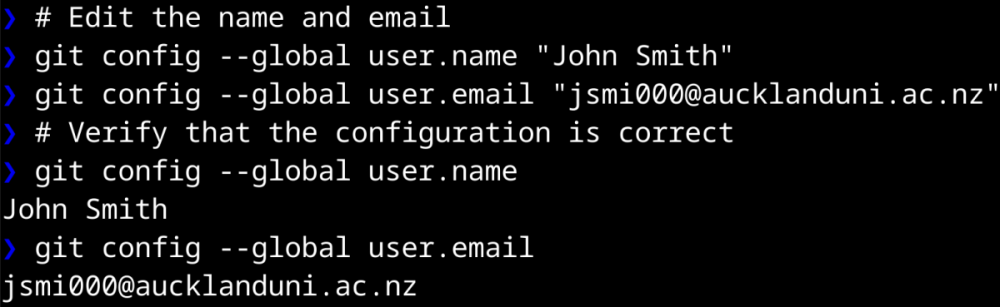
For example:
git config --global user.name "John Smith"
git config --global user.email "jsmi000@aucklanduni.ac.nz"
When <your name> includes a space (which will be true for the majority who have first and last names), wrap the name around double quotes:
"John Smith"
Without double quotes, shells on Unix (zsh and bash on macOS and GNU/Linux) as well as on DOS/Windows (the (Developer) Command Prompt and PowerShell) will treat the second (and third, etc.) word in <your name> as another shell argument. Since we only pass in one value (in this case, one string that specifies the value for the user.name key), we need to wrap <your name> in double quotes to tell the shell to treat the full name as one shell argument, and not separate ones.
Since email addresses do not come with spaces, it is fine to not wrap <your email> in double quotes.
Authentication with GitHub
At this point your identity as a developer is already set up and will be included in Git commits. Hence, performing a git commit succeeds.
If you are authenticating for the first time, create a private repository on GitHub first. The repository needs to be private so that it can only be cloned with an authenticated user. When we clone this private repository, we trigger the authentication step:
-
To create a repository on GitHub, follow the instructions on this webpage.
-
To make a repository private on GitHub, follow the instructions on this webpage.
-
Take note of the URL of this repository (e.g. https://github.com/username/repo-name)
Windows
Assuming you have used Git Bash on Windows, enter the following git clone command in Command Prompt or PowerShell:
git clone <YOUR_REPO_URL>
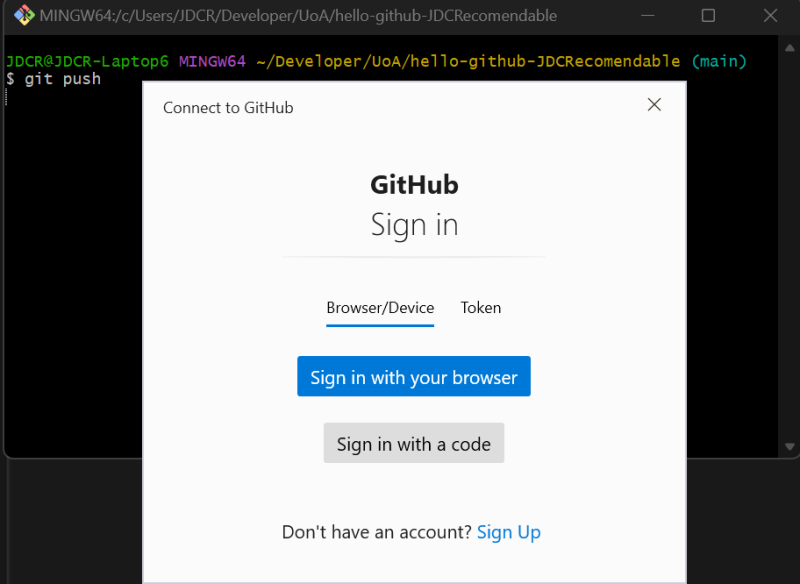
A pop-up window appears to allow saving your GitHub credentials to your Windows machine. Select one of the buttons for signing in (recommended to use Sign in with your browser) to continue.
At this point, you are ready to continue!
For advanced users: your GitHub credentials are stored using the Windows Credentials Store.
Unix (macOS and GNU/Linux)
If you are feeling advanced There are multiple ways to authenticate with GitHub. Examples are listed below:
- Authenticate with HTTPS (discussed here, recommended by GitHub)
- Authenticate with SSH
- Authenticate with using the GitHub CLI (i.e. the
ghcommand)Bear in mind that authentication with HTTPS, while promoted by GitHub, is less seucre than authentication with SSH. This is because HTTPS relies on a shared key between the client (you) and the server (GitHub). If that shared key is compromised (e.g. due to a man-in-the-middle (MITM) attack), then the client’s account is compromised.
On the other hand, SSH uses asymmetric cryptography to achieve authentication. Briefly, the client (you) keeps a private key on their machine, while the client gives the server (GitHub) their public key. During authentication, the server sends a challenge to the client, encrypting it using the client’s key. If the client is able to decrypt the challenge with their private key, then they are able to prove their identity to the server. This means that there is no shared secret between the client and the server, due to the use of public and private keys. Thus, this method of authentication is more resilient to phishing and MITM attacks. More information can be found here.
We discuss authentication with HTTPS in this article for compatibility with most computers.
Assuming that you have installed git, enter the following command in the terminal:
git clone <YOUR_REPO_URL>
As an aside, any git command will do as well, as long as the command necessitates a connection between the client and the server.
You will then be prompted for a username and a password.
When you type your username, you will see the characters printed on the terminal.
However, when you type your password, you will not see any of your typed characters. macOS users will see a key symbol. This is normal, and intended for security reasons. Just keep entering your password.

Upon entering your username or password correctly, git returns a fatal error, due to authentication failure. As of the time of writing, the git command also brings back two messages from remote (GitHub):

The first message from remote states that password authentication has been removed. That means that we cannot authenticate using our GitHub account password. We need to find another solution to push our commits.
Unix - Generating a GitHub personal access token (classic)
In place of passwords, GitHub allows a valid personal access token to be placed in the Password field to successfully authenticate and authorise the git clone action.
A personal access token is akin to a temporary key given to someone to allow them limited access until the duration of their access ends. GitHub’s personal access token works in much the same way, and ought to be renewed at a later date to continue access to GitHub through the command line. This is deemed more secure than using regular passwords because such tokens are more likely to be renewed at a faster interval than traditional passwords.
As of the time of writing, there are two types of personal access tokens—fine-grained tokens and classic tokens. In this course, we shall discuss classic tokens.
To acquire a classic personal access token from the GitHub website using a desktop or laptop computer:
- Log in to GitHub, if you are not logged in already.
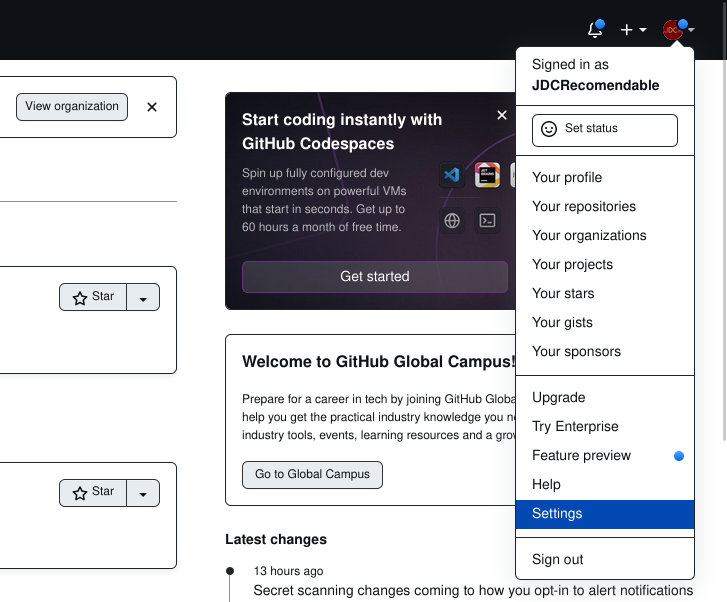
-
Click on your profile icon at the top-right of the web page.
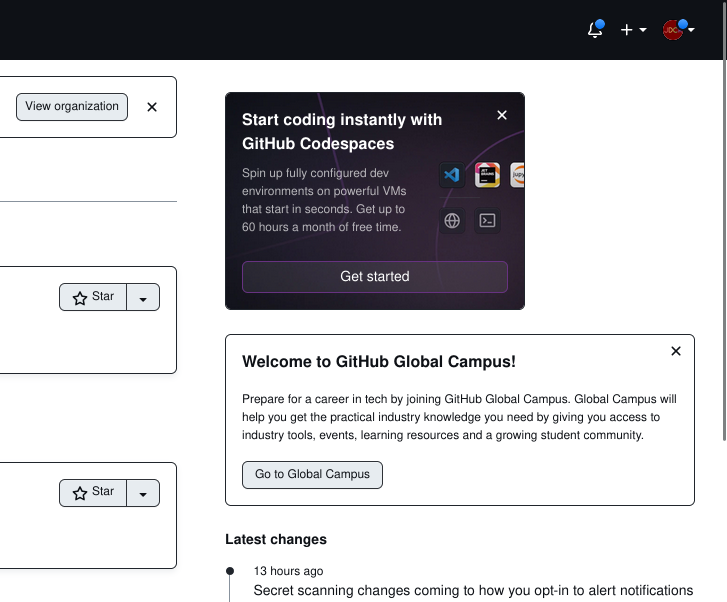
-
Click on Settings.
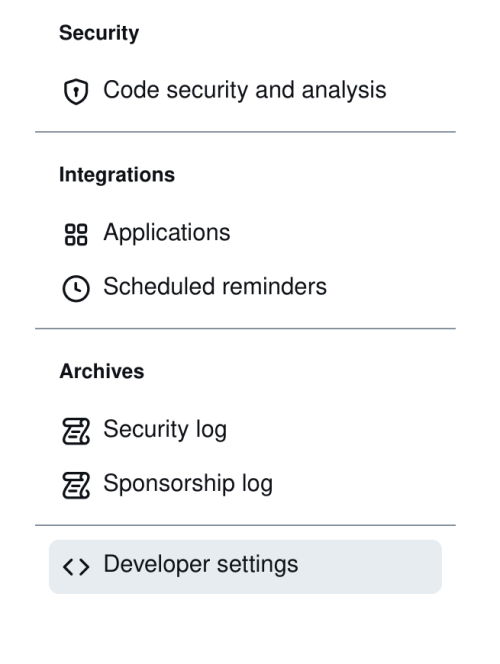
-
In the Settings page, at the left pane (when viewed on a desktop or laptop), scroll down to find Developer settings.
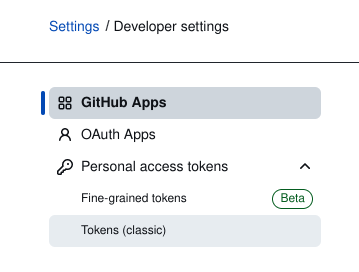
-
In the Developer settings page, at the left pane (when viewed on a desktop or laptop), expand the Personal access tokens view by clicking on the downward-pointing arrow.

-
Click on Tokens (classic).
-
In the Personal access tokens (classic) screen, click on the Generate new token button.
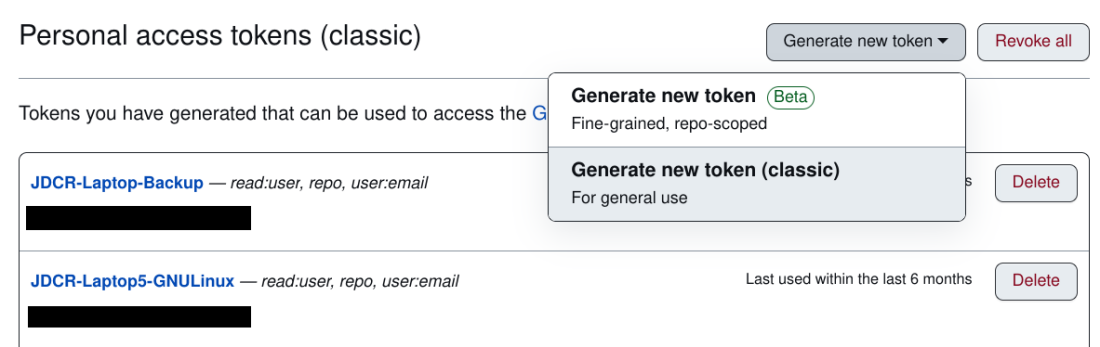
- Click on Generate new token (classic) (for general use).
-
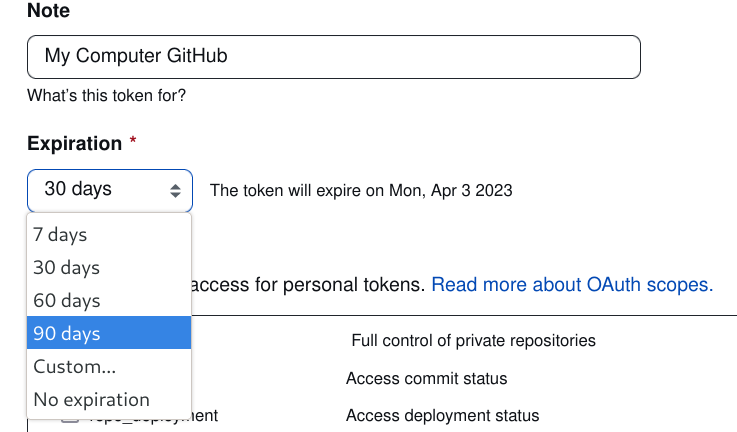
Add a Note and an Expiration.
-
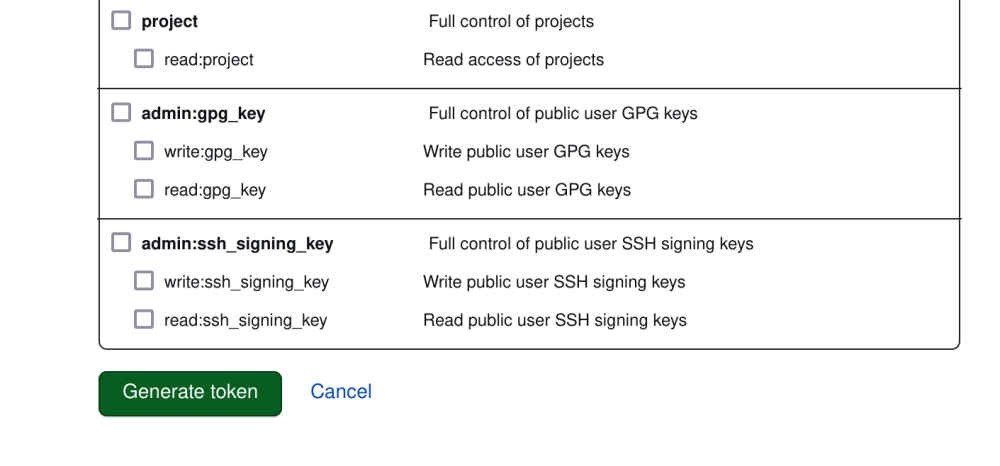
Tick the box for the repo category.

-
Tick the box for user:email.

-
Click Generate token.
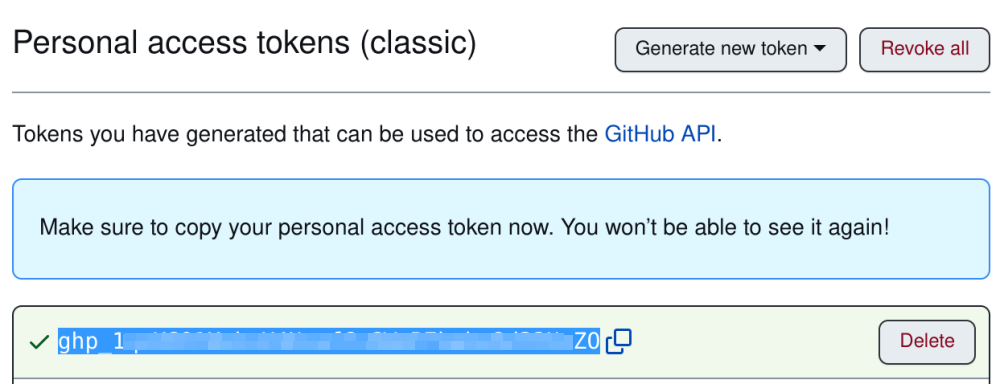
After clicking on Generate token, you will be redirected back to the Personal access tokens (classic) page where you get to copy that token onto your clipboard. To not lose it for the next instructions, feel free to paste the token to a text editor such as TextEdit, TextMate or Gedit.
An example of an authentication token generated from GitHub (highlighted in blue):
Unix - Using the personal access token
Once the personal access token has been copied, it can be pasted to the terminal when doing a git clone and git has asked for a password.
There can be more than one way to paste into the terminal, depending on your operating system.
macOS is the most straightforward, as this simply uses ⌘V.
On GNU/Linux, most terminals support pasting using Ctrl+Shift+V. Alternatively, you can try Shift+Insert.
When you paste at the password prompt, nothing will appear. Again, this is normal. Just hit Enter (GNU/Linux) or Return (macOS) to continue.
If you find that pasting with either of the keyboard shortcuts above still yield authentication errors, you can try right-clicking (GNU/Linux) or control-clicking (macOS) the terminal app and then selecting Paste in the menu bar that shows up.
Unix - Saving (caching) the personal access token
As you do more git clone, git pull and git push actions later, you may git repeatedly asking for your credentials. Thus, you may find yourself having to repeatedly paste paste this token into the terminal. There is also the problem of losing the token.
git comes with a credential manager that caches this token into your computer, so that you would not need to find and paste this token again into the terminal. Instead of asking you for your GitHub username and password, future git clone, git pull and git push actions to GitHub will cause git to automatically authenticate based on the cached token and immediately upload the changes from your local copy on your computer to the remote copy on GitHub.
To cache your personal access token using the credential manager, before doing your next git clone (or any other action that triggers the username and password prompts), type the following command:
# Store `git` credentials to your home directory
git config --global credential.helper store
If you use macOS, you may opt to store your credentials on your Mac’s local keychain instead. This is arguably more secure as your credentials are not stored in plaintext in your home directory:
# Store `git` credentials to your Mac's keychain
git config --global credential.helper osxkeychain
This tells git to save the next set of credentials (i.e. username and personal access token).
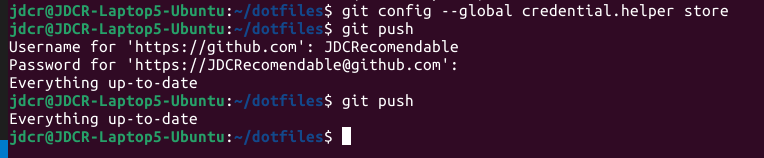
Then perform your next action that will cause the username and password prompt to appear (such as git push). At that point, you will be prompted for your username and then password (token) one more time. Just enter them normally.
As observed in the screenshot below, the prompt appeared one last time after the git config --global credential.helper store command was issued. In the next git push, git no longer asked for credentials, and proceeded with pushing (or saying that everything is up-to-date) directly.
You may be prompted to enter your username and password authentication token again:
References
See this wonderful talk by Linus Torvalds on Git: https://www.youtube.com/watch?v=4XpnKHJAok8