
IDE, Build Tool, Version Control
This page gives a very quick overview of the tools needed to complete your assignments in this course – starting with our first Hello GitHub assignment due soon!
We will give you a demo of this in the first week.
Tools for software development

In the previous lesson, we saw that there are some tools we need when we are writing software. For example:
- We used the Java compiler (
javac) to compile our source files into bytecode, and then - We used the Java interpreter (
java) to execute that bytecode (i.e., “run the program”).
However, we’re going to need many more tools along the way!
For the purposes of SOFTENG 281, the most important tools that we will need include:
- The Java SDK, this allows us to write Java code, compile it (
javac), run it (java). - A testing framework (JUnit) to ensure our code works correctly as intended.
- A build tool (Maven) to help automate a lot of the above steps.
- An IDE (VS Code) to more conveniently write code, run it and test it (provides auto-completion, powerful refactoring, etc).
- A version control system (Git) to keep a history/log of our code changes, and
- A remote service (GitHub) to backup that history remotely.
Software to install ASAP!
Remember, our Hello GitHub activity is due very soon, and it requires you to have everything set up in order to complete it.
In particular, you should aim to prioritise installing the following as soon as possible:
- Java SDK,
- Git,
- VS Code.
See the Resources section for instructions on how to install these.
Take advantage of the labs in the first week of the course. The TAs will help you with the installation if you run into problems.
You can of course also ask on Ed Discussion.
The Maven build tool
As you’re hopefully beginning to appreciate, you might have noticed there’s a lot of steps involved when it comes to software development. Even the simple steps of (i) editing the code, (ii) compiling the code, (iii) checking the code compiles, (iv) if it does, check that it gives the intended output, and so on. So many steps!

Regardless of the number of steps required, a build tool such as Maven will allow us to manage and automate this easily. So, so easily!
In fact, for the purposes of this course, there’s really only three “phases” you need to bother with.
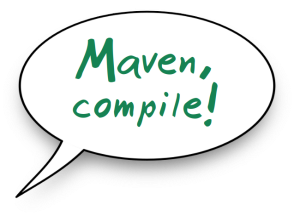
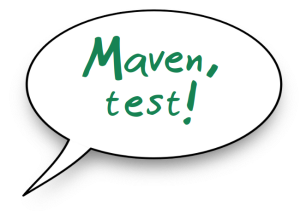
… and it’s really just a matter of you yelling at Maven! Something like this:

So, what do these Maven phases refer to?
Consider the flowchart below that illustrates the workflow we’ll be following for assignments in this course:
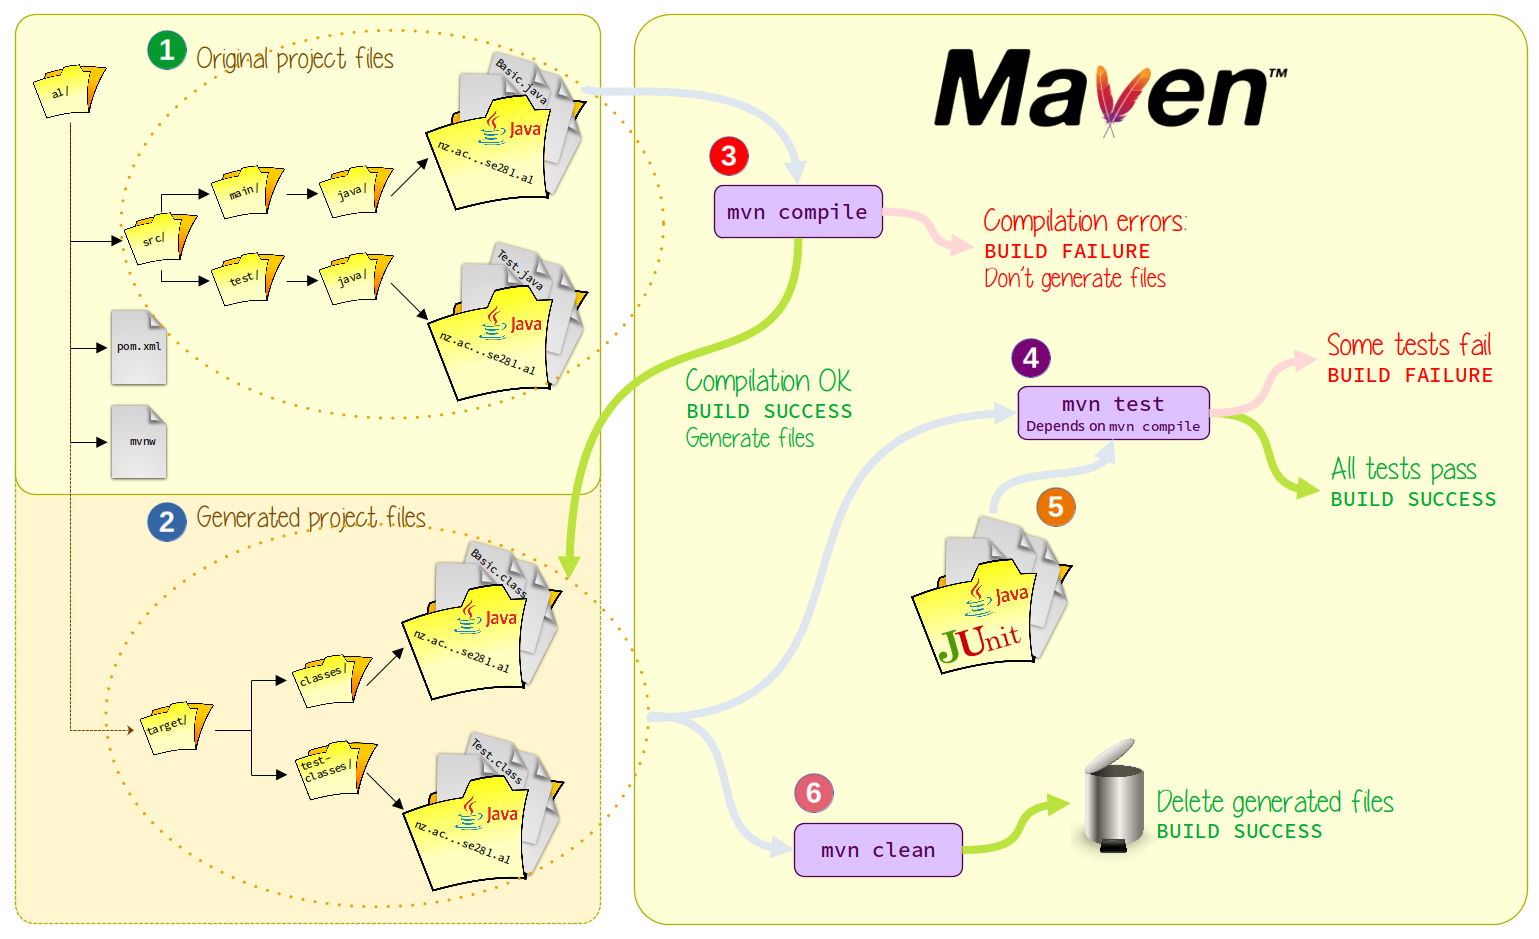
 When you clone the GitHub repository, you will download the original project files that represent your assignment. These are the project files you will be editing, namely the
 *.java files contained in the src/main/java folder. You will also notice there are more *.java files in the src/test/java folder, which define the test cases that your code needs to pass.
 As you work on your project, it will need to be compiled in order to run it to see if it works correctly. This is because the
 *.java files themselves are not “executable”. When we compile them, we get the equivalent *.class generated project files. Think of these files as a “machine understandable” equivalent of your original *.java files.

mvn compile
./mvnw compile for Unix/Mac OS or .\mvnw.cmd compile for Windows
This Maven phase is responsible for generating the *.class files based on the most recent *.java files. If there are no compilation errors in your *.java files, the *.class files will be created and you will see a BUILD SUCCESS message. If you have a compilation error with your code (such as incorrect Java syntax), you will see a BUILD FAILURE message instructing you to fix this before moving any further. With such compilation errors, you will not be able to test the logic of your code.

mvn test
./mvnw test for Unix/Mac OS or .\mvnw.cmd test for Windows
Once your code is successfully compiled, it can be tested. Only after a successful mvn compile can you make it this far (i.e., you cannot test your code if it doesn’t compile). The test cases in your src/test/java folder are making use of JUnit, which is a framework providing a range of powerful ways to help you test your code. Maven takes care of retrieving the required version of JUnit if you don’t already have it ( ), and connects it during this
 mvn test phase. If the code you wrote in the src/main/java folder meets all the logic expected from the test cases in the src/test/java folder, you will see a BUILD SUCCESS message. If your code has incorrect logic, you will see a BUILD FAILURE message instructing you which test case caused the failure. This is very helpful in figuring out where to go and fix your code. Look for something along the lines of:
[ERROR] Failures:
[ERROR]   TestSuite$TaskTest.testSum:23 expected:<10> but was:<2>
This message is telling you to go to line 23 of the A1TestSuite.java file. There, we were expecting the result 10, but for some reason it’s 2. When we go to line 23, we will see the actual test that failed:
assertEquals(10, Basics.getSum(1, 9));
For some reason, the Basics.getSum() method is returning 2 when we would expect it to return 10. Go into the getSum() method of the Basics.java file, and have a look why that might be. Keep changing the code, and rerunning the mvn test phase until it passes.

mvn clean
./mvnw clean for Unix/Mac OS or .\mvnw.cmd clean for Windows
You would have seen all the various files generated and dumped under the target folder. These are files that can easily be re-generated, and aren’t ones we care to have hanging around. Also, sometimes we might want to delete them to be extra sure that the mvn compile is correctly generating the files. Therefore, by using the mvn clean phase, we can delete them all and have then generated freshly to have the reassurance we are running the latest logic.
You will anyway need to run mvn clean before you submit your code. We don’t need (nor want) these generated files.
Simple Maven Demo
Consider the following simplified Maven project:
Want to run this on your own machine?
If you want to run this Maven demo on your own machine, you can download the MavenDemo.zip file below.
Unzip it, and then navigate into the folder in your terminal.
You can then use the ./mvnw or .\mvnw.cmd commands as shown above, depending on your operating system.
 Get your hands dirty!
Note: The instructions below are if you are running this on the Repl.it website (since Repl.it runs an image of a Linux machine). If you are running this on your own machine (download the MavenDemo.zip file above), you will need to use the Unix or Windows commands as appropriate. See the instructions above.
- Press the Run button. It will tell you to type in one of the Maven phases. Notice that the Repl is running on Linux, so it uses the Unix format.
- Type
./mvnw compileat the terminal. You should get a BUILD FAILURE. Look at the output to figure out what the problem is, and fix the code accordingly. Hint: it’s a compilation error. - Once you think you have fixed the error, type
./mvnw compileagain. You should get a BUILD SUCCESS if you fixed the compilation error. Your code has correctly compiled! - Once your code successfully compiles, type
./mvnw test. You should get a BUILD FAILURE. Look at the output to figure out what the problem is, and fix the code accordingly. Hint: it’s a logic mistake. - Once you think you have fixed the mistake, type
./mvnw testagain. You should get a BUILD SUCCESS if you fixed the logic mistake. - While you might need to open up the
src/test/java/TestSuite.javafile, you should not be modifying it in order to get a successful build. It’s not the test cases that are the problem, it’s the code being developed in thesrc/main/java/Basics.javafile! - Do you notice how there’s a
targetfolder whenever we do a./mvnw compileor./mvnw test? We can get rid of this by running the./mvnw cleanphase. - Once you got code passing the one (and only) test case, feel free to add more in the same
testSum()method of theTestSuite.javafile.
The VS Code IDE
Can you imagine when our code gets larger and more complicated?
It’s not going to be good enough if we only use something like “Notepad” to write the code. Software can (very) easily be composed of thousands lines of code, distributed across multiple files. Sometimes we might not be able to recall the name of a file, or maybe we need some extra hints when our code has a problem. Seriously, Notepad’s not going to cut it!
This is why we need an integrated development environment (IDE).
An IDE brings together all the tools we need into a convenient single application. This application will serve as the “development environment” from which we can do just about everything we will need.
An IDE is composed of various useful tools, integrated into the one place. This allows us to write code, run code, and test it all in one place.
IDEs also provide many useful features, like auto-completion, warning/error messages, abilities to jump to other parts of the code easily, and so on.
There are many IDE options out there. For this course, we will be using VS Code. We encourage you to use VS Code for your assignments, as this is the one you will see us use in class.
In the future, you might want to try out other IDEs, such as IntelliJ or Eclipse. But for now, we recommend you stick with VS Code.
We provide some guides in the Resources section for VS Code, such as:
- How to install it,
- How to use it for debugging,
- Keyboard shortcuts,
- Defining tasks, etc.
Version control with Git
Watch the first 4 minutes of this video.
At this stage, you don’t need to worry about the installation instructions (you can find plenty of easier instructions how to install it, including in the SOFTENG 281 Resources section).
The following 2-minute video is also a nice overview why it’s important for software development:
Here’s a visual illustration of the core concepts underlying Git:
In terms of actually using Git, you will want to get familiar with the command line usage. Not only is this more useful, but it’s also easier in the long run!. There are plenty of YouTube videos that explain this well, the Using GitHub for assignments page, as well on the Resources section of this website.
The main states that files can be in when using Git are:
- Ignored: The file is being completely ignored by Git. This is the state of a file when you have added it (or a general rule that matches its name) to the
.gitignorefile. When you execute agit statuscommand, you will not see any files that are in the ignored state. - Untracked: The file is not yet tracked by Git. This is the state of a file when you first create it. Git sees it as a new file.
- Tracked: The file is being tracked by Git. Tracked files can be in one of the following states:
- Staged: The file is in the staging area. This is the state of a file when you have added it to the staging area. This happens when a
git addcommand is used. - Committed: The file is in the repository. This is the state of a file when you have committed it to the repository. This happens when a
git commitcommand is used. - Modified: The file has been changed since the last commit or the last time it was staged.
- Staged: The file is in the staging area. This is the state of a file when you have added it to the staging area. This happens when a
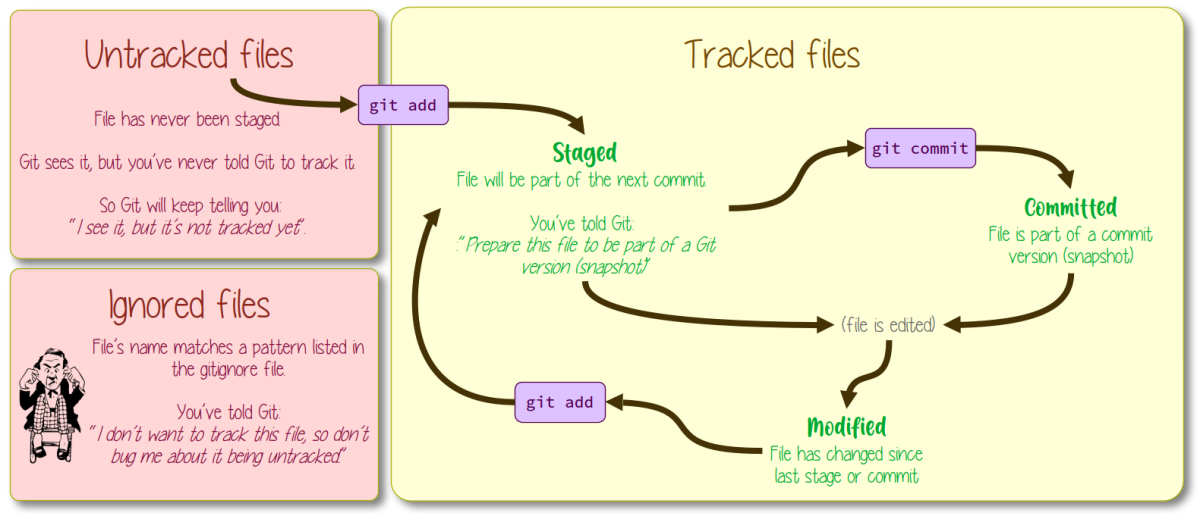
In a nutshell, Git is the software used to track changes on a set of files.
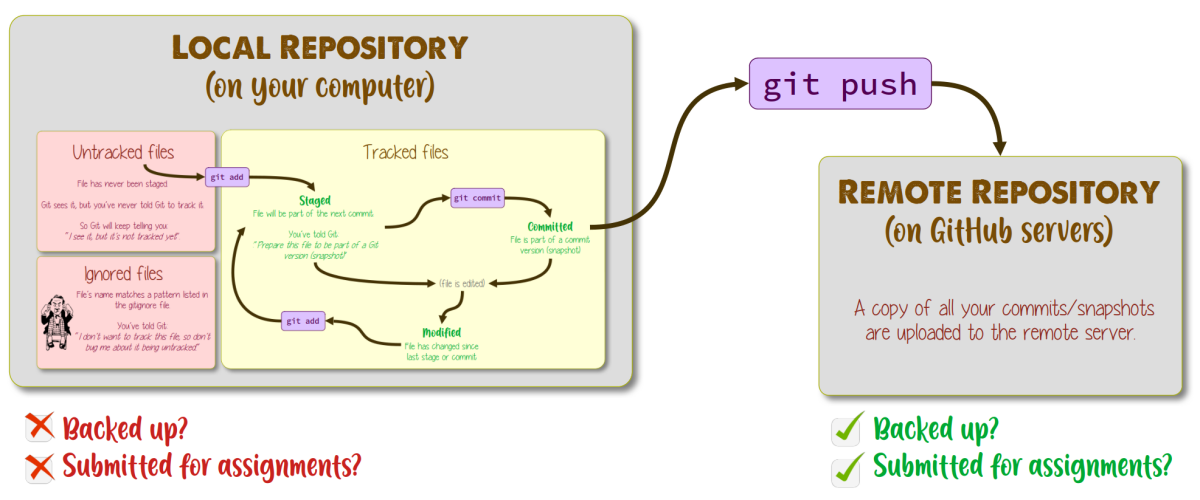
As such, strictly speaking, Git can be used purely on your own local machine if you wanted (no need to connect it to the “cloud”). This way, you are using Git purely for the tracking functionality it provides as you produce different versions of your files.
If you are NOT using Git with some cloud service, you are losing out on two key features:
- First, you stand to lose all your work (and the version snapshots you saved) if something were to happen to your local computer! Ouch!
- Second, you cannot collaborate with others on the same project (since you are only tracking the files locally on your own machine). With that said, all assessments in this course are individual. So, you shouldn’t be “collaborating” with anyone anyway!
GitHub
After reading what you lose out on if you only have Git alone on a local machine, you can now appreciate Git services such as GitHub. There are others, not just GitHub. GitHub is just the most popular, and has great support for educational purposes. So, we’ll be using GitHub in this course.
With a service such as GitHub, you can push your repository of files to their servers. Others collaborating with you can then pull your changes. Similarly, you can pull the changes that others have pushed.
Assuming you have been frequently pushing your changes to the remote repository, this means you can easily retrieve the latest version of your project should something bad happen to your computer! If your laptop disintegrates, gets stolen, or you accidentally wiped everything off it (hopefully not—touch wood!), then at least your assignments are safe and you’ll get credit for the work you have pushed to the GitHub servers.
Here’s a neat video that explains Git vs GitHub nicely:
In this course, we don’t need to worry about “branches”, so you can just ignore that.
Check the Using GitHub for assignments page for information on how to use GitHub throughout the assignments from the command line.
Below you can see how your local repository (on your computer) is connected to the remote repository (on GitHub). Only when you use the git push command does your local repository send its changes to the remote repository.
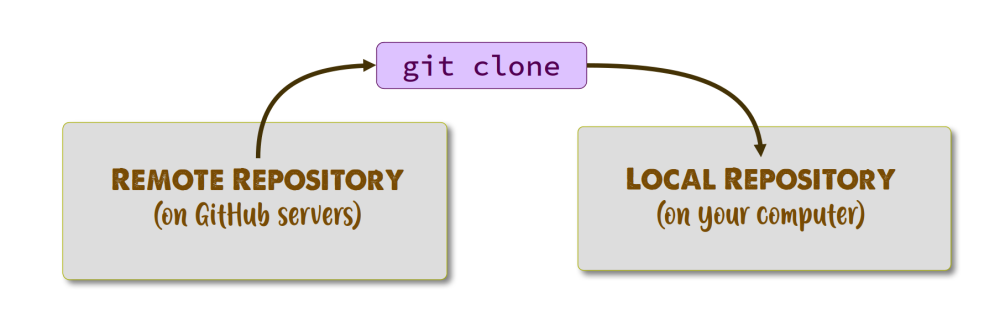
The other git command you will need to use is the git clone command. This is used to copy a remote repository to your local machine (when you don’t already have a copy of it). This is how you will get the assignment repositories from GitHub, or some other repository you want to work on that isn’t yet on your local machine. You will only need to use this command once, when you first want to get a copy of the repository:
 Using Git and GitHub is not optional!
You must use Git and GitHub for all your assignments in this course.
You must use the GitHub repo cloned from the course’s GitHub Organization using the invitation given to you.
Make sure you familiarise yourself with the Git etiquette expectation for your assignments.