
Introduction to Java
First, let’s have some fun…
But more seriously, what will we learn over the next 6 weeks?
“Write once, run anywhere” – James Gosling
Watch the following super-quick summary of Java. You should be able to appreciate the first half of the video.
The second half of the video might not make too much sense just yet, but you will be able to fully understand it in six weeks time!
In fact, you will even be able to pick out some of the imperfections in it!
Structure of a Java source file
The bare-bones basics of a Java program is to have a single Java source file, shown below:
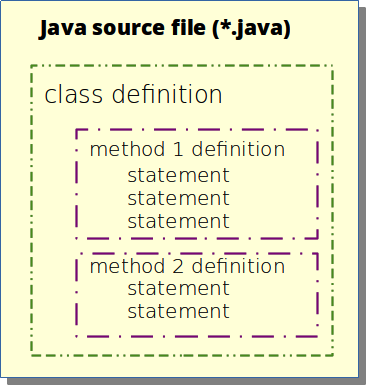
For the bare-minimum, to do anything remotely interesting, we need:
- At least one source file,
- At least one class defined inside this source file,
- At least one method definition inside the class, and
- At least one statement inside the method.
Below you will fine such a program:
- The Java source file is
Main.java. - The class defined is
Main:- The class starts on line 1, and ends on line 5.
- The opening brace (
{on line 1) and closing brace (}on line 5) define the scope of theMainclass.
- The only method defined is called
main:- The method starts on line 2, and ends on line 4.
- The opening brace (
{on line 2) and closing brace (}on line 4) define the scope of themainmethod.
- The only statement is
System.out.printlnon line 3.- Unsurprisingly, this tells the program to print a line to the console, with the content
Hello world!.
- Unsurprisingly, this tells the program to print a line to the console, with the content
Click the run button at the top of the Repl.
Note: If you would like to edit the above Repl (and all the other Repls you see on the course website), you have a few options of how to go about it:
- Most of the exercises in the website are in ACP. So you can access them either in ACP’s WebIDE, or download via the ACP extension in VS Code. This is probably the most convenient.
- Alternatively, you can log into replit.com. If you haven’t already done so, first create yourself a GitHub account (which you will need for the course anyway) following these instructions, then you can log into replit.com using that same GitHub account*. This way, you can edit the repls directly in your browser, and it will save your changes to your own Repl account as a copy of the original.
You will notice a couple of things we learnt in the previous lesson:
- The Java source file (
Main.java) gets compiled by the Java compiler command (javac).- This produces the
Main.classfile, containing the byte code. - Don’t see the
Main.classfile? Typelsat the console prompt (the ), then press Enter.
- This produces the
- The Java byte code (
Main.class) gets executed in the Java Runtime Environment (JRE –java).- Notice that we didn’t mention the file extension (
.class), as we are actually mentioning the name of the class (rather than the name of the file that the class is in). - When the program runs, it gives us the output we expected.
- Notice that we didn’t mention the file extension (
 Get your hands dirty!
Edit the code above by:
- Changing the content of the
println, - Adding more
printlnstatements on subsequent lines, - Using a mixture of
printinstead ofprintln.
Videos to watch
It may seem like there’s a lot of videos listed here, however keep in mind:
- You already know these concepts (from C programming in ENGGEN 131),
- In fact, often the syntax will be exactly the same in Java as it was in C!
- Even when it’s different, it’s actually still very similar.
- So, this is really just revision (if you need it).
- You only need to watch the ones you feel you need to recall that particular concept,
- and understand it in the context of Java (but again, the concepts are the same as in C).
- You can skip through the introductory greeting parts, to get straight to the main explanations.
Understanding System.out.println()
Understanding String
Understanding int
Understanding boolean
Variable declaration, initialisation, and assignment
Understanding Arrays 
Even though you have seen arrays before in C, they appear slightly different (i.e., syntactically) in Java.
But don’t fear, because the concepts are the same. What’s more, arrays in Java are much clearer and easier to use than they are in C/C++!
Understanding if-else statements
Don’t worry about the Scanner part, just focus on the concepts of if-else statements.
Understanding while loops
Don’t worry about the Scanner part, just focus on the concepts of while loops.
Understanding for loops 
Pay attention to the example at the end that combines an array (grades) with a for loop.
Understanding functions
Functions are very similar to what you have seen in C.
In the video below, they are called “methods” (but strictly speaking, they are used as “functions” in this video).
We will distinguish later on in the course the differences of methods versus functions.
But for now, it’s not a big deal.
Understanding parameters
Parameters are an important part of functions/methods.
Get your hands dirty!
Edit the code below:
- You are given two
intvariables:firstandsecond. - If their sum is more than 10:
- Display
"over".
- Display
- Otherwise, if their sum is less than 0:
- Display
"under".
- Display
- Otherwise:
- Display the actual sum.
Test your code by using different combinations of values for first and second, to make sure you account for all the scenarios.
Get your hands dirty!
Edit the code below:
- You are given an array of
intnumbers. - If the array has nothing in it:
- Display
"empty".
- Display
- Otherwise, if the array’s sum is more than 20:
- Display
"over".
- Display
- Otherwise, if the array’s sum is less than 5:
- Display
"under".
- Display
- Otherwise:
- Display the actual sum.
Test your code to make sure you account for all the scenarios above, by:
- Testing for an empty array, i.e.
int[] numbers = {}; - Testing with only a single number in the array, e.g.:
int[] numbers = {3};int[] numbers = {12};int[] numbers = {25};
- Testing with a different number of values inside the array, e.g.:
int[] numbers = {2, 1}; // two numbersint[] numbers = {8, 5, 1, 2, 1}; // five numbers
- Testing with different values inside the array (i.e., resulting in over/under/sum output).
int[] numbers = {8, 5, 1, 2, 11}; // overint[] numbers = {-8, 5, 1, 2, -11}; // underint[] numbers = {2, 5, 1, 2, 1}; // sum = 11
Note: When you are testing the code and changing the array content, the only code you are allowed to change is that of the array content. You should not be changing code related to the logic!
Hint: You should be using a for loop and numbers.length.
Get your hands dirty!
For the exercises above, introduce methods.
For the first activity:
- Write a method named
sumOfTwo()that:- Takes in two
intparameters (firstandsecond), - Prints
"over","under", or the sum according to the parameters.
- Takes in two
- In the
main()method, test it:public static void main(String[] args) { sumOfTwo(5, 7); sumOfTwo(-5, 2); sumOfTwo(2, 3); }
For the second activity:
- Write a method named
sumOfArray()that:- Takes in an
int[]parameter (numbers), - Prints
"empty","over","under", or the sum according to the array parameter.
- Takes in an
- In the
main()method, test it:public static void main(String[] args) { sumOfArray(new int[]{}); sumOfArray(new int[]{3}); sumOfArray(new int[]{23}); sumOfArray(new int[]{-5}); sumOfArray(new int[]{-3, -2, 1}); sumOfArray(new int[]{2, 4, 8, -2, 1}); }
Other excellent online Java tutorials
Each of the following break down a lot of the coding into digestible sections. Pick and match what you need.